=================================
=================================
=================================
출처: http://codeincomplete.com/posts/javascript-game-foundations-the-game-loop/
Ten Essential Foundations of Javascript Game Development
- A Web Server and a Module Strategy
- Loading Assets
- The Game Loop
- Player Input
- Math
- DOM
- Rendering
- Sound
- State Management
- Juiciness
The Game Loop
In board games, card games, and text-adventure games, the game updates only in response to player input, but in most video games the state updates continuously over time. Entities move, scores increase, health decreases, and objects fall, speed up, and slow down.
Therefore we need a game loop that can update() and render() our game world.
When running in the browser, all javascript code is executed in a single thread, the UI thread (not counting WebWorkers). Which means we can’t run a naive infinite game loop:
while(true) { // UH OH! - blocks UI thread update(); render(); }
This would block the UI thread, making the browser unresponsive. Not good.
RequestAnimationFrame
Instead, the browser provides asynchronous mechanisms for us to “do a little work”, then let the browser UI do it’s job, then have it callback to us at a later time to “do a little more work”.
In older browsers, we might have used setInterval or setTimeout to call our update method a set number of frames per second, but in modern browsers we should be using requestAnimationFrame to hook into the browser’s native refresh loop:
function frame() { update(); render(); requestAnimationFrame(frame); // request the next frame } requestAnimationFrame(frame); // start the first frame
Timestamps
While requestAnimationFrame gives us our asynchronous loop, it doesn’t guarantee exactly how frequently it will execute. In most modern GPU accelerated browsers it will be close to 60fps, but it might be a little more, might be a little less. If our update or render methods are slow we might cause it to drop drastically below 60fps.
We cannot assume that 1/60th of a second passes in each frame. Therefore we need to measure exactly how much time has passed between subsequent iterations of the loop. In modern browsers we can use the high resolution timer and in older browsers fallback to using a Dateobject:
function timestamp() { return window.performance && window.performance.now ? window.performance.now() : new Date().getTime(); },
Now that we have a utility method for getting a timestamp (in milliseconds) we can extend our game loop to provide that information to the update and render methods.
var now, dt, last = timestamp(); function frame() { now = timestamp(); dt = (now - last) / 1000; // duration in seconds update(dt); render(dt); last = now; requestAnimationFrame(frame); } requestAnimationFrame(frame);
One additional note is that requestAnimationFrame might pause if our browser loses focus, resulting in a very, very large dt after it resumes. We can workaround this by limiting the delta to one second:
... dt = Math.min(1, (now - last) / 1000); // duration capped at 1.0 seconds
Fixing Our Timestep
Now that we know exactly how long it has been since the last frame, we can use that information for any math calculations within our update method.
Having a variable timestep can work for many simple games. However we gain additional benefits if we can guarantee that the update method is called at a fixed, known, interval.
Replayable - if the timestep is variable (and unpredictable) then we cannot predictably replay the level. If we want to be able to replay what happened we need the timestep to be fixed and predictable
Predictable Physics - if we have a physics engine in our game, then variations in the timestep would make it unpredictable, which might make it hard to create predictable level design
Mitigate bullet-through-paper - depending on our collision detection scheme, we might find that fast moving objects can pass through small objects, this can be mitigated if our fixed timestep is set relative to our entities maximum speed and minimum size.
The idea behind a fixed timestep gameloop has been written about thoroughly by gafferongames.com
The basic idea is to accumulate our dt until it is greater than our desired fixed timestep, call update with the fixed timestep, and carry over the remainder to accumulate for the next time.
We should also pass any remainder dt to our render function so it can perform smoothing LERP calculations (if required)
var now, dt = 0, last = timestamp(), step = 1/60; function frame() { now = timestamp(); dt = dt + Math.min(1, (now - last) / 1000); while(dt > step) { dt = dt - step; update(step); } render(dt); last = now; requestAnimationFrame(frame); } requestAnimationFrame(frame);
For a detailed explanation of fixed timestep game loops, I highly recommend you read the articles by gafferongames.com, gamesfromwithin.com and koonsolo.com
Adding an FPS Meter
One last nice to have is to integrate an FPS counter into the loop. These days I favor FPSMeter which can be integrated in easily:
var fpsmeter = new FPSMeter({ decimals: 0, graph: true, theme: 'dark', left: '5px' }); function frame() { fpsmeter.tickStart(); ... fpsmeter.tick(); }
BONUS: Slow Motion
As a bonus, we can (optionally) adjust the step variable and play our game in slow motion. This can be very helpful when debugging. If we multiply step by 5, the game will play 5 times slower (12.5 fps instead of 60fps).
Putting this all together into a final version that can be re-used by different games, we can build a general purpose Game.run method that allows the caller to override various options:
Game = { ... run: function(options) { var now, dt = 0, last = timestamp(), slow = options.slow || 1, // slow motion scaling factor step = 1/options.fps, slowStep = slow * step, update = options.update, render = options.render, fpsmeter = new FPSMeter(options.fpsmeter || { decimals: 0, graph: true, theme: 'dark', left: '5px' }); function frame() { fpsmeter.tickStart(); now = timestamp(); dt = dt + Math.min(1, (now - last) / 1000); while(dt > slowStep) { dt = dt - slowStep; update(step); } render(dt/slow); last = now; fpsmeter.tick(); requestAnimationFrame(frame, options.canvas); } requestAnimationFrame(frame); }, ... }
I’ve used a variation of this game loop for all my javascript games so far. It’s worked very well.
=================================
=================================
=================================
출처: https://developer.mozilla.org/en-US/docs/Web/API/window/requestAnimationFrame
The window.requestAnimationFrame() method tells the browser that you wish to perform an animation and requests that the browser call a specified function to update an animation before the next repaint. The method takes a callback as an argument to be invoked before the repaint.
Note: Your callback routine must itself call requestAnimationFrame() if you want to animate another frame at the next repaint.
You should call this method whenever you're ready to update your animation onscreen. This will request that your animation function be called before the browser performs the next repaint. The number of callbacks is usually 60 times per second, but will generally match the display refresh rate in most web browsers as per W3C recommendation. requestAnimationFrame()calls are paused in most browsers when running in background tabs or hidden <iframe>s in order to improve performance and battery life.
The callback method is passed a single argument, a DOMHighResTimeStamp, which indicates the current time when callbacks queued by requestAnimationFrame begin to fire. Multiple callbacks in a single frame, therefore, each receive the same timestamp even though time has passed during the computation of every previous callback's workload. This timestamp is a decimal number, in milliseconds, but with a minimal precision of 1ms (1000 µs).
Syntax
window.requestAnimationFrame(callback);
Parameters
callbackA parameter specifying a function to call when it's time to update your animation for the next repaint. The callback has one single argument, a DOMHighResTimeStamp, which indicates the current time (the time returned from performance.now() ) for when requestAnimationFrame starts to fire callbacks.
Return value
A long integer value, the request id, that uniquely identifies the entry in the callback list. This is a non-zero value, but you may not make any other assumptions about its value. You can pass this value to window.cancelAnimationFrame() to cancel the refresh callback request.
Example
var start = null; var element = document.getElementById('SomeElementYouWantToAnimate'); element.style.position = 'absolute'; function step(timestamp) { if (!start) start = timestamp; var progress = timestamp - start; element.style.left = Math.min(progress / 10, 200) + 'px'; if (progress < 2000) { window.requestAnimationFrame(step); } } window.requestAnimationFrame(step);
=================================
=================================
=================================
출처: https://msdn.microsoft.com/ko-kr/library/hh920765(v=vs.85).aspx
Internet Explorer 10 및 JavaScript로 작성한 Windows 스토어 앱은 requestAnimationFrame 메서드를 새롭게 지원합니다. 이 메서드는 시스템이 프레임을 그릴 준비가 되었을 때 애니메이션 프레임을 호출하여 애니메이션 웹 페이지를 만들 수 있는 더 유연하고 효율적인 방법을 제공합니다. 이 API 전에 setTimeout 및 setInterval을 사용하여 그린 애니메이션은 웹 개발자에게 애니메이션의 그래픽 타이머를 예약할 수 있는 효율적인 방법을 제공하지 않았습니다. 따라서 애니메이션이 과도하게 그려지고, CPU 주기가 낭비되었으며, 추가 전력이 사용되었습니다. 또한 웹 사이트가 보이지 않을 때, 특히 웹 사이트가 배경 탭의 페이지를 사용하거나 브라우저가 최소화된 경우에도 애니메이션이 종종 발생합니다.
애니메이션에서 10밀리초의 JavaScript 타이머 확인을 사용할 경우 여기 표시된 대로 타이밍 불일치가 발생합니다.
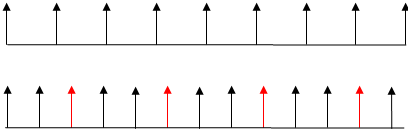
맨 위 행은 대부분의 모니터에 표시되는 16.7밀리초 디스플레이 주파수를 나타내고 맨 아래 행은 일반적인 10밀리초 setTimeout을 나타냅니다. 디스플레이 새로 고침 간격 전에 그리기 요청이 한 번 더 발생하기 때문에 매 세 번째 그림은 그릴 수 없습니다(빨간색 화살표로 표시). 이러한 과도한 그리기는 매 세 번째 프레임이 손실되기 때문에 애니메이션이 끊어지는 현상을 가져옵니다. 이러한 타이머 확인 감소는 또한 배터리 수명에도 좋지 않은 영향을 미치고 다른 앱의 성능을 저하시킬 수 있습니다.
W3C(World Wide Web 컨소시엄)의 스크립트 기반 애니메이션의 타이밍 컨트롤(영문) 사양에 정의된 requestAnimationFrame 메서드는 브라우저가 페이지 디스플레이를 업데이트해야 할 때만 앱에 알리도록 할 수 있으므로 프레임 손실 문제를 해결할 수 있습니다. 따라서 앱이 브라우저 그리기 간격에 맞춰 완벽하게 조정되며 적절한 리소스 양만 사용합니다. 둘 다 단일 콜백을 예약하므로 setTimeout에서 requestAnimationFrame으로 전환하는 것은 간단합니다. 애니메이션을 지속하려면 애니메이션 함수가 호출된 후에 requestAnimationFrame을 다시 호출합니다.
requestAnimationFrame 사용
이 새 API를 사용하려면 콜백 함수를 사용하여 requestAnimationFrame을 호출하면 됩니다. 타이밍은 시스템에 의해 처리됩니다. 다음과 같이 현재 setTimeout을 사용하여 애니메이션 타이밍을 조정하는 경우
var handle = setTimeout(renderLoop, PERIOD);
아래에 표시된 대로 setTimeout을 requestAnimationFrame으로 바꿀 수 있습니다.
var handle = requestAnimationFrame(renderLoop);
이는 첫 번째 다시 표시를 처리합니다. 애니메이션을 계속 진행하려면 콜백 함수 내에서 requestAnimationFrame을 다시 호출합니다(여기에서 renderLoop로 표시됨).
<!DOCTYPE html> <html> <head> <title>Script-based animation using requestAnimationFrame</title> <style type="text/css"> #animated { position: absolute; top:100px; padding: 50px; background: crimson; color: white; } </style> </head> <body> <div>Click the box to stop and start it</div> <div id="animated">Hello there.</div> <script type="text/javascript"> // global variables var elm = document.getElementById("animated"); var handle = 0; var lPos = 0; renderLoop(); // call animation frame to start function renderLoop() { elm.style.left = ((lPos += 3) % 600) + "px"; handle = window.requestAnimationFrame(renderLoop); } // click the box to stop the animation document.getElementById("animated").addEventListener("click", function () { if (handle) { window.cancelAnimationFrame(handle); handle = null; } else { renderLoop(); } }, false); </script> </body> </html>
이 예제에서는 먼저 getElementById를 사용하여 <div> 요소를 전역 변수에 저장합니다. renderLoop() 함수가 호출되어 애니메이션을 시작합니다. <div> 요소의 위치가 변경된 후에 requestAnimationFrame이 다시 호출되어 다음 이동을 설정합니다. 이는 브라우저를 닫거나 <div> 요소를 클릭할 때까지 계속됩니다.
addEventListener 메서드는 <div> 요소의 클릭 이벤트를 처리합니다. 요소를 클릭하면 현재 핸들과 함께 cancelAnimationFrame이 호출됩니다.
콜백 함수의 시간
콜백 함수를 사용하여 예를 들어 SVG, Canvas 또는 여기에서 보는 바와 같이 CSS 속성을 비롯하여 거의 모든 것에 애니메이션 효과를 줄 수 있습니다. 이 콜백 함수에는 들어오는 time 매개 변수 한 개가 있고 이 매개 변수는 콜백 함수가 호출된 시간을 나타냅니다. 이는 페이지의 탐색 시작부터 측정된 고해상도 시간인 DOMHighResTimeStamp입니다. DOMHighResTimeStamp는 밀리초로 측정되며 밀리초의 천분의 1까지 정확하게 측정됩니다. 이 시간 값은 1970년 1월 1일 이후 시간을 밀리초로 측정하는 Date.now()와 직접 비교할 수 없습니다. time 매개 변수를 현재 시간과 비교하려면 현재 시간에 대해 window.performance.now를 사용하세요. 시간 값을 DOMTimeStamp에서 DOMHighResTimeStamp로 변경하는 것은 W3C 스크립트 기반 애니메이션의 타이밍 컨트롤(영문) 사양의 최신 편집자 초안에 포함된 최근 변경 사항이므로 일부 공급업체는 시간 값을 여전히 DOMTimeStamp로 구현할 수 있습니다. W3C 사양의 이전 버전에서는 DOMTimeStamp를 사용했으며, 이때는 현재 시간에 Date.now를 사용할 수 있었습니다.
브라우저 지원
위에서 설명한 대로 일부 브라우저 공급업체는 여전히 DOMTimeStamp 매개 변수를 구현했거나 window.performance.now 타이밍 함수를 구현하지 않았을 수 있습니다. W3C 사양이 아직 최종본이 아니기 때문에 다른 브라우저 제조업체는 자체 접두사가 추가된 requestAnimationFrame및 cancelAnimationFrame의 구현을 만들었습니다. 이 예제에서는 여러 브라우저에서 작동하며 <div> 요소를 이동하는 시간을 사용하는 애니메이션 프로그램 버전 하나를 제공합니다.
<!DOCTYPE html>
<html>
<head>
<title>Script-based animation using requestAnimationFrame</title>
<style type="text/css">
div { position: absolute; left: 10px; top:100px; padding: 50px;
  background: crimson; color: white; }
</style>
<script type="text/javascript">
    var requestId = 0;
    var startime = 0;
    var lpos = 0;
    var elm;

    function init() {
        elm = document.getElementById("animated");
    }

    function render() {
        elm.style.left = ((lpos += 3) % 600) + "px";
        requestId = window.requestAFrame(render);
    }

    function start() {
        if (window.performance.now) {
            startime = window.performance.now();
        } else {
            startime = Date.now();
        }
        requestId = window.requestAFrame(render);
    }
    function stop() {
        if (requestId)
            window.cancelAFrame(requestId);
    }


    // handle multiple browsers for requestAnimationFrame()
    window.requestAFrame = (function () {
        return window.requestAnimationFrame ||
                window.webkitRequestAnimationFrame ||
                window.mozRequestAnimationFrame ||
                window.oRequestAnimationFrame ||
                // if all else fails, use setTimeout
                function (callback) {
                    return window.setTimeout(callback, 1000 / 60); // shoot for 60 fps
                };
    })();

    // handle multiple browsers for cancelAnimationFrame()
    window.cancelAFrame = (function () {
        return window.cancelAnimationFrame ||
                window.webkitCancelAnimationFrame ||
                window.mozCancelAnimationFrame ||
                window.oCancelAnimationFrame ||
                function (id) {
                    window.clearTimeout(id);
                };
    })();


</script>
</head>
<body onload="init();">

<div id="animated">Hello there.</div>
<button onclick="start()">Start</button>
<button onclick="stop()">Stop</button>
</body>
</html>
이 예제는 공급업체 접두사가 있는 요소가 추가된 W3C 사양 샘플의 업데이트된 버전입니다. 이 예제에서는 추가적으로 window.performance.now을(를) 테스트하며 지원되지 않으면 Date.now를 사용하여 현재 시간을 가져옵니다. requestAnimationFrame 및 cancelAnimationFrame이(가) 지원되지 않는 경우 setTimeout 및 clearTimeout이(가) 사용됩니다. 따라서 이전 버전의 브라우저와 호환됩니다.
API 참조
샘플 및 자습서
requestAnimationFrame을 사용한 효율적인 애니메이션 샘플
Internet Explorer 테스트 드라이브 데모
IEBlog 게시물
W3C 웹 성능: 성능 투자 계속웹 성능 API가 빠르게 W3C 후보 권고안으로 제안됨IE10 Release Preview에서 웹 안정성 향상연간 리뷰: W3C 웹 성능 작업 그룹HTML5에서 보다 효율적인 PC 하드웨어 사용: 새로운 웹 성능 API, 1부
사양
=================================
=================================
=================================
출처: https://blog.coderifleman.com/2016/12/02/request-animation-frame-test/
requestAnimationFrame을 어떻게 테스트 할 수 있을까?
얼마전에 기능 개발을 하다가 애니메이션을 다룰 일이 생겼다. 처음엔 CSS를 이용했지만, IE8을 지원하고자 “raf“라는 폴리필 라이브러리를 이용해 requestAnimationFrame(이하 raf)으로 개발했다. raf의 대략적인 형태는 다음과 같다(API의 자세한 설명은 MDN의 window.requestAnimationFrame()을 참고).
var start = null; function step(timestamp) { if (!start) { start = timestamp; } var progress = timestamp - start; // Use progress to do something. if (progress < 1500) { window.requestAnimationFrame(step); } } window.requestAnimationFrame(step);
코드를 보면 알겠지만 그렇게 직관적인 편은 아니다. raf를 쓸 때마다 이런 식으로 코드를 작성하긴 싫었다. 그래서 사용하기 편하게 raf를 랩핑한 객체 하나를 만들었다(여기서 시작한 작은 프로젝트가 있다 - StepperJS).
class Stepper { start(options) { const { duration = 0, easing = linear, // is easing function. step = () => {} } = options; let startTime = 0; const stepping = (timestamp) => { if (!startTime) { startTime = timestamp; } const pastTime = timestamp - startTime; const progress = pastTime / duration; if (pastTime >= duration) { step(1); return; } step(easing(progress)); window.requestAnimationFrame(stepping); }; window.requestAnimationFrame(stepping); } }
이렇게 작성한 Stepper 객체는 다음과 같이 사용할 수 있다.
const stepper = new Stepper(); stepper.start({ duration: 1500, step: (n) => { element.style.left = `${150 * n}px` } });
개인적으로 생각했을 때 raf를 곧바로 사용하는 것보다 더 직관적이고 편해 보인다(물론 다른 의견을 가진 사람이 있을 수도 있다). 이제 Stepper 객체를 어떻게 테스트할 수 있을지 살펴보자.
Stepper는 지정한 duration과 easing에 따라 현재 시점에 해당하는 n 즉, progress 값을 콜백 함수에 전달하는 단순한 역할을 담당한다. 그렇다면 다음과 같이 테스트 케이스를 작성할 수 있을 것 같다.
should call step callback with the current progress by duration and easing.
음, 확실히 유닛 테스트로써는 손색없지만 필자는 사용자 관점에서 서술하는 걸 좋아하니 이렇게 고쳐보자.
The user should be able to know the current progress through the start method of Stepper
이를 어떻게 검증할 수 있을까? 필요한 값을 설정하고 start 메서드를 호출한 후 특정 시간으로 옮긴(tick) 다음 “n”이 기대하는 값과 일치하는지 확인하면 될 것 같다. 한번 테스트 코드로 옮겨보자.
test('The user should be able to know the current progress through the start method of Stepper', (assert) => { // Given const stepper = new Stepper(); const duration = 300; const easing = linear; let progress; // When stepper.start({ duration, easing, step: (n) => progress = n }); // Then assert(progress === ???); });
다른 조건들은 어려울 게 없지만, 특정 시간으로 옮기는 행위는 그렇지 않다. 함수를 호출하는 순간 시간은 흘러 버리므로 특정 시간에 해당하는 progress 값을 비교할 수 없다.
이처럼 테스트 환경에서 시간을 조작하고 싶을 때 사용할 수 있는 테스트 더블 라이브러리가 있다. 바로 “sinon“이다. sinon의 FakeTimer는 setTimeout과 Date 객체 등을 덮어써서 동기적으로 시간을 조작할 수 있는 수단을 제공한다. 이것을 사용해보자.
const clock = sinon.useFakeTimers(); test('The user should be able to know the current progress through the start method of Stepper', (assert) => { // Given const stepper = new Stepper(); const duration = 300; const easing = linear; const step = sinon.spy(); // When stepper.start({ duration, easing, step }); clock.tick(0); clock.tick(250); // Then assert(step.args[1][0].toFixed(2) === linear(250 / 300).toFixed(2)); });
당연한 얘기겠지만 TypeError가 발생한다. raf는 시간이 아닌 repaint 시점을 기준으로 호출되며 독자적으로 타임스템프를 계산해 콜백에 전달하므로 sinon의 FakeTimer로 조작할 수 없다. 따라서 동기적으로 호출한 args 프로퍼티에 쌓인 값이 없으므로 에러가 발생하는 것이다.
그렇다면 어떻게 해야 할까. 고맙게도 누군가 raf를 Stub한 “raf-stub“을 개발해 배포해놨다. 이 Stub을 사용해 테스트를 다시 작성해보자.
const stub = createStub(); sinon.stub(window, 'requestAnimationFrame', stub.add); test('The user should be able to know the current progress through the start method of Stepper', (assert) => { // Given const stepper = new Stepper(); const duration = 300; const easing = linear; const step = sinon.spy(); // When stepper.start({ duration, easing, step }); stub.step(1, 0); stub.step(1, 250); // Then assert(step.args[1][0].toFixed(2) === linear(250 / 300).toFixed(2)); });
테스트가 통과한다. raf를 사용해 작성한 코드를 테스트하려고 할 때 다소 막막할 수 있다. 하지만 sinon과 Stub을 적절히 사용한다면 손쉽게 테스트할 수 있다.
여기까지 raf를 테스트하는 방법을 소개했다. 비슷한 고민을 하는 사람에게 작은 팁으로나마 도움이 되길 바라며 예제 코드는 UYEONG/request-animation-frame-test에 올려놓았으니 참고하길 바란다.
=================================
=================================
=================================
HTML5 Canvas에서 애니메이션을 구현하고자 하는 경우 보통 setInterval() 함수를 이용한다. setInterval() 함수는 잘 알다시피 매개변수로 받은 콜백함수를 주기적으로 호출하는 함수이다. 대개 화면을 그리는 함수를 setInterval() 함수를 이용하여 주기적으로 호출하는 방식으로 Canvas를 다시 그리게 된다.
하지만, setInterval() 함수 자체가 단순히 주기적으로 콜백함수를 호출하는 기능을 담고 있는 것이지, Canvas를 다시 그리는 용도가 아니기 때문에, 애니메이션 구현 시에는 한계점이 있다.
setInterval() 함수는 언제나 콜백함수를 호출하기 때문에 브라우저의 다른 탭이 선택된 경우와 같이 실제 화면을 다시 그릴 필요가 없는 경우에도 화면을 다시 그린다. 그래서 시스템의 리소스 낭비를 초래하여, 불필요한 전력을 소모하게 만든다. 또한, 디스플레이 갱신 전에 캔버스를 여러 번 고치더라도 디스플레이 갱신 바로 직전의 캔버스 상태만 적용이 되기 때문에, 프레임 손실이 발생할 수도 있다.
(브라우저를 최소화 했다던가, 혹은 다른 탭을 선택했을 경우의 리소스 낭비는 브라우저마다 차이가 있는 것 같다. 어느 잘 개발된 브라우저의 경우엔 브라우저 최소화나 다른 탭을 선택하였을 때 콜백함수를 호출하지 않는 것으로 보인다. 관리자 도구에서 리스스 사용 타임라인을 보면, 리소스를 사용하지 않고 멈춰있는 것을 확인할 수 있다. 다만, 강제적으로 화면을 멈추게 한 경우(예를 들어, 최소화 버튼을 누른 상태에서 마우스를 옮기면 화면이 멈춘 상태로 남아 있다)에는 어김없이 리소스를 사용하고 있다.)
이러한 문제점을 해결하기 위해 W3C에서는 'Timing control for script-based animations' 이라고 하는 주제(?)로 새 기능을 만들고 있다. 이에 새로 개발 중인 것이 requestAnimationFrame 이다. 현재 Candidate Recommendation 상태여서 큰 문제가 없는 한 정식 버전이 될 것 같다.
그럼, 본격적으로 requestAnimationFrame() 함수를 살펴보자.
requestAnimationFrame() 함수는 브라우저가 화면을 업데이트 해야하는 경우에만 콜백함수를 호출한다. 이는 브라우저가 최소화되었다던가, 다른 탭이 선택된 경우에는 콜백함수를 호출하지 않는다는 것을 의미한다. 또한 콜백함수 호출 주기(DOMHighRestTimeStamp라고 하는데, )는 브라우저에서 관리(?)되기 때문에 fps 값 설정 없이도 최적화된 (부드러운) 애니메이션 구현이 가능하다.
사용법 또한 무척 간단하며, 기존 setInterval() 함수 사용법과 크게 다르지 않기 때문에, 쉽게 setInterval() 함수에서 requestAnimationFrame() 함수로 변환이 가능하다.
이 함수는 setInterval() 함수와 마찬가지로 단일 콜백함수를 가진다. 다만, requestAnimationFrame() 함수는 별도의 interval 매개변수를 가지지 않기 때문에, 'requestAnimation([콜백함수]);' 형태로 사용한다.
또한, requestAnimationFrame() 함수는 다음 번 프레임에 화면 처리를 하는 형식이라 setInterval() 함수처럼 계속 호출되지는 않는다. 그래서, 애니메이션을 위해 콜백함수 내에서 requestAnimationFrame() 함수를 이용해 재귀호출해줘야 한다.
| function drawScreen() { ... } var loop = window.setInterval(drawScreen, 1000); |
| ↓ |
| function drawScreen() { ... loop = window.requestAnimationFrame(drawScreen); } var loop = window.requestAnimationFrame(drawScreen); |
애니메이션을 종료할 경우엔 setInterval() 함수와 대응되는 clearInterval() 함수가 있듯이, requestAnimationFrmae() 함수에도 대응되는 cancelAnimationFrame() 함수가 있어 애니메이션을 종료할 수 있다.
cancelAnimationFrame() 함수도 clearInterval() 함수와 사용법이 동일하다.
window.cancelAnimationFrame(loop);
마지막으로..
requestAnimationFrame() 함수는 아직 Candidate Recommendation 상태이기 때문에, 표준이 정해지지 않았다. 하여, 브라우저별 처리를 해 줘야 한다.
| window.requestAnimationFrame = function() { return window.requestAnimationFrame || window.webkitRequestAnimationFrame || mozRequestAnimationFrame || window.oRequestAnimationFrame || window.msRequestAnimationFrame || function (callback) { window.setTimeout(callback, 1000); } }(); |
이 코드는 브라우저별 적합한 requestAnimationFrame() 함수를 설정한다.
[참고]
http://msdn.microsoft.com/ko-kr/library/ie/hh920765(v=vs.85).aspx
출처: http://beautifulcode.tistory.com/entry/requestAnimationFrame를-이용한-캔버스-애니메이션-구현 [Beautiful Code]
=================================
=================================
=================================
출처: https://msdn.microsoft.com/ko-kr/library/dn265056(v=vs.85).aspx
TML5 게임에서 setInterveral을 requestAnimationFrame으로 바꾸기
여기서는 setInterval을 requestAnimationFrame으로 바꾸어 Boulder Bop의 성능을 향상시키는 방법에 대해 설명합니다. 이 향상된 버전의 Boulder Bop을 Boulder Bop Perf라고 합니다.
일반적으로 requestAnimationFrame의 성능이 setInterval보다 더 낫습니다(자세한 내용은 개발자용 Internet Explorer 10 가이드 참조). Boulder Bop의 경우 setInterval을 requestAnimationFrame으로 변환할 때 다음 두 가지 사항에 주의해야 합니다.
- 거리 = 속도 · 시간입니다(자세한 내용은 속도 참조).
- requestAnimationFrame은 애니메이션 프레임이 발생하도록 예약된 시간을 나타내는 단일 인수를 콜백 함수에 반환합니다. 현재 예약된 시간에서 이전에 예약된 시간을 빼서 작은 시간 증분을 계산할 수 있습니다(Δt).
이제 Boulder 생성자의 move 메서드를 고려해 보세요.
var move = function() { // Public.
  that.core.cx.baseVal.value += that.unitX * BOULDER_SPEED;
  that.core.cy.baseVal.value += that.unitY * BOULDER_SPEED;

  if (that.exited()) { // Use the Missile constructor's exited() method here.
    that.markActive(false); // Mark the boulder object as inactive so as to get it out of _objects[] (and thus out of the game).
  }
}; // Game.Boulder.move()

that.move = move;
위의 거리 수식을 사용하면 Δx = sₓ·Δt입니다. 여기서 sₓ는 x 방향의 속도입니다. 마찬가지로, Δy = sy·Δt입니다.
Δt(dt 매개 변수)를 move 메서드에 전달하면 이 코드는 다음과 같이 나타납니다.
var move = function(dt) { // Public.
  that.core.cx.baseVal.value += (dt * sx);
  that.core.cy.baseVal.value += (dt * sy);
    .
    .
    .
}; // Game.Boulder.move()

that.move = move;
x 및 y 방향(sx 및 sy)의 필요한 속도를 계산하면 작업이 완료되었습니다.
sx 및 sy를 계산하기 위해 먼저 BOULDER_SPEED 값을 적절하게 조정합니다. sx는 that.unitX * BOULDER_SPEED(x 방향의 고정 속도 요소)이고 sy는 that.unitY * BOULDER_SPEED(y 방향의 고정 속도 요소)입니다. 따라서 BOULDER_SPEED를 적절하게 조정하면 다음과 같이 나타납니다.
var move = function(dt) { // Public.
  that.core.cx.baseVal.value += (dt * that.unitX * BOULDER_SPEED);
  that.core.cy.baseVal.value += (dt * that.unitY * BOULDER_SPEED);

  if (that.exited()) { // Use the Missile constructor's exited() method here.
    that.markActive(false); // Mark the boulder object as inactive so as to get it out of _objects[] (and thus out of the game).
  }
}; // Game.Boulder.move()

that.move = move;
dt를 계산하기 위해 requestAnimationFrame에서 콜백이 실행되도록 예약된 시간을 콜백에 반환한다는 것을 고려합니다. 이 내용을 이해하기 쉽도록 먼저 run 함수부터 살펴보겠습니다.
var run = function() { // Public. Invoked when the Start button is clicked.
  setSound('play'); // Play any previously paused sound effects.
  spec.paused = false; // This is the spec parameter that is passed into the "Game constructor".
  globals.helpers.removeText({ id: "gameOver" }); // If "Game Over" text is on the screen, this removes it.
  globals.helpers.opacify(false); // Un-opacify the screen (whether it needs it or not).
  _priorTimeStamp = window.performance.now(); // This is used in update().
  _requestAnimationFrameID = window.requestAnimationFrame(update); // Using requestAnimationFrame generally provides better performance than setInterval. Note that requestAnimationFrame's callback is passed a single argument, which indicates the time at which the animation frame is scheduled to occur.
}; // Game.run()

that.run = run; // Make run() a public method.
_priorTimeStamp = window.performance.now() 줄은 사용자가 Start 단추를 클릭한 시간을 저장합니다. 다음 줄인 _requestAnimationFrameID = window.requestAnimationFrame(update)에서는 가까운 미래에 update가 실행되도록 예약하고 예약된 시간을 전달합니다(애니메이션 요청을 취소하는 데 사용할 수 있는 ID 값도 반환됨). 이 예약된 시간 인수는 update의 currentTimeStamp 매개 변수가 됩니다.
var update = function(currentTimeStamp) { // Private. Update the position of the game objects, etc. Note the requestAnimationFrame sets the currentTimeStamp parameter.
  var dt = currentTimeStamp - _priorTimeStamp; // dt is the time interval between animation frames, in milliseconds.
  _priorTimeStamp = currentTimeStamp;

  for (var i = 0; i < _objects.length; i++) { // Must use _objects.length in that the length of objects can dynamically change.
    if (DEBUG) { console.log("length: " + _objects.length + ", type: " + _objects[i].type + ", id: " + _objects[i].core.id); }
    _objects[i].move(dt); // Move the game object in a way that only this type of game object knows how to do.
    _objects[i].collisionDetection();
    if (_objects[i].exited()) {
      _objects[i].remove(); // This must be the last thing called in the FOR loop.
    } // if
  } // for

  var activeBunkers = 0;
  var activeBoulders = 0;
  for (var i = 0; i < _objects.length; i++) { // If _objects.length is 0, then activeBunkers will be 0, and the game terminates.
    if (_objects[i].type == "bunker") {
      activeBunkers++;
    }

    if (_objects[i].type == "boulder") {
      activeBoulders++;
    }
  } // for

  if (activeBunkers == 0) { // All bunkers have been destroyed.
    gameOver();
    return;
  }

  if (!globals.helpers.bossLevel(spec.level) && activeBoulders == 0) { // Player cleared current non-boss level.
    nextLevel(); // Move to the next level.
  }

  _requestAnimationFrameID = window.requestAnimationFrame(update); // Note that requestAnimationFrame passes to its callback (i.e., update) a single argument, which indicates the time at which the animation frame is scheduled to occur.
}; // Game.update()
처음 반복할 때 dt는 사용자가 Start 단추를 클릭한 시간과 브라우저에서 첫 번째 애니메이션 프레임을 예약한 시간(update 실행) 사이의 시간 차이입니다. 이후의 dt는 연속된 애니메이션 프레임 사이의 시간입니다. 시스템 속도가 빠를 경우 dt가 작아서 시스템에서 update를 호출하는 높은 속도를 오프셋합니다. 시스템 속도가 느릴 경우 dt가 비교적 커서 시스템에서 update를 호출하는 낮은 속도를 오프셋합니다. 이런 방식으로 사용자 하드웨어에 관계없이 게임 플레이 속도를 일정하게 유지하며, requestAnimationFrame이 setInterval보다 더 "고급"이라는 점에서 일반적으로 더 매끄럽게 작동합니다.
이러한 변경 내용을 제외할 경우 Boulder Bop과 Boulder Bop Perf의 차이점은 다음 비교의 빨간색 텍스트에서 확인할 수 있듯이 크지 않습니다.

위의 차이점을 검토하면 Boulder Bop(setInteval)을 보다 성능이 뛰어난 Boulder Bop Perf(requestAnimationFrame)로 변환한 방법을 확인할 수 있습니다.
이제 고유한 캐주얼 2D 게임을 만들기에 충분한 지식을 습득했습니다. 준비 작업으로, 먼저 벙커를 향해 임의로 폭탄을 투하하는 비행 물체(볼더 개체 기반) 또는 흥미로운 다른 게임 요소 같은 몇 가지 게임 요소를 더 추가하여 Boulder Bop Perf를 좀더 복잡하게 만들어 볼 수 있습니다. 기본적으로 하늘이 한계가 됩니다.
관련 항목
=================================
=================================
=================================
자바스크립트는 종종 시각적 변화를 유발합니다. 어떤 경우에는 스타일 조작을 통해 직접 구현되거나, 어떤 경우에는 데이터 검색 또는 정렬과 같은 시각적 변화를 일으키는 계산을 통해 구현됩니다. 타이밍이 나쁘거나 실행 시간이 긴 자바스크립트는 성능 문제의 일반적인 원인입니다. 가급적 이러한 영향을 최소화할 수 있는 방법을 찾아야 합니다.
작성하는 자바스크립트가 실제로 실행되는 코드가 아닐 수도 있기 때문에 자바스크립트 성능 프로파일링은 약간 복잡할 수 있습니다. 최신 브라우저는 가급적 가장 빠른 실행 성능을 제공하기 위해 JIT 컴파일러 및 모든 최적화 방법과 기술을 사용하며, 이로 인해 코드의 동적인 기능이 변경됩니다.
참고: 실행 중인 JIT를 보려면 Vyacheslav Egorov가 만든 IRHydra2를 참조하세요. 이는 Chrome의 자바스크립트 엔진 V8이 자바스크립트 코드를 최적화 중일 때 코드의 중간 상태를 보여줍니다.
하지만 이와 더불어 앱이 자바스크립트를 제대로 실행하도록 명확히 수행할 수 있는 일부 기능들이 있습니다.
TL;DR
- 시각적 업데이트에 setTimeout 또는 setInterval을 피하고 대신 항상 requestAnimationFrame을 사용합니다.
- 메인 스레드를 벗어나 오래 실행되는 자바스크립트를 Web Workers로 이전합니다.
- 마이크로 작업을 사용하여 여러 프레임에서 DOM을 변경합니다.
- Chrome DevTools의 Timeline 및 자바스크립트 프로파일러를 사용하여 자바스크립트의 영향을 평가합니다.
시각적 변화에 requestAnimationFrame 사용
화면에서 시각적 변화가 발생하고 있을 때 개발자는 브라우저에서 정확한 시간(프레임 시작 시)에 작업을 수행하길 원합니다. 자바스크립트가 프레임 시작 시 실행되도록 보장하는 유일한 방법은 requestAnimationFrame을 사용하는 것입니다.
/**
* If run as a requestAnimationFrame callback, this
* will be run at the start of the frame.
*/
function updateScreen(time) {
// Make visual updates here.
}
requestAnimationFrame(updateScreen);
프레임워크 또는 샘플에서 setTimeout 또는 setInterval을 사용하여 애니메이션과 같은 시각적 변화를 수행할 수도 있지만, 이 경우 문제는 콜백이 프레임에서 특정 시점(종료 시)에 실행되고, 종종 프레임이 누락되어 버벅거림 현상이 발생할 수 있다는 점입니다.
실제로 jQuery의 기본 animate 동작은 현재 setTimeout을 사용하는 것입니다! 이를 패치하여 requestAnimationFrame을 사용할 수 있는데, 이 방법을 강력히 권장합니다.
복잡성 감소 또는 Web Workers 사용
자바스크립트는 브라우저의 메인 스레드에서 스타일 계산, 레이아웃 및 페인트(대부분의 경우에 실행됨)와 함께 실행됩니다. 자바스크립트가 장시간 실행되면 다른 작업을 차단하여 프레임이 누락될 가능성이 있습니다.
자바스크립트를 언제 얼마나 오래 실행할지 전략을 수립해야 합니다. 예를 들어, 스크롤과 같은 애니메이션의 경우, 이상적으로 3-4ms의 영역에서 자바스크립트를 유지해야 합니다. 이보다 길면 너무 많은 시간이 걸릴 위험이 있습니다. 유휴 상태에서는 소요 시간에 대한 걱정을 덜 수 있습니다.
예를 들어 DOM 액세스가 필요하지 않은 경우 등 많은 경우에 순수한 계산 작업을 Web Workers로 이전할 수 있습니다. 정렬 또는 검색과 같은 데이터 조작 또는 순회(traversal)는 대개 이 모델에 적합하며 로드 및 모델 생성도 마찬가지입니다.
var dataSortWorker = new Worker("sort-worker.js");
dataSortWorker.postMesssage(dataToSort);
// The main thread is now free to continue working on other things...
dataSortWorker.addEventListener('message', function(evt) {
var sortedData = evt.data;
// Update data on screen...
});
일부 작업은 이 모델에 적합하지 않을 수 있습니다. Web Workers는 DOM 액세스 권한이 없습니다. 작업이 메인 스레드에 있어야 하는 경우, 큰 작업을 각각 몇 밀리초 이하의 마이크로 작업으로 세분화하고, 각 프레임에서 requestAnimationFrame 핸들러 내부에서 실행하는 일괄 처리 방식을 고려해 보세요.
var taskList = breakBigTaskIntoMicroTasks(monsterTaskList);
requestAnimationFrame(processTaskList);
function processTaskList(taskStartTime) {
var taskFinishTime;
do {
// Assume the next task is pushed onto a stack.
var nextTask = taskList.pop();
// Process nextTask.
processTask(nextTask);
// Go again if there’s enough time to do the next task.
taskFinishTime = window.performance.now();
} while (taskFinishTime - taskStartTime < 3);
if (taskList.length > 0)
requestAnimationFrame(processTaskList);
}
이 접근방식은 UX 및 UI가 중요하며, 진행률 또는 작업 표시기를 사용하여 작업이 처리 중임을 사용자가 알 수 있도록 해야 합니다. 어떤 경우이든 이 접근방식은 앱의 메인 스레드를 사용 가능한 상태로 유지하여 사용자 상호작용에 계속 반응할 수 있도록 합니다.
자바스크립트의 '프레임 비용' 살펴보기
프레임워크, 라이브러리 또는 고유 코드 평가 시 프레임별 자바스크립트 코드의 실행 비용을 평가하는 것이 중요합니다. 이는 전환 또는 스크롤처럼 성능이 중요한 애니메이션 작업 수행 시 특히 중요합니다.
자바스크립트의 비용 및 성능 프로필을 측정하는 가장 좋은 방법은 Chrome DevTools를 사용하는 것입니다. 일반적으로 다음과 같은 낮은 수준의 세부정보 레코드를 얻을 수 있습니다.
오래 실행되는 자바스크립트를 발견하면 DevTools 사용자 인터페이스의 상단에 있는 자바스크립트 프로파일러를 활성화할 수 있습니다.
이 방법으로 자바스크립트를 프로파일링하는 데 따르는 오버헤드가 있으므로 자바스크립트 런타임 특성을 더 세부적으로 파악하려는 경우에만 활성화하세요. 이제 확인란이 활성화된 상태에서 동일한 작업을 수행하고 자바스크립트에서 호출된 함수에 대해 휠씬 더 많은 정보를 얻을 수 있습니다.
이 정보를 사용하여 자바스크립트가 애플리케이션에 미치는 성능 영향을 평가하고, 함수 실행에 너무 오랜 시간이 걸리는 핫스팟을 찾아 수정하기 시작할 수 있습니다. 이전에 언급한 것처럼 오래 실행되는 자바스크립트를 찾아 제거하거나, Web Workers로 이전하여(자바스크립트를 제거할 수 없는 경우) 메인 스레드의 여유 공간을 확보하여 다른 작업을 계속 수행할 수 있도록 해야 합니다.
자바스크립트 미세 최적화 피하기
요청과 요소의 offsetTop이 getBoundingClientRect() 계산보다 빠른 것처럼 브라우저가 하나를 다른 것보다 100배 빨리 실행할 수 있지만 실제로 함수 호출 시 프레임당 시간은 거의 항상 짧기 때문에 자바스크립트의 성능 측면에 중점을 두는 것은 일반적으로 노력의 낭비입니다. 일반적으로 절약되는 시간은 밀리초의 일부에 불과합니다.
게임이나 컴퓨팅 비용이 비싼 애플리케이션을 만드는 경우는 예외입니다. 일반적으로 많은 계산이 단일 프레임에 적용되고 이 경우 모든 것이 도움이 되기 때문입니다.
간단히 말해서, 미세 최적화(micro-optimization)는 일반적으로 빌드 중인 애플리케이션 유형에 매핑되지 않기 때문에 매우 신중해야 합니다.
=================================
=================================
=================================
출처: https://www.paulirish.com/2011/requestanimationframe-for-smart-animating/
requestAnimationFrame for Smart Animating
FEB 22ND, 2011
If you’ve never written code to animate inside the browser, you can stop reading :)
What is requestAnimationFrame?
In your animation work, you’ve used a timer loop to make changes every few milliseconds. Good for us: browser vendors have decided, “hey, why don’t we just give you an API for that, because we can probably optimize some things for you.” So it’s basic API for use with animation, whether that be DOM-based styling changes, canvas or WebGL.
Why should I use it?
The browser can optimize concurrent animations together into a single reflow and repaint cycle, leading to higher fidelity animation. For example, JS-based animations synchronized with CSS transitions or SVG SMIL. Plus, if you’re running the animation loop in a tab that’s not visible, the browser won’t keep it running, which means less CPU, GPU, and memory usage, leading to much longer battery life.
OMG I can brag about having a site with battery-friendly animations?
Yeah bro. Totes McGoats.
How should I use this?
Note: I am using ‘requestAnimFrame` here because since the spec is still in flux, I don’t want to make a straight polyfill, yet.
2012.01.07: The spec has gotten some fixes and settled down. We’re also seeing ms and o implementations, so we’re ready for a polyfill now!
A robust polyfill
Opera engineer Erik Möller wrote about rAF and developed a polyfill that better handles browsers without native support. You can read about it, but basically his code will choose a delay of between 4ms and 16ms in order to more closely match 60fps. Here it is, in case you’d like to use it. Note it uses the standard method name. I have also fixed the cancel* method’s name, as it has changed in WebKit.
I have this polyfill available as a gist as well.
Let’s see that in actionThe requestAnimationFrame API
The callback is passed the current time as the first argument, as you’ll likely want that.
You’ll also notice the second parameter to requestAnimFrame: the element that visually bounds the entire animation. For canvas and WebGL, this will be the actual <canvas> element. For DOM stuff, you can leave it off or define it for a slightly more optimized experience.It’s since been removed from the spec (and WebKit’s implementation)
Is it ready?
Right now, the Webkit implementation (available in Nightly Safari and Chrome Dev Channel) and the Mozilla one (available in FF4) differ slightly. Mozilla’s has a bug which caps potential framerates at about 30fps.Actually, “It’s currently capped at 1000/(16 + N) fps, where N is the number of ms it takes your callback to execute. If your callback takes 1000ms to execute, then it’s capped at under 1fps. If your callback takes 1ms to execute, you get about 60fps.” (thx, Boris) It’ll be fixed though, probably for the next release after FF4 ships. Also Chrome 10 doesn’t have the time parameter (added in m11), FF currently ignores the element argument.
We want your feedback!
If you do animation work, WebKit and Gecko hackers would love to hear if this meets your needs or if it could be improved any. Take a look at the draft requestAnimationFrame spec. It’s currently modeled like setTimeout; does a setInterval repeating style API make more sense? Does this API have downsides when animating multiple simultaneous elements? Does the element reference work for you? In general, does this solve the common cases of animation?
Resources for hackers
- Draft spec (authored by heycam and jamesr)
- Chromium design doc
- A basic example
- A more comprehensive example with some available config
- MDC docs on mozRequestAnimationFrame
- Current implementations in YUI (yui anim loop), three.js, limejs – ticket for jQuery’s implementation
- Demo by Louis-Rémi Babé watch your CPU drop when you change tabs.
- Nokarma’s coverage of requestAnimationFrame
- Mozilla’s Robert O’Callhan early post on rAF
Thx @mrdoob for bringing this up today and spreading the good word.
2011.06.01: Joe Lambert took this idea and provided shims for both setTimeout and setInterval that leverage this. http://blog.joelambert.co.uk/2011/06/01/a-better-settimeoutsetinterval/
2011.10.13: Updated code sample and explained why the rAF call before render makes sense due to the timeout fallback.
2011.12.14: Updated code sample and text. Removed references to element argument, as it was removed from spec and webkit’s impl.
2012.01.01: Added polyfill from Erik Moller.
2012.01.05: Addressed polyfill fix from Tino Zijdel of DHTML Lemmings fame. :)
2013.03.06: No more `ms` or `o` prefixes neccessary. Removed.
2014.01.23: Someone asked if this polyfill is still neccessary. It is. Red and yellow-flagged entries still require the fallback and prefix normalization, respectively:
=================================
=================================
=================================
기타관련링크:
https://www.slideshare.net/byungholee399/ss-52050678
=================================
=================================
=================================
'WEB > JavaScript' 카테고리의 다른 글
| html 스크립트 자바 스크립트 파일 이벤트, onchange 이벤트 관련 (0) | 2020.09.21 |
|---|---|
| html5, javascript ... 웹 파일 읽기/쓰기 업로드 가능 관련 (2) | 2020.09.20 |
| [JavaScript] 자바스크립트 코드, 코드압축, 코드숨기기 코드암호화 보안 관련 (0) | 2020.09.20 |
| Node.js로 ECMAScript 모듈을 사용하는 방법 관련(import, export, mjs) 관련 (0) | 2019.12.13 |
| Node.js 버전 업그레이드 관련(AWS C9 등등) (0) | 2019.12.13 |


댓글 영역