=================================
=================================
=================================
보기전에
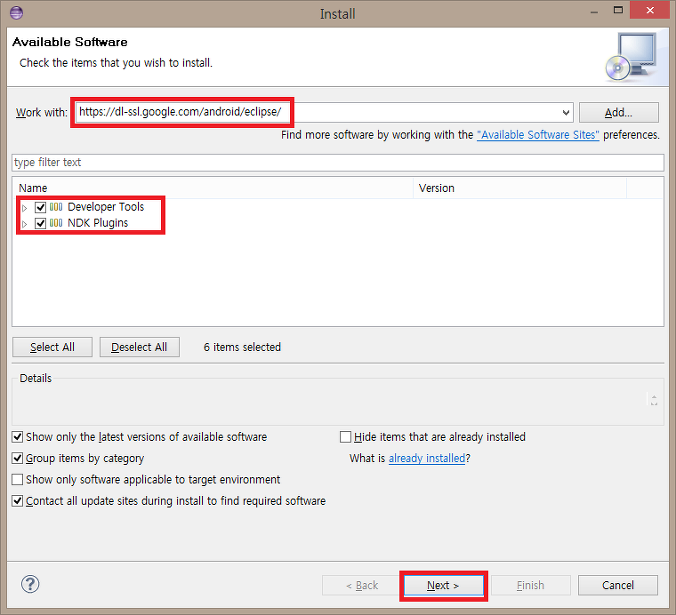
https://dl-ssl.google.com/android/eclipse/
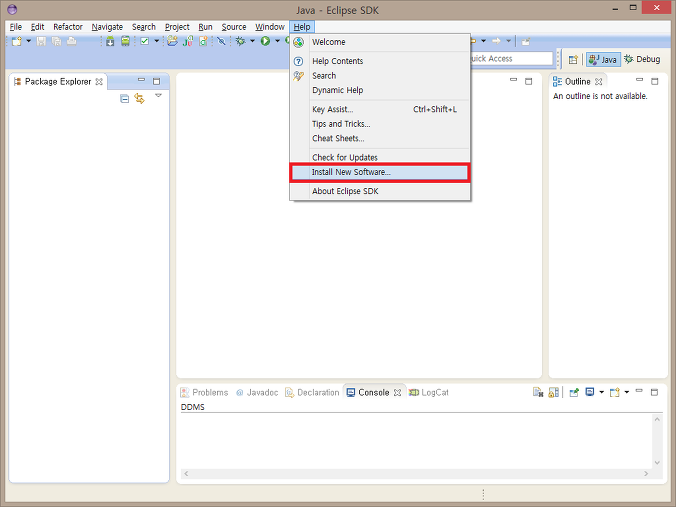
메뉴 -> help -> install new software 에서
ndk plug 를 설치 했는지 확인
=================================
=================================
=================================
출처: http://canon110.tistory.com/45
NDK 사용해서 터미널로 로그 남기기
2011.01.26 수정
ndk 사용한 Application 작성시 디버깅에 어려움이 많다.
이 포스팅은 이것에 대해 다룬다.
우선 ndk에서는 log를 남기기 위한 API들을 제공한다. 그것들은 다음 경로에 있다.
ANDROID_NDK_PATH/build/platforms/android-1.5/common/include/android/log.h
이 log.h 파일을 jni 소스가 위치한 폴더에 카피하도록 한다. (include하기 위함)
이것들을 사용하기 위해서, 해당 소스(xxx.c, xxx.cpp)파일 안에 일종의 wrapper를 다음과 같이 씌운다.
#ifndef __ANDROID_LOG_H__
#define __ANDROID_LOG_H__
#include "log.h"

#define LOGV(...)   __android_log_print(ANDROID_LOG_VERBOSE, "libnav", __VA_ARGS__)
#define LOGD(...)   __android_log_print(ANDROID_LOG_DEBUG, "libnav", __VA_ARGS__)
#define LOGI(...)   __android_log_print(ANDROID_LOG_INFO, "libnav", __VA_ARGS__)
#define LOGW(...)   __android_log_print(ANDROID_LOG_WARN, "libnav", __VA_ARGS__)
#define LOGE(...)   __android_log_print(ANDROID_LOG_ERROR, "libnav", __VA_ARGS__)

#endif /* __ANDROID_LOG_H__ */
위와 같이 작성 후 이 헤더 파일을 include하여 사용하면 된다. (소스의 3번째줄)
그리고 build 시에 Android.mk 파일을 다음과 같이 추가해준다.
예)
####################################################################
LOCAL_PATH:= $(call my-dir)
include $(CLEAR_VARS)


LOCAL_MODULE    := lib***
LOCAL_SRC_FILES := test.c

LOCAL_LDLIBS := -L$(SYSROOT)/usr/lib -llog   # 빌드시에 liblog.so를 링크하도록 함!
LOCAL_CFLAGS := -DCONFIG_EMBEDDED -DUSE_IND_THREAD

#include $(BUILD_STATIC_LIBRARY)
include $(BUILD_SHARED_LIBRARY)
####################################################################
또한, 로그 사용방법은 사용하고자 하는 특정 함수 안에 다음과 같이 작성하면 된다.
...
LOGD("############### test log...(in NDK) ################");
...
아래 사진은 JNI에서 남긴 로그를 안드로이드 DDMS로 확인한 스크린샷이다.
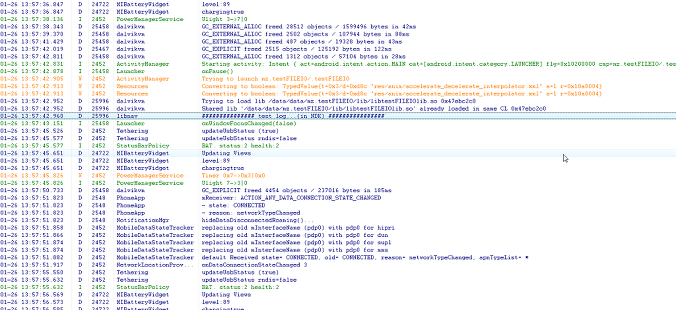
위 사진 가운데쯔음에 보이는 선택 영역이
JNI가 수행되는 동안 LOGD함수에 의해 DDMS의 로그캣에 찍힌 로그내역인 것이다.
출처 : http://duo830210.tistory.com/tag/ndk%20log
=================================
=================================
=================================
출처: http://seohs.tistory.com/284
이 디버깅 방법은 안드로이드 개발 시 NDK를 사용하는 경우 Log.d와 같은 문자열을 찍는 방법이다.
일반적인 printf(C언어)나 Log.d(안드로이드)를 사용할 수 없기때문에
다음과 같은 방법을 통해 C++에서 문자열을 찍어 디버깅을 수행할 수 있다.
1. 환경 준비하기
1-1. 안드로이드 MAKEFILE 수정하기
안드로이드 MAKEFILE은 "Android.mk"이다. 이 파일을 열어서 "LOCAL_LDLIBS:= -llog"을 한 줄을 추가한다.
1-2. 헤더파일 추가하기
문자열을 출력할 파일에 "#include <android/log.h>"을 추가한다.

2. 문자열 출력하기
문자열을 출력할 부분에 "__android_log_print(ANDROID_LOG_DEBUG, "TAG", "Message")"을 추가한다.
ANDROID_LOG_DEBUG를 대신할 수 있는 옵션으로는 다음과 같다.
- ANDORID_LOG_UNKNOWN
- ANDROID_LOG_DEFAULT
- ANDROID_LOG_VERBOSE
- ANDROID_LOG_DEBUG
- ANDROID_LOG_INFO
- ANDROID_LOG_WARN
- ANDROID_LOG_ERROR
- ANDROID_LOG_FATAL
- ANDROID_LOG_SILENT
TAG와 Message는 Log.d("TAG", "Message")와 같은 역할을 한다.
예를 들어 __android_log_print(ANDROID_LOG_DEBUG, "CHK", "Hello World")인 경우 Log.d("CHK", "Hello World"와 같다.)
혹은 특정 변수의 값을 출력해야 한다면 다음과 같이 출력이 가능하다.
예를 들어, INT형인 VAR라는 변수의 값을 출력해야 하는 경우
__android_log_print(ANDROID_LOG_DEBUG, "CHK", "This value is %d", VAR) 의 식으로 사용할 수 있다.
[Reference]
01. http://blog.naver.com/jbin_k?Redirect=Log&logNo=130127879251
=================================
=================================
=================================
출처: http://permadi.com/blog/2011/09/creating-your-first-android-jnindk-project-in-eclipse-with-sequoyah/
his guide shows how to create an sample (Hello World type) Android JNI Application. Using Eclipse and Sequoyah, you can do everything inside the Eclipse IDE (there’s no need to run annoying command lines from Console or DOS prompt).
You should do the previous guide first in order to follow this guide. There is a bit of overlap from the previous guide (which is here:http://www.permadi.com/blog/2011/09/setting-up-android-jni-projects-in-windows-eclipse-and-sequoyah/) so you can skip to step 4 if you have done the previous guide.
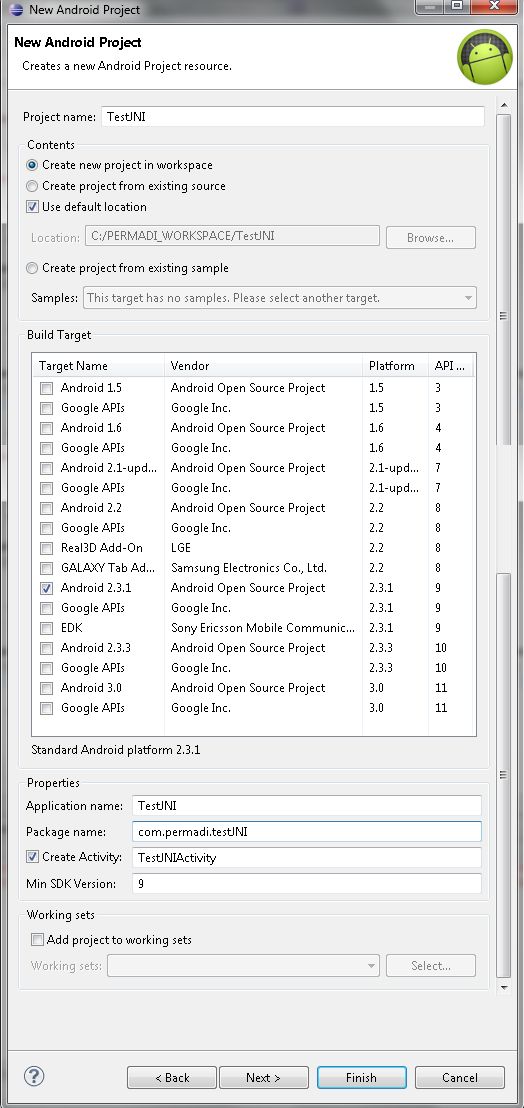
Step 1. Create a New Android project.
Select API level of at least 9. Do not use <space> in the project name or Android NDK may complain later.
Step 2. Add Native Support
This is where Sequoyah do its action.
Right click the project on Eclipse Workspace, then select Android Tools -> Add Native Support.
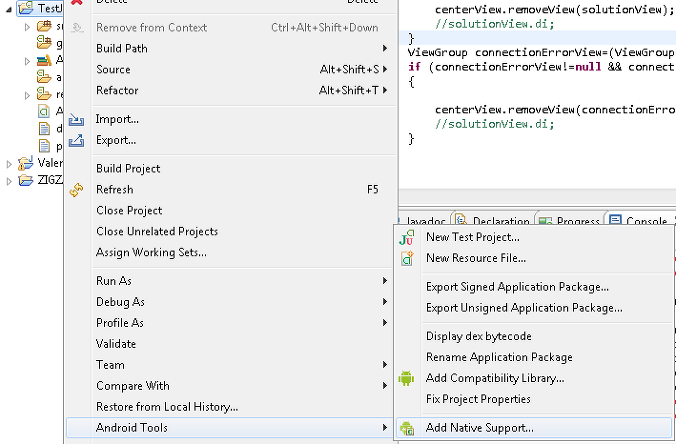
This dialog should come up:
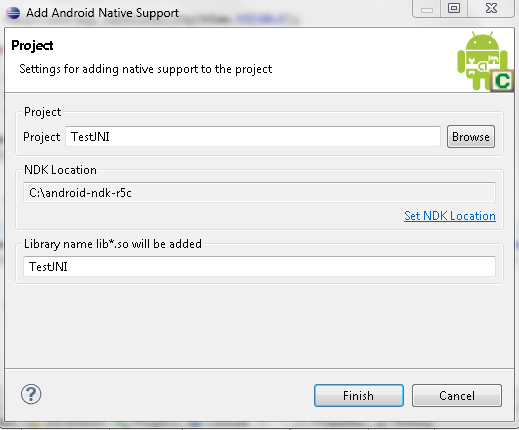
Just leave the default values as default. (But if the NDK location is wrong then set it to the path where you installed the Android NDK.)
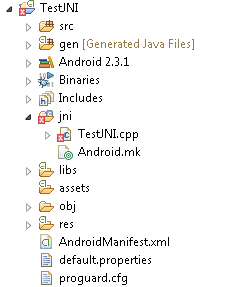
What this process does is create a Makefile and a stub C++ file for you. You should see a folder named jni which has been automatically created for you, with an Android.mk and .cpp file.
Step 3. Build Project
The cpp file is empty right now, but we’re are finally ready to test building something. So do Build Project and hold your breath.
Examine the Eclipse Console window. You should see something like this:
**** Build of configuration Default for project TestJNI ****

bash C:\android-ndk-r5c\ndk-build V=1

cygwin warning:

MS-DOS style path detected: C:\PERMADI_WORKSPACE\TestJNI

Preferred POSIX equivalent is: /cygdrive/c/PERMADI_WORKSPACE/TestJNI

CYGWIN environment variable option "nodosfilewarning" turns off this warning.

Consult the user's guide for more details about POSIX paths:


http://cygwin.com/cygwin-ug-net/using.html#using-pathnames


rm -f /cygdrive/c/PERMADI_WORKSPACE/TestJNI/libs/armeabi/lib*.so /cygdrive/c/PERMADI_WORKSPACE/TestJNI/libs/armeabi-v7a/lib*.so /cygdrive/c/PERMADI_WORKSPACE/TestJNI/libs/x86/lib*.so

rm -f /cygdrive/c/PERMADI_WORKSPACE/TestJNI/libs/armeabi/gdbserver /cygdrive/c/PERMADI_WORKSPACE/TestJNI/libs/armeabi-v7a/gdbserver /cygdrive/c/PERMADI_WORKSPACE/TestJNI/libs/x86/gdbserver

rm -f /cygdrive/c/PERMADI_WORKSPACE/TestJNI/libs/armeabi/gdb.setup /cygdrive/c/PERMADI_WORKSPACE/TestJNI/libs/armeabi-v7a/gdb.setup /cygdrive/c/PERMADI_WORKSPACE/TestJNI/libs/x86/gdb.setup

Install        : libTestJNI.so => libs/armeabi/libTestJNI.so

mkdir -p /cygdrive/c/PERMADI_WORKSPACE/TestJNI/libs/armeabi

install -p /cygdrive/c/PERMADI_WORKSPACE/TestJNI/obj/local/armeabi/libTestJNI.so /cygdrive/c/PERMADI_WORKSPACE/TestJNI/libs/armeabi/libTestJNI.so

/cygdrive/c/android-ndk-r5c/toolchains/arm-linux-androideabi-4.4.3/prebuilt/windows/bin/arm-linux-androideabi-strip --strip-unneeded C:/PERMADI_WORKSPACE/TestJNI/libs/armeabi/libTestJNI.so

**** Build Finished ****
If there’s any error, make sure that of your Android NDK environment is set-up correctly first before continuing.
Step 5. Open up the Activity class.
Should look like below:
package com.permadi.testJNI;

import android.app.Activity;

import android.os.Bundle;

public class TestJNIActivity extends Activity {

    /** Called when the activity is first created. */

    @Override

    public void onCreate(Bundle savedInstanceState) {

        super.onCreate(savedInstanceState);

        setContentView(R.layout.main);

    }

}
Step 6. Add a function which we will implement natively in C++.
Let’s call it stringFromJNICPP() just because I feel like it.
package com.permadi.testJNI;

import android.app.Activity;

import android.os.Bundle;

import android.widget.TextView;

public class TestJNIActivity extends Activity {

    /** Called when the activity is first created. */

    @Override

    public void onCreate(Bundle savedInstanceState) {

        super.onCreate(savedInstanceState);

        setContentView(R.layout.main);

    }

    public native String stringFromJNICPP();

}
Step 7. Load the native library.
package com.permadi.testJNI;

import android.app.Activity;

import android.os.Bundle;

public class TestJNIActivity extends Activity {

    //... same as above

    static {

        System.loadLibrary("TestJNI");

    }

}
How did I came up with that name (TestJNI)? This name is arbitrary but should match the LOCAL_MODULE specified injni/Android.mk and it should not contain special-characters, not even a . In this example, mine is named: TestJNI because myAndroid.mk looks like this:
LOCAL_PATH: = $(call my - dir)
include $(CLEAR_VARS)
LOCAL_MODULE: = TestJNI

# # # Add all source file names to be included in lib separated by a whitespace
LOCAL_SRC_FILES: = TestJNI.cpp
include $(BUILD_SHARED_LIBRARY)
Step 8. Add a TextView to display the message so that we can see that the native method is actually being called.
Here’s my main.xml, note the addition of TextView with id=myTextField:
<?xml version="1.0" encoding="utf-8"?>
<LinearLayout
    xmlns:android="http://schemas.android.com/apk/res/android"
    android:orientation="vertical"
    android:layout_width="fill_parent"
    android:layout_height="fill_parent">
    <TextView
        android:layout_width="fill_parent"
        android:layout_height="wrap_content"
        android:text="@string/hello"
        android:id="@+id/myTextField"/>
</LinearLayout>
Then I set the content of the TextView to the string returned by stringFromJNICPP() function.
My Activity class looks like this now (line 15 is where I call the CPP function and print the return value into the text field):
package com.permadi.testJNI;

import android.app.Activity;

import android.os.Bundle;

import android.widget.TextView;

public class TestJNIActivity extends Activity {

    /** Called when the activity is first created. */

    @Override

    public void onCreate(Bundle savedInstanceState) {

        super.onCreate(savedInstanceState);

        setContentView(R.layout.main);

        TextView myTextField = (TextView) findViewById(R.id.myTextField);

        myTextField.setText(stringFromJNICPP());

    }

    public native String stringFromJNICPP();

    static {

        System.loadLibrary("TestJNI");

    }

}
Step 9. Add the native C++ code.
Open jni/TestJNI.cpp (this file should have been created for you by Step 2) and add this code.
#include <string.h>

#include <jni.h>

#include <android/log.h>


extern "C" {

    JNIEXPORT jstring JNICALL Java_com_permadi_testJNI_TestJNIActivity_stringFromJNICPP(JNIEnv * env, jobject obj);

};

JNIEXPORT jstring JNICALL Java_com_permadi_testJNI_TestJNIActivity_stringFromJNICPP(JNIEnv * env, jobject obj)

{

    return env - > NewStringUTF("Hello From CPP");

}
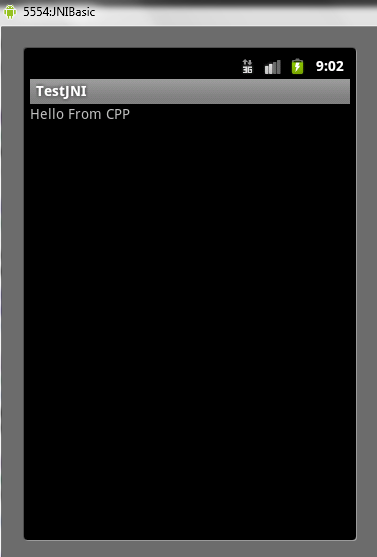
The code simply returns a string saying Hello From CPP.
Notice how the function is named and how it needs to be exported because Android NDK mostly works with C.
Now, you might think that the function is insanely long, but this isn’t an arbitrary name because it actually follows a convention that tells the JNI to resolve which Java code references it. The convention is something like… the word Java_, followed by <your Java package name> with all the <dot> replaced with <underscores>, followed by <underscore>, then class name, followed by <underscore> and the function name. Confused? Here’s an excerpt from Java documentation athttp://download.oracle.com/javase/1,5.0/docs/guide/jni/spec/design.html
Resolving Native Method Names
Dynamic linkers resolve entries based on their names. A native method name is concatenated from the following components:
the prefix Java_
a mangled fully-qualified class name
an underscore (“_”) separator
a mangled method name
for overloaded native methods, two underscores (“__”) followed by the mangled argument signature
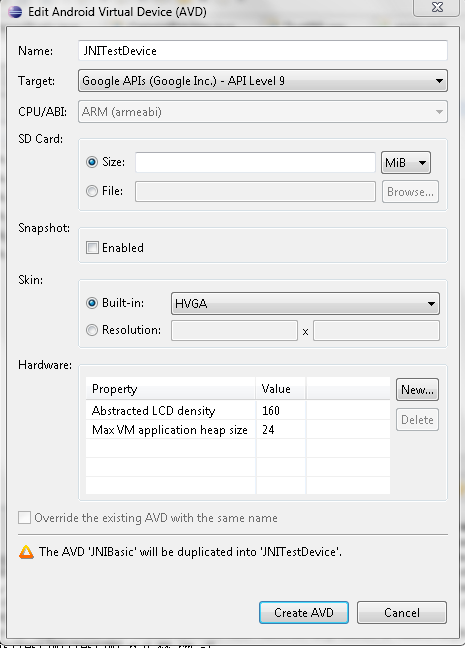
Step 10. Create a Test Device.
Before testing, I recommend crating a new AVD that is compatible with API level 9 (if you don’t already have one) since the latest NDK recommend this level. Head over here if you don’t know how to create an AVD:http://developer.android.com/guide/developing/devices/index.html. You can also test on a real device (I personally have ran this example on Nexus One phone).
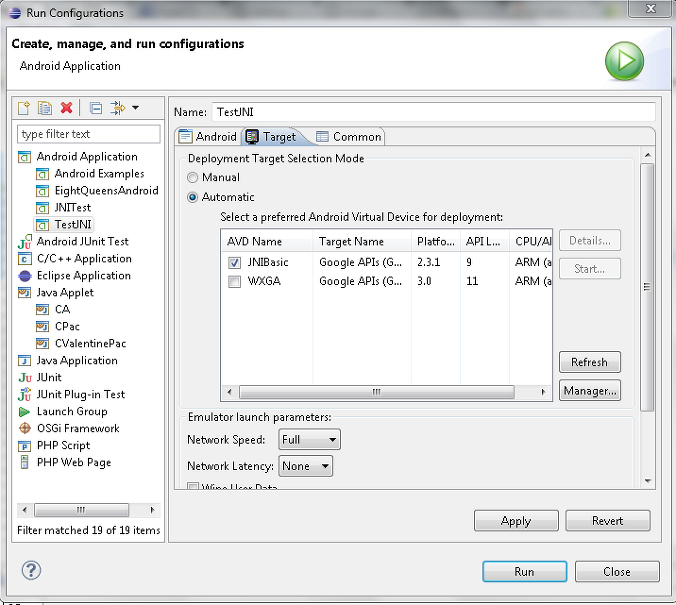
When running, make sure that you select this AVD via Run->Run Configurations->Target.
Step 11. Build it.
Build the project from Eclipse (from the menu: Project->Build Project). This will build both the java and C/C++ source files as well as installing the resulting C/C++ into the package in one step. If you’re expecting to have to deal with command lines, it’s is a nice surprise that you don’t need to!
Make sure that the Eclipse Console is open (menu: Window->Show View->Console). There should be no error, with much luck. If there are, then head over below to the Common Errors section below.
Step 12. Run it.
Voila, here is it.
Common Errors
Error
Multiple markers at this line
- Method 'NewStringUTF' could not be resolved
- base operand of '->' has non-pointer type '_JNIEnv'
Solution: You are probably using C convention inside CPP file. In general, the difference is below:
C:
(*env)->NewStringUTF(env, "Hello From C");C++
env->NewStringUTF("Hello From CPP");Error
07-09 07:47:31.103: ERROR/AndroidRuntime(347): FATAL EXCEPTION: main
07-09 07:47:31.103: ERROR/AndroidRuntime(347): java.lang.UnsatisfiedLinkError: stringFromJNI_CPP</pre>
Solution:
- Do not use underscore in JNI function names.
- Are you loading the right library name?
Error
first defined here    TestJNI        line 5, external location: C:\PERMADI_WORKSPACE\TestJNI\obj\local\armeabi\objs\TestJNI\com_permadi_testJNI_TestJNIActivity.o:C:\PERMADI_WORKSPACE\TestJNI\jni\com_permadi_testJNI_TestJNIActivity.c    C/C++ Problem
make: *** [/cygdrive/c/PERMADI_WORKSPACE/TestJNI/obj/local/armeabi/libTestJNI.so] Error 1    TestJNI             C/C++ Problem
multiple definition of `Java_com_permadi_testJNI_TestJNIActivity_stringFromJNI'    com_permadi_testJNI_TestJNIActivity.c    /TestJNI/jni    line 5    C/C++ Problem
or
C:/PERMADI_WORKSPACE/TestJNI/obj/local/armeabi/objs/TestJNI/com_permadi_testJNI_TestJNIActivity.o: In function `Java_com_permadi_testJNI_TestJNIActivity_stringFromJNI':
C:/PERMADI_WORKSPACE/TestJNI/jni/com_permadi_testJNI_TestJNIActivity.c:5: multiple definition of `Java_com_permadi_testJNI_TestJNIActivity_stringFromJNI'
C:/PERMADI_WORKSPACE/TestJNI/obj/local/armeabi/objs/TestJNI/com_permadi_testJNI_TestJNIActivity.o:C:/PERMADI_WORKSPACE/TestJNI/jni/com_permadi_testJNI_TestJNIActivity.c:5: first defined here
collect2: ld returned 1 exit status
make: *** [/cygdrive/c/PERMADI_WORKSPACE/TestJNI/obj/local/armeabi/libTestJNI.so] Error 1
Possible solution:
- Make sure there’s no duplicate function names.
- Check the Android.mk to ensure that no source file is being compiled multiple times. For instance, at some point my Makefile was messed up like this, with one of the source file (com_permadi_testJNI_TestJNIActivity.c) being added twice, which caused the error.
LOCAL_PATH := $(call my-dir)
include $(CLEAR_VARS)
LOCAL_MODULE    := TestJNI
### Add all source file names to be included in lib separated by a whitespace
LOCAL_SRC_FILES := TestJNI.cpp com_permadi_testJNI_TestJNIActivity.c com_permadi_testJNI_TestJNIActivity.c
include $(BUILD_SHARED_LIBRARY)
Error
Description    Resource    Path    Location    Type
Method 'NewStringUTF' could not be resolved    com_permadi_testJNI_TestJNIActivity.c    /TestJNIC/jni    line 6    Semantic Error
Type 'JNIEnv' could not be resolved    com_permadi_testJNI_TestJNIActivity.c    /TestJNIC/jni    line 4    Semantic Error
Type 'jobject' could not be resolved    com_permadi_testJNI_TestJNIActivity.c    /TestJNIC/jni    line 4    Semantic Error
Type 'jstring' could not be resolved    com_permadi_testJNI_TestJNIActivity.c    /TestJNIC/jni    line 4    Semantic Error
Solution:
This is actually a very strange error because I have seen it suddenly creeping up on projects that had compiled fine before. There must be a bug somewhere (in Eclipse, NDK, SDK?) which caused this to happen in some situations and intermittently — and I don’t know what triggers it. The remedy (hack) is to add the android-ndk include path into the Project Property->C/C++ paths.
Open the Project Properties. Expand the C/C++ General section, then select the Paths and Symbols sub-section. In the Includes tab, select GNU C, enter the \platforms\android-9\arch-arm\usr\include path. See below (click image to zoom).
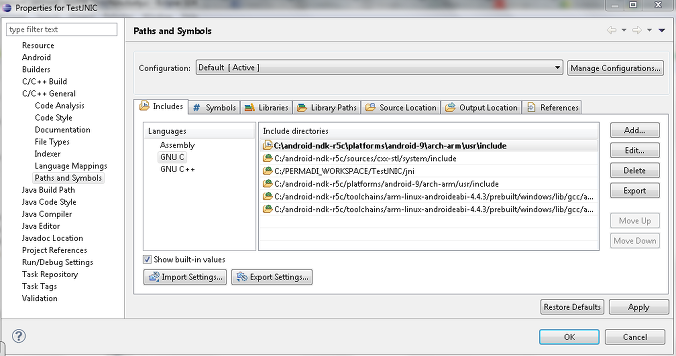
Do the same to the GNU C++ section. Click Apply. Agree when asked to rebuild index. Then rebuild the project. The error is magically gone. What’s odd is that once the build is successful, you can remove the paths that you have just added, make code changes that triggers a recompile, and the error usually won’t come back.
Where to go from here
Examine the NDK sample codes and see how things work. There are Open GL samples if you’re into game programming. See this guide on how to compile them within Eclipse: http://www.permadi.com/blog/2011/12/running-android-ndk-examples-using-eclipse-and-sequoyah/
5 Responses to “Creating your first Android JNI/NDK Project in Windows Eclipse with Sequoyah”
- Setting Up Android JNI Projects in Windows Eclipse – And Sequoyah[...] Creating your first Android JNI/NDK Project in Eclipse with Sequoyah [...]
- September 13th, 2011 at 1:04 am
- Creating your first Android JNI/NDK Project in Eclipse with Sequoyah – Example Download[...] that you need the environment described here to use this example: Bookmark on Delicious Digg this post Recommend on Facebook Share with [...]
- September 30th, 2011 at 10:47 pm
- JohnSorry, I meant to ask, is there a particular reason for the “Select API level of at least 9″?
- Does something bad happen is leve 8 is used?
- March 26th, 2012 at 1:10 pm
- permadiAccording to the Google Doc (http://developer.android.com/sdk/ndk/overview.html), “Applications that use native activities must be run on Android 2.3 or later.” This is why on the example, we use api level 9.
- April 4th, 2012 at 9:04 pm
- beefNice tutorial, I had the same problem with jobject/JNIEXPORT/etc. and I’m glad I found the answer here.
- April 21st, 2012 at 1:50 pm
=================================
=================================
=================================
출처: http://steamboys.egloos.com/1248879
- JDK 다운로드.
- Android SDK 다운로드.
- Android NDK 다운로드.
- Eclipse 다운로드.
- Cygwin 다운로드.
- JDK 설치.
- 작업폴더 생성. (D:\Android)
- 작업폴더에 Android NDK파일 압축을 푼다. (D:\Android\android-ndk-r8b-windows)
- 작업폴더에 Android SDK를 설치. (D:\Android\android-sdk)
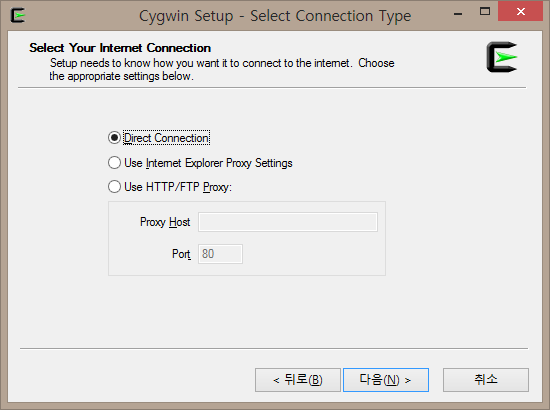
- 작업폴더에 Cygwin을 설치. (D:\Android\Cygwin)
- 작업폴더에 Eclipse파일 압축을 푼다. (D:\Android\Eclipse)
- Eclipse 실행.
- Eclipse에 ADT를 설치.
(https://dl-ssl.google.com/android/eclipse/) 복사.
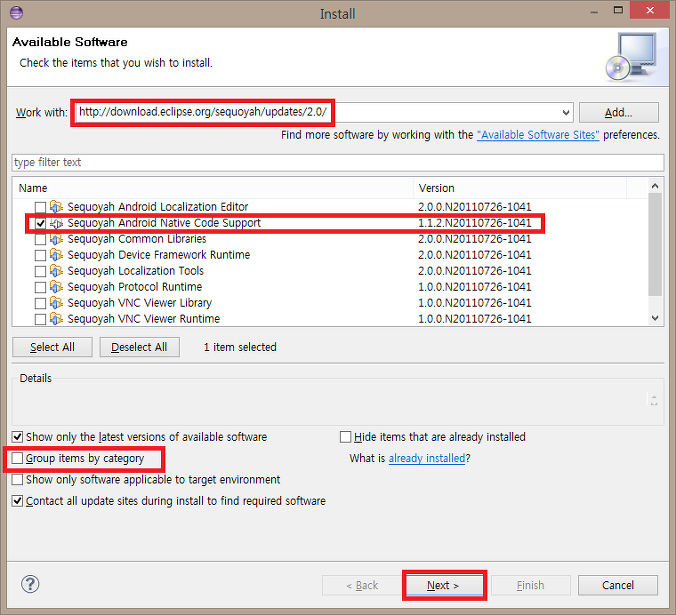
- Eclipse에 Sequoyah를 설치.
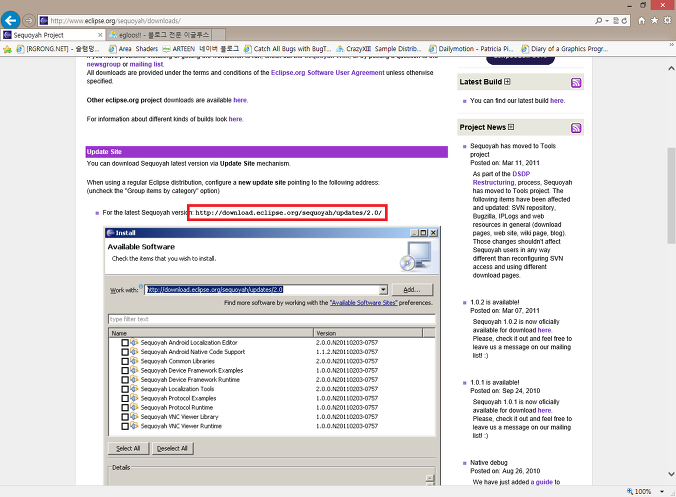
(http://download.eclipse.org/sequoyah/updates/2.0/) 복사
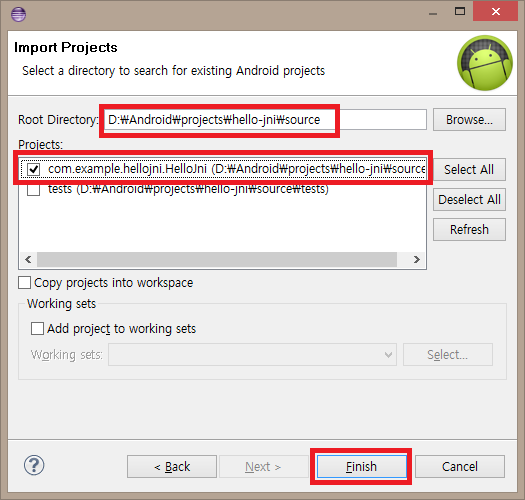
- 작업폴더 생성.
(D:\Android\projects\hello-jni\sorce)
(D:\Android\projects\hello-jni\workspace)
NDK sample 복사.
D:\Android\projects\hello-jni\sorce 에 붙여넣기.
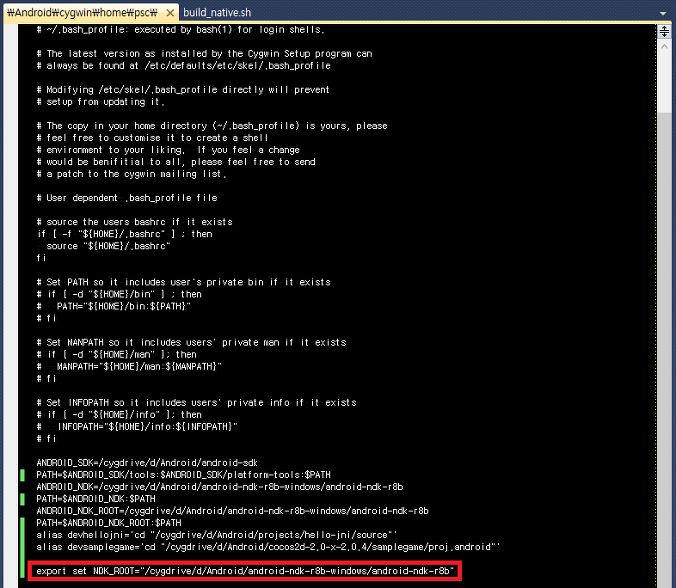
- cygwin\home\username\.bash_profile 편집. (대소문자구별)
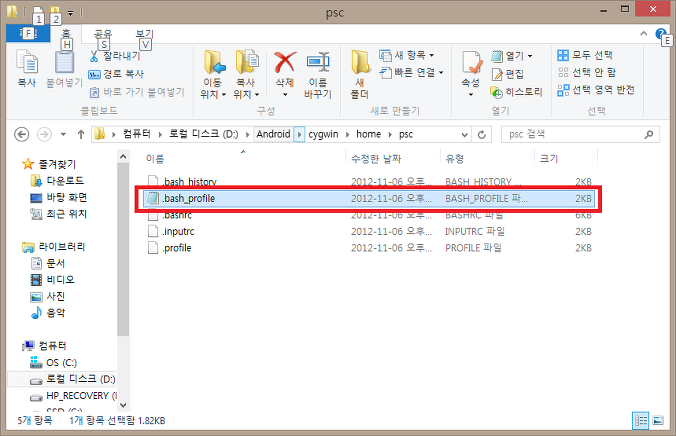
내용끝에 아래의 내용을 추가.
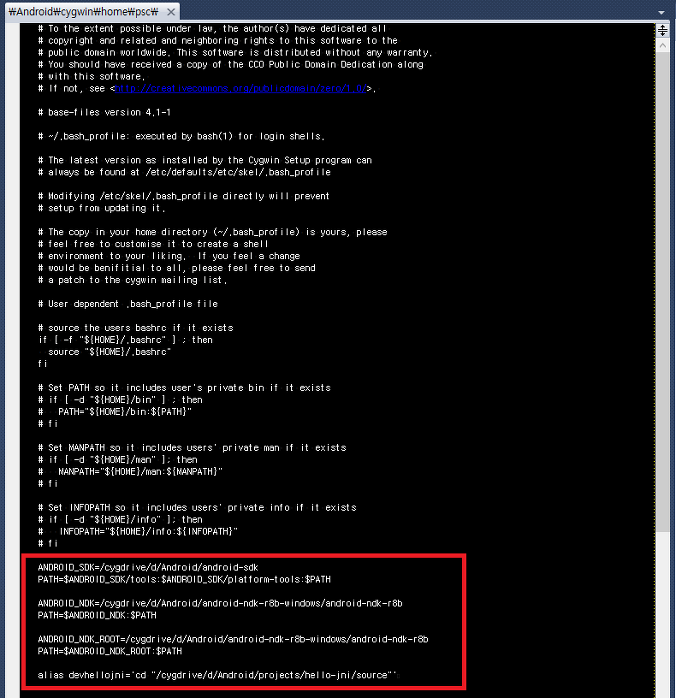
ANDROID_SDK=/cygdrive/d/Android/android-sdk
PATH=$ANDROID_SDK/tools:$ANDROID_SDK/platform-tools:$PATH
ANDROID_NDK=/cygdrive/d/Android/android-ndk-r8b-windows/android-ndk-r8b
PATH=$ANDROID_NDK:$PATH
ANDROID_NDK_ROOT=/cygdrive/d/Android/android-ndk-r8b-windows/android-ndk-r8b
PATH=$ANDROID_NDK_ROOT:$PATH
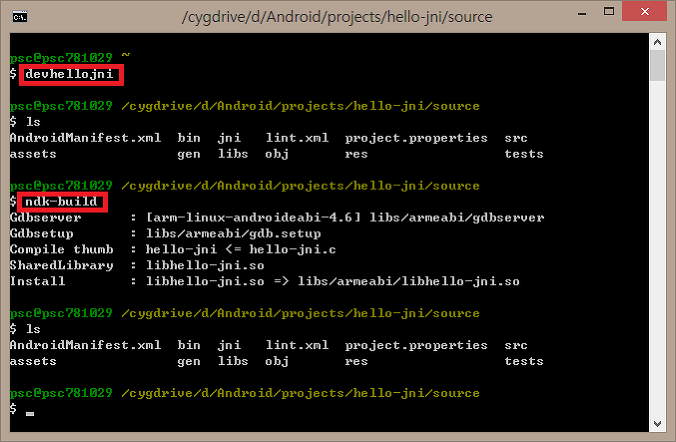
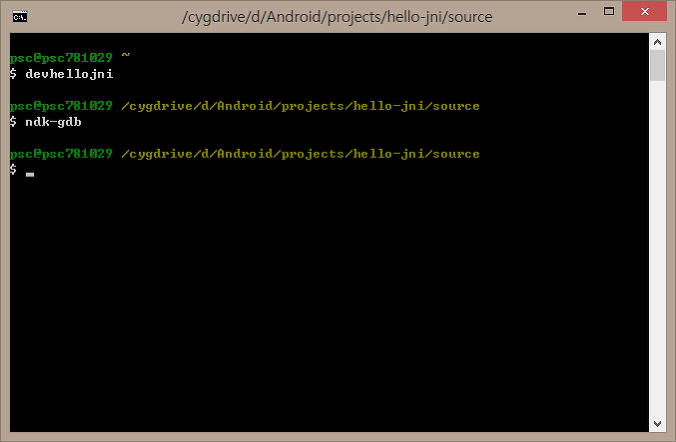
alias devhellojni='cd "/cygdrive/d/Android/projects/hello-jni/source"'
- Cygwin.bat 실행.
오류없이 정상 실행 확인.
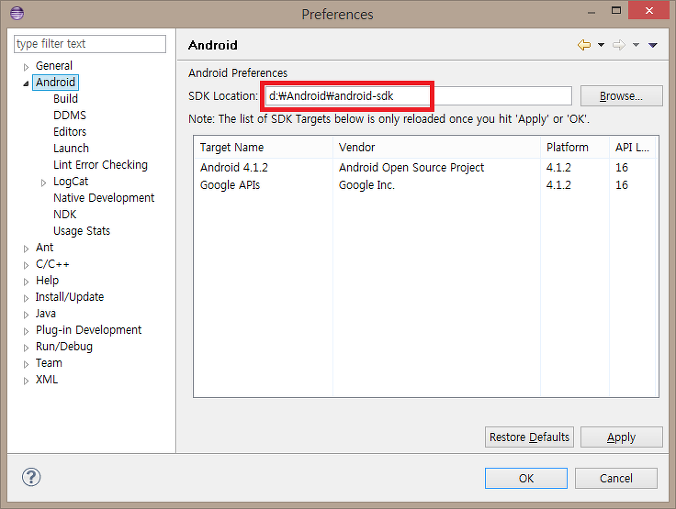
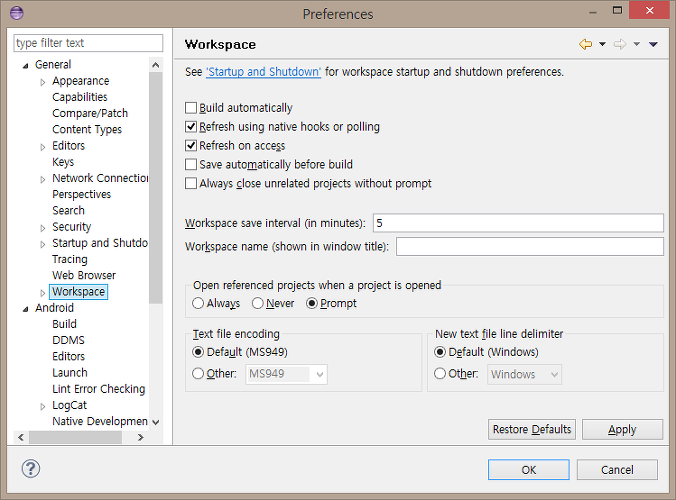
- Eclipse 설정
Window->preferences 선택.
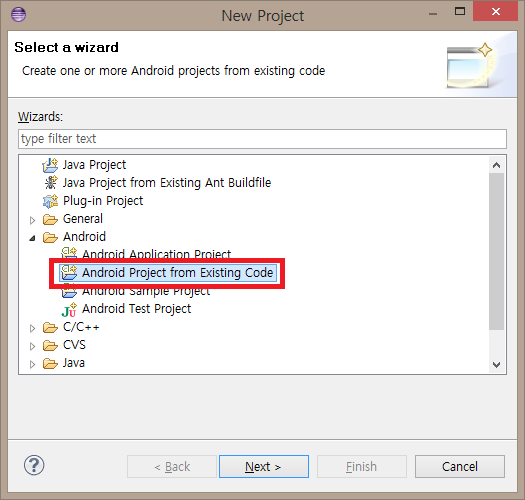
- Eclipse에서 project 열기.
File->New->Project... 선택.
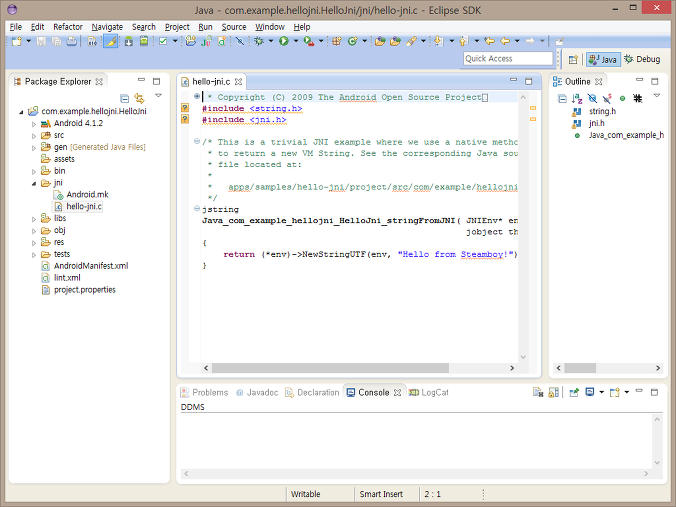
- Eclipse에서 project 빌드.
Project->Build All 선택. (오류없이 빌드)
- Java Debug.
- c++ 디버깅.
프로젝트에서 오른 마우스 클릭->Android tools->Add Native Support... 선택.
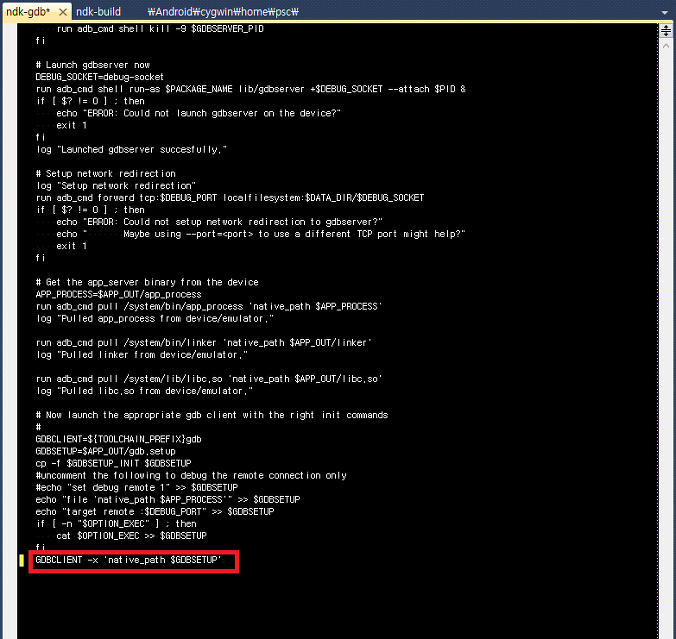
D:\Android\android-ndk-r8b-windows\android-ndk-r8b\ndk-gdb 편집.

맨 마지막 줄 GDBCLIENT -x 'native_path $GDBSETUP'를 지운다.
Cygwin 실행.
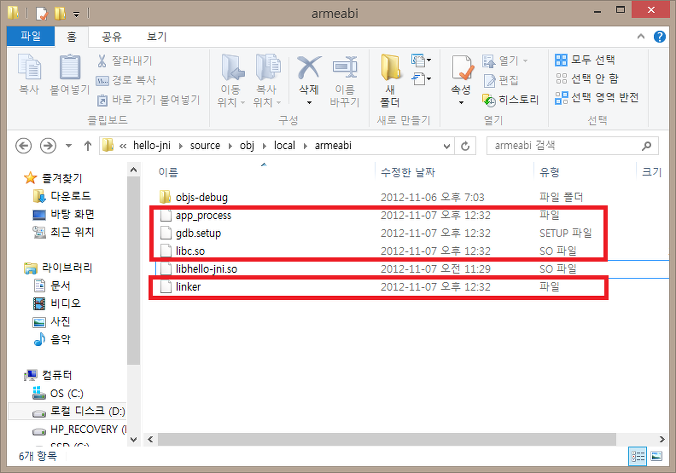
파일 생성 확인. (app_prcess, gdb.setup, libc.so, linker)
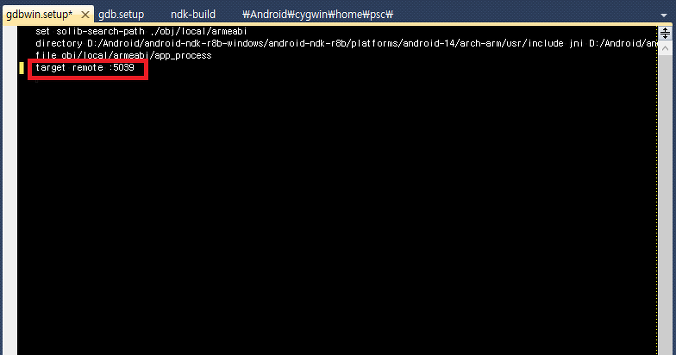
gdb.setup로 복사된 gdbwin.setup 파일 생성.
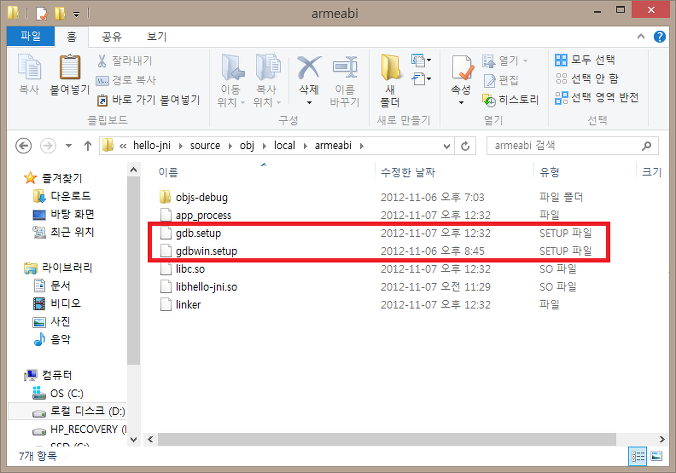
gdbwin.setup 파일 편집. (마지막 target remote :5039 문자열을 지운다)
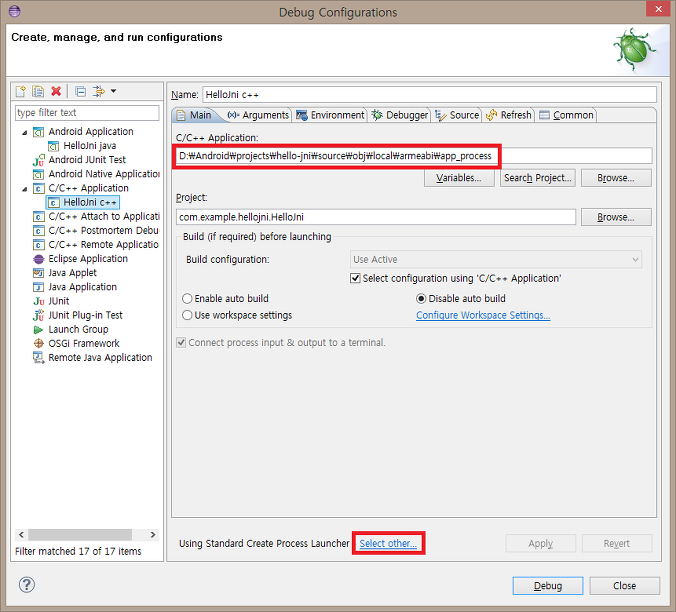
C/C++ Application:에 ndk-gdb에 의해 생성된 app_process 설정후 Select other... 선택.
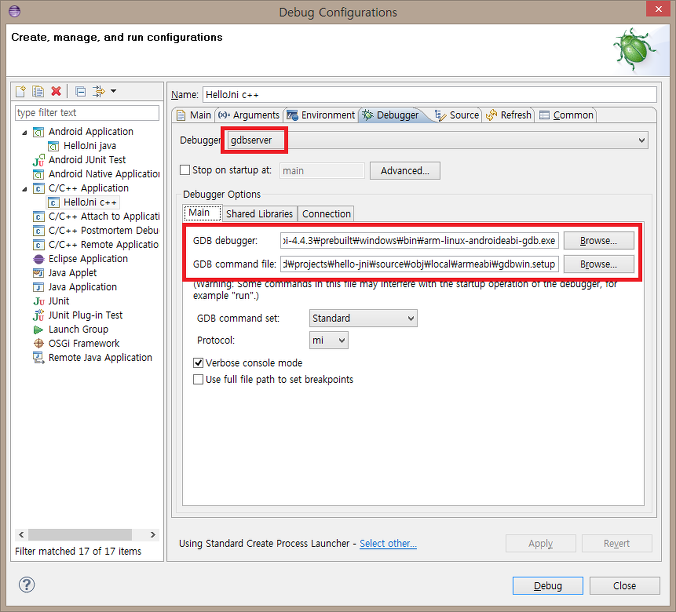
GDB debuffer: (D:\Android\android-ndk-r8b-windows\android-ndk-r8b\toolchains\arm-linux-androideabi-4.4.3\prebuilt\windows\bin\arm-linux-androideabi-gdb.exe)
GDB command file: (D:\Android\projects\hello-jni\source\obj\local\armeabi\gdbwin.setup)
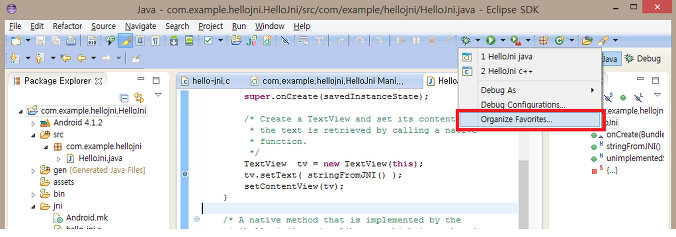
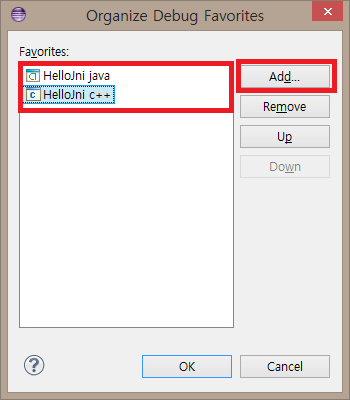
2가지 디버그 추가.
HelloJni java 디버그 실행.
Cygwin에서 (ndk-gdb --force) 실행.
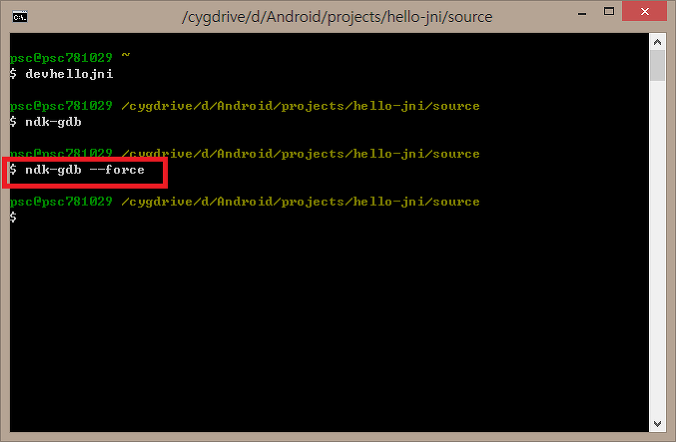
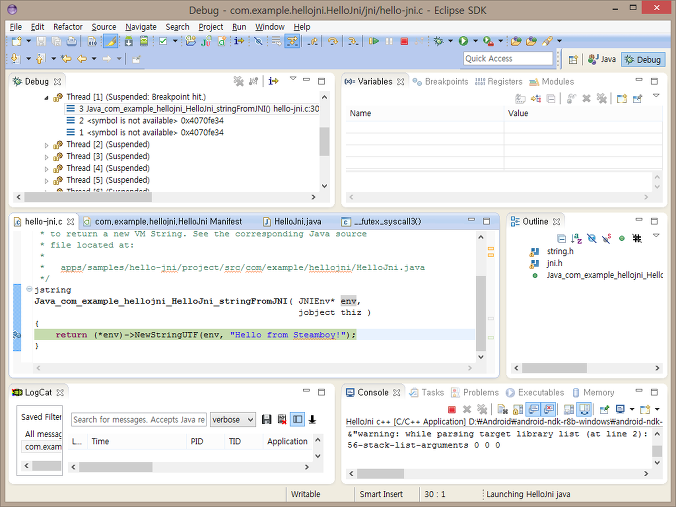
HelloJni c++ 디버그 실행.
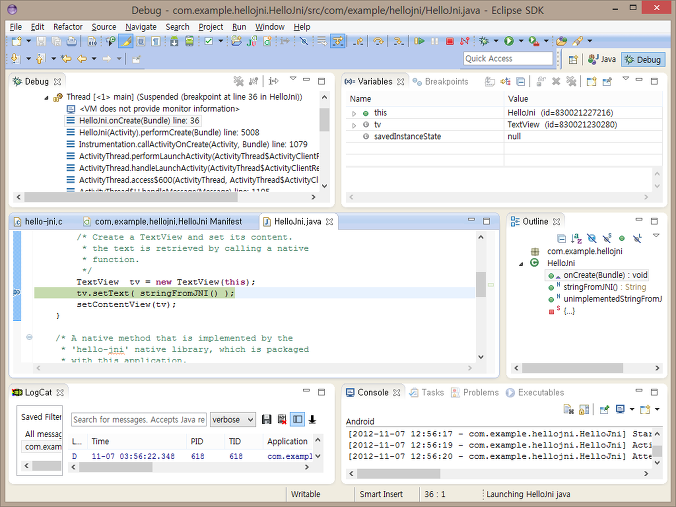
디버깅 진행.
- 완료.
========================================================================================
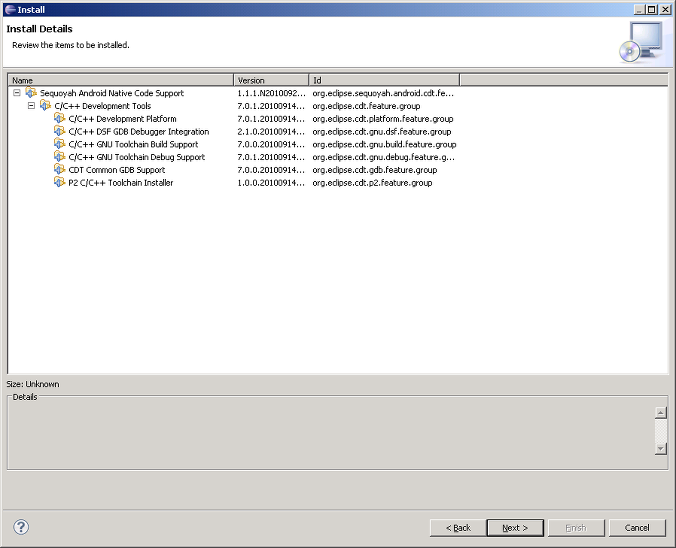
- 이클립스 JAVA,c++ 통합 CDT(C/C++ Development Tools) 플러그인 설치.
Help->Install new software
Work with: 에 juno - http://download.eclipse.org/releases/juno선택.
Programming languases 카테고리 선택.
c/c++ development tools 체크.
- windows 환경 변수 설정.
- D:\android\cygwin\bin;D:\android\android-sdk\tools;
- android sdk manager를 이용하여 업데이트.
- d:\android\android-sdk\tools\android.bat 실행.
- cocos2dx에 create-android-project.bat의 설정 변경.
set _CYGBIN=D:\Android\cygwin\bin
set _ANDROIDTOOLS=D:\Android\android-sdk\tools
set _NDKROOT=D:\Android\android-ndk-r8b-windows\android-ndk-r8b
- 관리자 모드로 명령프롬프트 실행.
- cocos2dx에 create-android-project.bat 실행.
- Cygwin\home\psc\.bash_profile에 설정.
export set NDK_ROOT="/cygdrive/d/Android/android-ndk-r8b-windows/android-ndk-r8b"
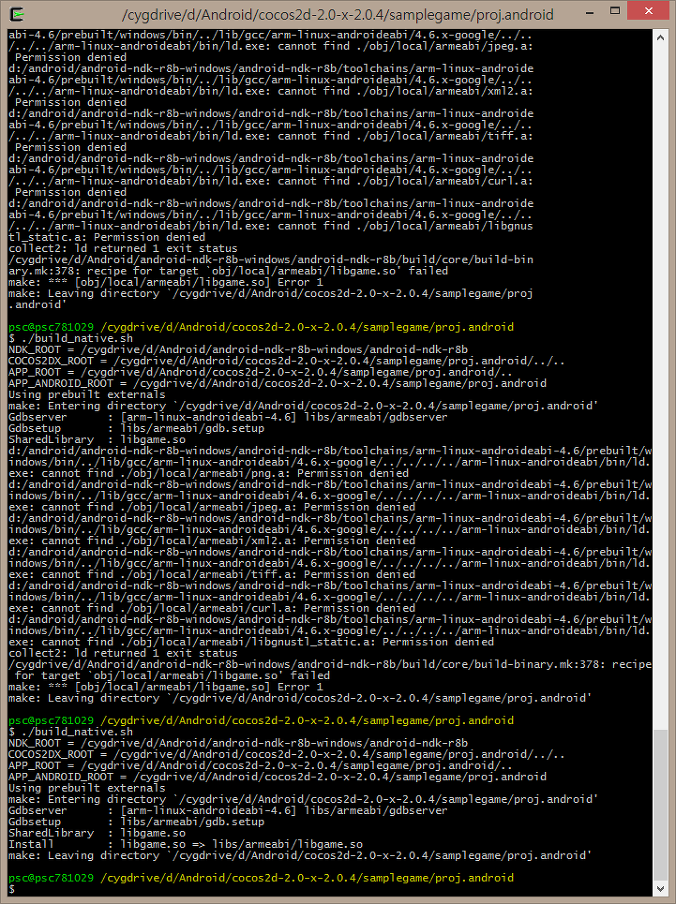
- Cygwin : cocos2dx 생성한 프로젝트 위치에서 sh build_native.sh 실행.
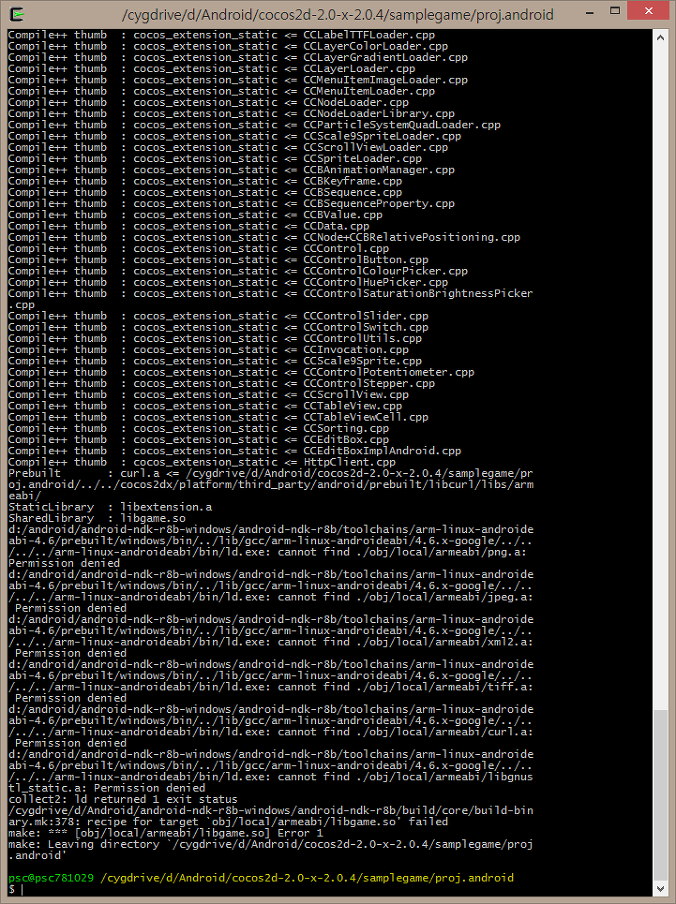
D:\Android\cocos2d-2.0-x-2.0.4\samplegame\proj.android\obj에 보안설정에서 읽기쓰기 권한을 준후, 다시 빌드.
- 이클립스.
File->New->Project- Android-Android Project from Existing Code
- 프로젝트의 속성 설정.
java Compiler -> Compiler compliance level: 을 1.6 선택.
- 이클립스의 Package Explorer에서 cocos2dx 라이브러리 import.
/- !
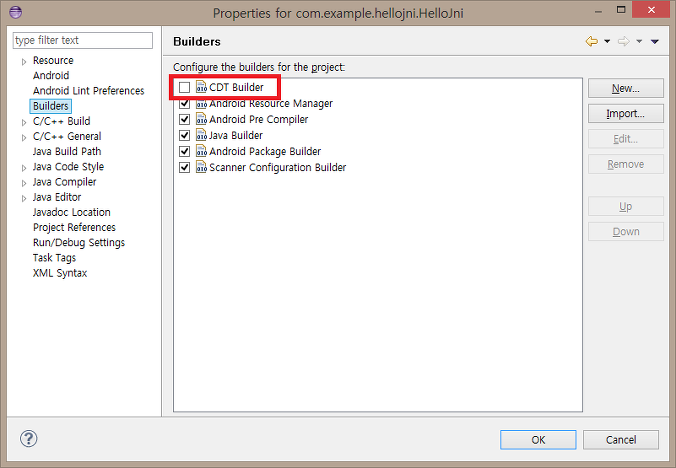
- c/c++ 프로젝트로 컨버팅.
c/c++build에 NDK_ROOT라는 환경변수 추가. D:\Android\android-ndk-r8b
c/c++build 에 bash D:/Android/cocos2d-2.0-x-2.0.3/testcocos/proj.android/build_native.sh NDK_DEBUG=1 V=1
빌드 디렉토리도 설정.
C++ include 경로들을 추가한다.
소스로케이션에 classes 를 추가한다.
*-
- avd 메니져에 gpu 에뮬레이터 기능 추가. yes로 설정
- ndk-gdb 실행시 아래와 같이 오류가 난다면 D:\Android\cocos2d-2.0-x-2.0.4 SimpleGame\proj.android\jni\Android.mk
파일에서 include $(BUILD_SHARED_LIBRARY) 다음줄에 아래의 내용을 넣어준다.
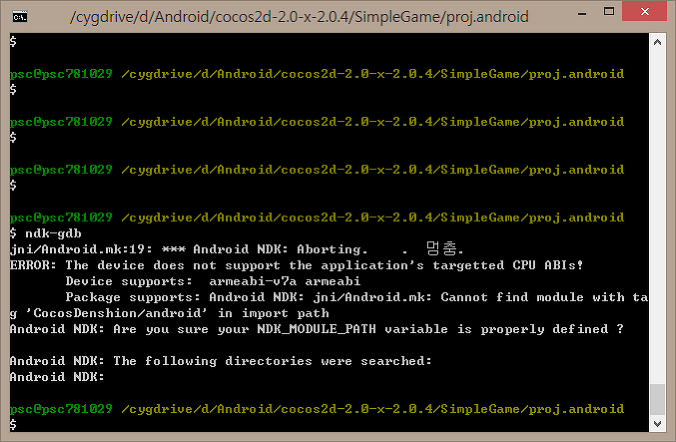
$(call import-add-path,/cygdrive/d/Android/cocos2d-2.0-x-2.0.4)
$(call import-add-path,/cygdrive/d/Android/cocos2d-2.0-x-2.0.4/cocos2dx/platform/third_party/android/prebuilt)
ndk-gdb --start --verbose --force
=================================
=================================
=================================
출처: http://mooyou.tistory.com/52
이클립스에서 NDK 디버깅하기
Posted 2012/11/01 11:49, Filed under: 개발이야기/Android
1. CDT 설치
The NDK plugin currently works with CDT 7.0.2 or CDT 8.0.2.
|

2. NDK 플러그인 사용
| 1. First set the path to SDK and NDK: Eclipse -> Window -> Preferences -> Android -> set path to SDK Eclipse -> Window -> Preferences -> Android -> NDK -> set path to the NDK 2. Right click on an Android project and select Android Tools -> Add native support. Note that you will not be able to add native support if the project already has C/C++ nature. At this point, you will be able to build your applications using Project -> Build All. |
3. NDK 디버깅
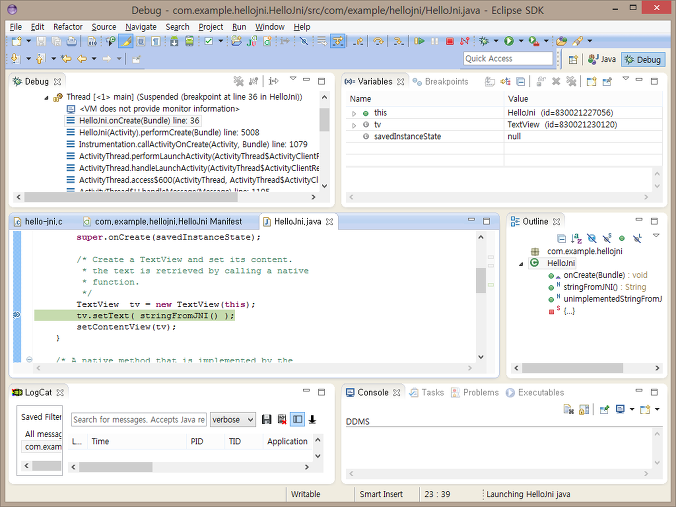
| 1. Update your build config to include “NDK_DEBUG = 1”. Right click project -> properties -> C/C++ Build: 2. Set a breakpoint in your C code. 3. Right click on your project, select Debug As -> Android Native Application Note: There is a delay of a few seconds between when the activity is launched and when native debugging starts. If your code is already executed by that point, then you won’t see the breakpoint being hit. So either put a breakpoint in code that is called repetitively, or make sure that you call JNI code after you see that ndk-gdb has connected. |
4. 이클립스 환경설정
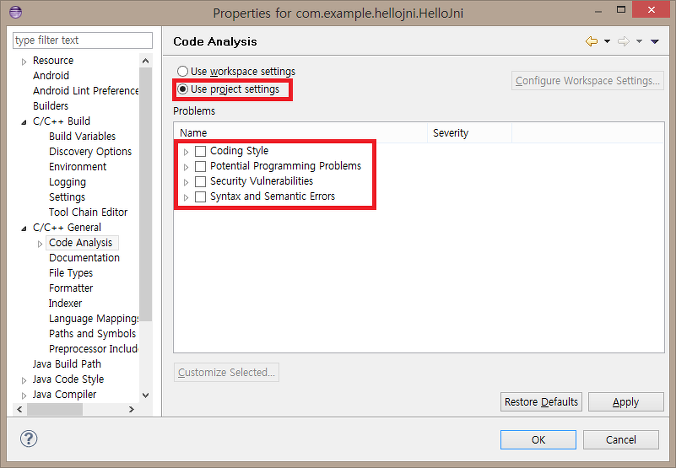
| Eclipse -> Window -> Preferences -> C/C++ -> Code Analysis Syntax and semantic Errors 체크 해제 (체크 해제 안할 경우 구문에러 인식하여 빌드되지 않습니다.) |
참조: http://tools.android.com/recent/usingthendkplugin
이클립스에서 NDK 디버깅하기 (1)
| 2012/11/01 |
Tag : CDT, Debug, debugging, Eclipse, NDK, NDK 디버깅, 디버깅, 이클립스
Response : 0 Trackback , 1 Comment
Trackback URL : http://mooyou.tistory.com/trackback/52


- # mooyou 2012/11/01 12:09 Delete Reply
- 직접 적용하여 NDK 디버깅을 해보니 정말 편리한데요 다음과 같은 특징이 있습니다.
1. 이클립스에서 안드로이드 어플리케이션을 빌드할때 so도 같이 빌드되어 적용됩니다.
(so를 빌드하기 위해 cmd 또는 cygwin을 사용하지만 그럴 필요가 없습니다.)
2. C/C++ 문법 에러 표시가 되며, 약간의 인텔리센스 기능을 지원합니다. (ctrl + space)
3. 이클립스에서 C/C++ 코드에 브레이크 포인트를 설정하고 자바와 마찬가지로 디버깅이 가능합니다.
(기존 NDK 디버깅은 logcat을 이용하거나, ndk-gdb를 사용하여 GUI환경이 아닌 커멘트 환경에서 디버깅을 하였습니다.)
=================================
=================================
=================================
출처: http://codepedia.tistory.com/115
NDK 개발환경 구축하기 (Eclipse + Cygwin + C++ plugin + Sequoyah plugin) (Android) 2012/01/05 13:17
플러그인 설치 및 환경 구성
원문 사이트 : http://www.permadi.com/blog/2011/09/setting-up-android-jni-projects-in-windows-eclipse-and-sequoyah/
1. eclipse 설치
- eclipse 검색하여 기본으로 설치 한다.
//이클립스 버전에 따라 /indigo 또는 /helio 또는 /juno 이런식으로 써주어야 할 때두 있다.
//그리고 사이트 http://download.eclipse.org/releases/indigo 해야지만 보이는 옵션두 있다 꼼꼼히 살펴보자
2. C++ plugin 설치
- Eclipse 메뉴 > Help > Install New Software...
- Indigo - http://download.eclipse.org/releases/indigo 를 선택
- Programming Languages > C/C++ Development Tools 설치
3. Sequoyah plugin 설치
- Eclipse 메뉴 > Help > Install New Software...
- Indigo - http://download.eclipse.org/releases/indigo 를 선택
- Mobile and Device Development > Sequoyah로 시작하는 것 모두 설치
4. Cygwin 설치
- cygwin 검색하여 기본으로 설치 한다.
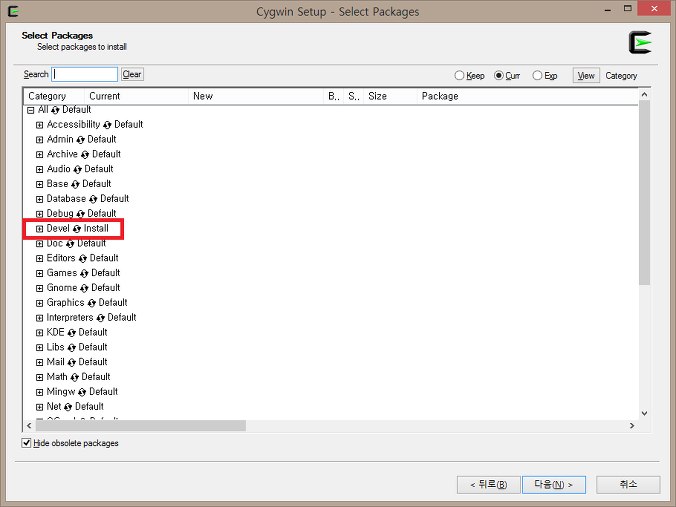
- 설치 항목
- devel/make
- window 환경변수에 cygwin의 bin 디렉토리 설정

5. Android ndk 설치
- android ndk 검색하여 기본으로 설치 한다.
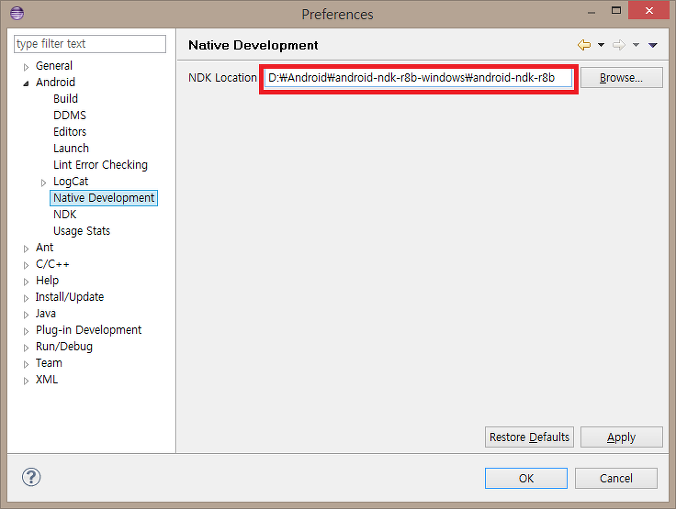
- Eclipse 메뉴 > Window > Preerences > Android > Native Development 에 ndk 설치 디렉토리 설정
프로젝트 생성 및 컴파일
1. Android Project 생성
- Android Project를 생성한다.
2. Android Native Project 생성
- Package Explorer view 에서 프로젝트를 선택 후 마우스 우클릭으로 팝업메뉴 확장
- Android Tools > Add Native Support ... 선택하여 Native Project 생성
3. Native Project 컴파일
- Package Explorer view > 팝업메뉴 > Build Project
- 컴파일 에러 발생
4. Build Config 설정
- Package Explorer view > 팝업메뉴 > Build Path > Configure Build Path
- C/C++ Build의 Buid command 의
bash ndk-build 를
bash android ndk directory\ndk-build 로 수정
=================================
=================================
=================================
출처: http://www.eclipse.org/sequoyah/documentation/native_debug.php
- 0) Sequoyah Native Debug feature must be installed.
You can install it from Sequoyah update site: 
It will install CDT's dependencies if needed:-
- 1) The platform must be Android 2.2 (android-8)
- 2) The ndk version must be r4b (it contains bugfixes to ndk-gdb that are necessary)
- 3) Eclipse CDT 7.0 or newer must be installed
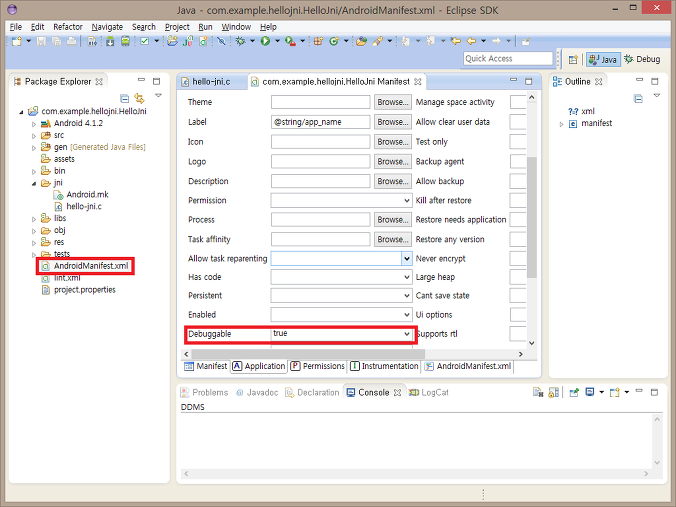
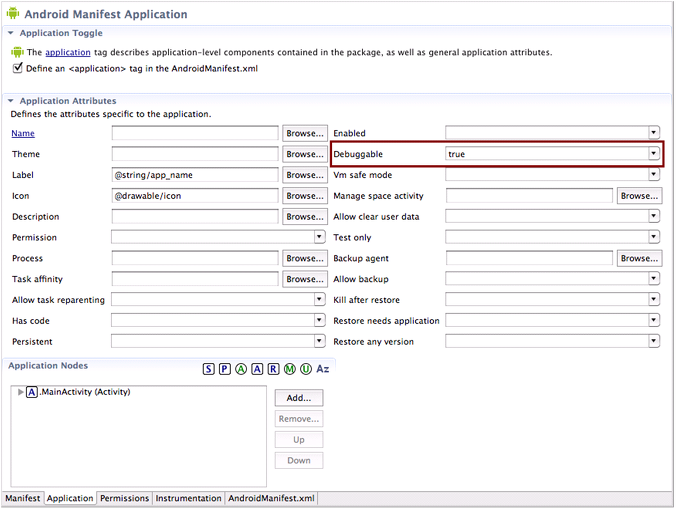
- 4) The AndroidManifest.xml must have the property of the application node android:debuggable="true":
- 5) The build must have been done with the ndk-build (if using the Sequoyah Android components, it will be automatic)
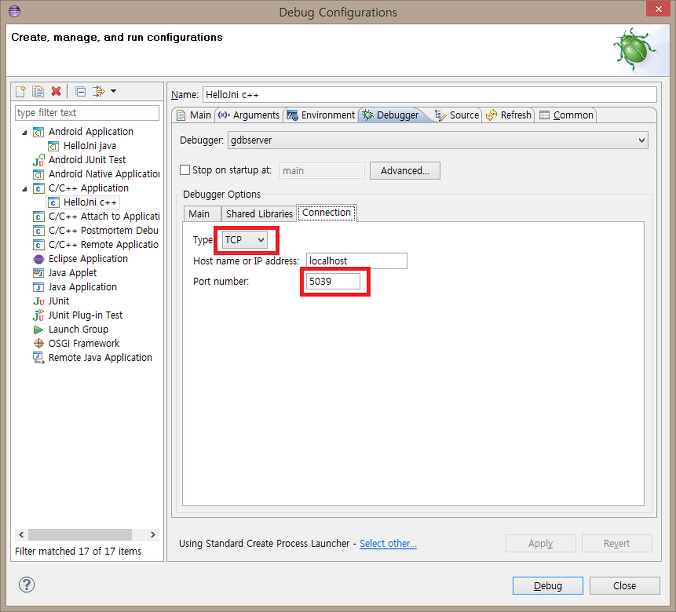
Configurations
- 01) Create a debug configuration for an Android application (can be done with Eclipse or MOTODEV Studio)
- 02) Create a debug configuration for a C/C++ application
- 03) Set the following properties:
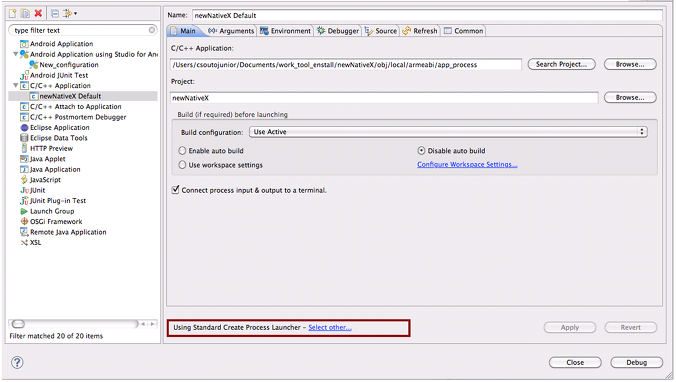
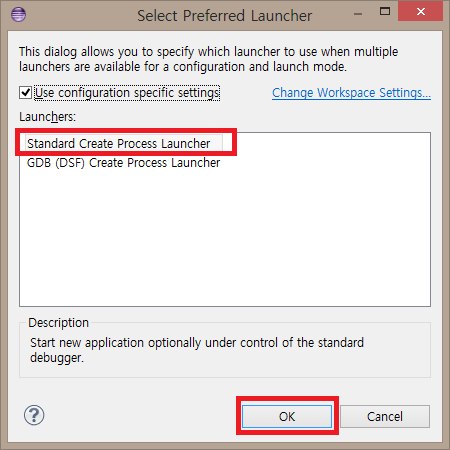
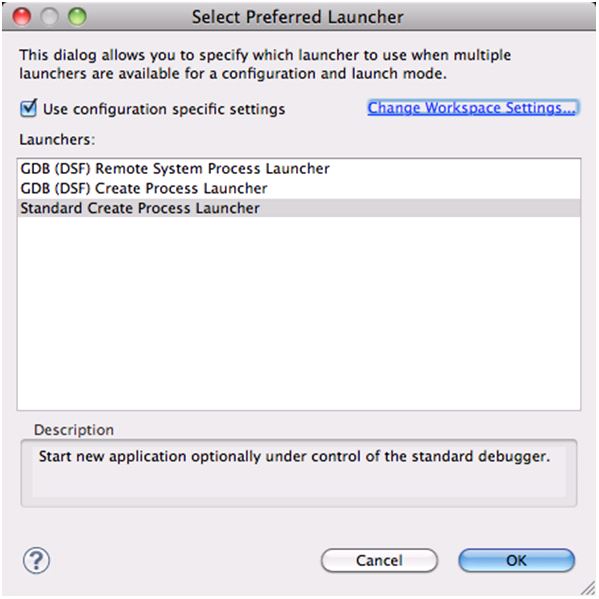
- 04) The process launcher must be the Standard Process Launcher. This is selected at the bottom of the Main tab:
- 05) On the "Main" tab:
the Field C/C++ Application: $PROJECT_PATH/obj/local/armeabi/app_process - 06) On the "Debugger" tab:
- field Debugger: gdbserver
- On the "Main" subtab:
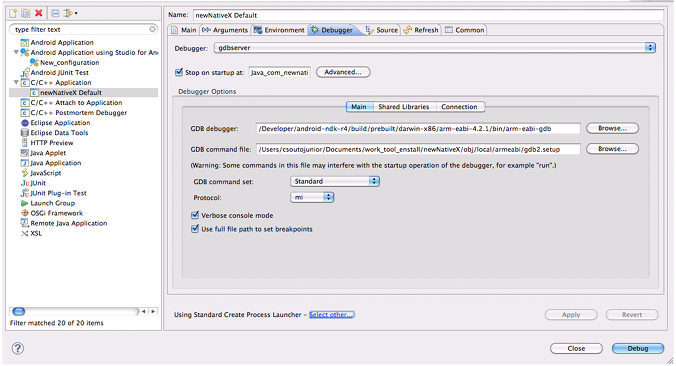
- 07) GDB debugger: $NDK_PATH/build/prebuilt/$ARCH/arm-eabi-$GCC_VERSION/bin/arm-eabi-gdb
- 08) GDB command file: $PROJECT_PATH/obj/local/armeabi/gdb2.setup
[Windows users] Uncheck the "Use full file path to set breakpoints" option - On the "Connection" subtab:
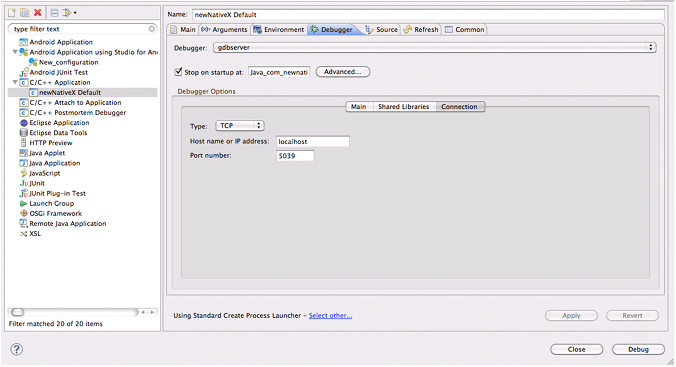
- 09) Type: TCP
- 10) Hostname or IP address: localhost
- 11) Port number: 5039
nstructions
- Open the ndk-gdb script that came with the android NDK and comment the last line
(we are not calling the usual gdb client, but we will attach an Eclipse gdb session instead):
# $GDBCLIENT -x $GDBSETUP -e $APP_PROCESS - Insert a breakpoint in your Java code, preferably after all System.loadLibrary() calls.
(To make sure that the debugger is correctly attached to the Java process) - Launch the android debug and wait for it to reach the breakpoint
- From a Terminal session, in the project folder, run the modified ndk-gdb command. It should not attach
to an gdb client, but call the gdbserver on the emulator and open a TCP port for connection. - In the $PROJECT_PATH/obj/local/armeabi/, modify the gdb.setup file, removing the target remote:5039 statement.
(For some reason, the Eclipse GDB session does not like this statement being done in the commands file)
Rename this new file to gdb2.setup. This step need to be run just once, on the first debug session.
(I am working on further tweaking the ndk-gdb script to generate the gdb.setup file without the target statement,
but for the time being, this workaround will work) - Launch the C/C++ Application debug and wait for the Eclipse GDB session
to fully connect to the emulator's gdbserver instance
- After following these steps, one can continue to debug the application as usual, using the "continue" option
- to let the execution flow until the next breakpoint is hit or by using the usual "step-in" to execute each statement
- individually. Setting a breakpoint on a Java statement that calls a native function through JNI and stepping
- into will place the user at the beginning of the native code.
=================================
=================================
=================================
출처: http://blog.naver.com/winkaery?Redirect=Log&logNo=140161779468
C++로 작성된 cocos2d-x 는
이클립스에서 디버깅시
에러 발생하면 이게 뭔 에런지 ... 막막해 진다.
간단하게 에러 덤프 하는 방법을 적어 둔다
일단 설치된 안드로이드 경로를 배쉬에 추가한다
쉘)touch .bash_profile
쉘)export PATH=${PATH}:/안드로이드설치경로/android/platform-tools
쉘)export PATH=${PATH}:/안드로이드설치경로/android/tools
이후 에러발생하여 죽었을 경우 쉘에서 덤프하여 볼수 있다.
쉘) adb logcat | ndk-stack -sym /Users/hyungminkim/cocos2d-10/toyshotunlimitedskt/android/obj/local/armeabi
쉘) adb logcat | ndk-stack -sym /해당프로젝트경로/android/obj/local/armeabi
해당 프로젝트 경로를 적어 준다.
이거 몰랐을땐 정말 답답했었는데 ㅠ_ㅠ
=================================
=================================
=================================
'스마트기기개발관련 > OpenGL (그래픽, 게임)' 카테고리의 다른 글
| android 안드로이드 오픈지엘 OpenGL ES 2.0 효과, api 등등 (1) | 2020.09.18 |
|---|---|
| 안드로이드 Android ndk 오픈지엘 OpenGL ES LoadTexture 관련 (0) | 2020.09.18 |
| 안드로이드 오픈지엘 OpenGL ES 2.0 매핑 투영 카메라 관련 (0) | 2014.06.11 |
| 안드로이드 Android 오픈지엘 OpenGL 사용 시 Antialiasing 작용 관련 (0) | 2012.11.13 |
| 안드로이드 Android FPS 구하기 타이머 관련 (0) | 2012.11.13 |


댓글 영역