=================================
=================================
=================================

[안드로이드 / OpenGL] 마치 2D 좌표계인 것처럼 그림 그리기
개발자 이야기/안드로이드 2012/01/02 16:30
OpenGL ES는 3차원 공간입니다. 하지만, 2D 좌표계처럼 사용하고 싶을 때가 있습니다.
그럴 때는 당연히 x, y, z 좌표중 z 좌표를 0으로 세팅하고 사용을 하겠죠.
하지만, 좌표만 바꾼다고 단말기 스크린(Screen)의 픽셀 좌표 1개가 OpenGL 상의 원하는 좌표가
되지 않을 경우가 많습니다.
이 때는 ViewPort를 적절하게 잘 조절을 해줘야 합니다.
그러기 위해서는 다음과 같이 세팅하면 됩니다.
gl.glOrthof(0, 480, 0, 800, 1, -1);
이 때 값들은 480x800 해상도를 가진 단말기 기준입니다.
그런데, 이 경우는 y좌표가 단말기 위쪽으로 갈수록 커지고 단말기 아래쪽이 0이 됩니다.
우리가 흔히 사용하는 GUI 좌표에서는 y좌표가 위쪽이 0이고, 아래로 갈수록 커지죠.
즉, 이 때는 이렇게 할 수 있습니다.
gl.glOrthof(0, 480, 800, 0, 1, -1);

자, 그러면 이 픽셀 좌표에 맞게 삼각형을 그리는 전체 소스를 한 번 보겠습니다.
SnowOpenGLESActivity.java
package snowdeer.opengles.test;

import android.app.Activity;

import android.opengl.GLSurfaceView;

import android.os.Bundle;

import android.view.Window;

import android.view.WindowManager;

public class SnowOpenGLESActivity extends Activity

{

    private GLSurfaceView m_gsView = null;

    @Override

    public void onCreate(Bundle savedInstanceState)

    {

        super.onCreate(savedInstanceState);

        requestWindowFeature(Window.FEATURE_NO_TITLE);

        getWindow().setFlags(WindowManager.LayoutParams.FLAG_FULLSCREEN,
        WindowManager.LayoutParams.FLAG_FULLSCREEN);

        m_gsView = new GLSurfaceView(this);

        m_gsView.setRenderer(new SnowRenderer());

        setContentView(m_gsView);

    }

    @Override

    protected void onPause()

    {

        super.onPause();

        m_gsView.onPause();

    }

    @Override

    protected void onResume()

    {

        super.onResume();

        m_gsView.onResume();

    }

}
SnowRenderer.java
package snowdeer.opengles.test;

import javax.microedition.khronos.egl.EGLConfig;

import javax.microedition.khronos.opengles.GL10;

import android.opengl.GLSurfaceView.Renderer;

public class SnowRenderer implements Renderer

{

    private SnowTriangle m_SnowTriangle = null;

    public SnowRenderer()

    {

        m_SnowTriangle = new SnowTriangle();

    }

    public void onDrawFrame(GL10 gl)

    {

        gl.glClear(GL10.GL_COLOR_BUFFER_BIT | GL10.GL_DEPTH_BUFFER_BIT);

        gl.glLoadIdentity(); // Matrix 리셋

        gl.glTranslatef(0.0 f, 0.0 f, 0.0 f);

        m_SnowTriangle.draw(gl);

    }

    public void onSurfaceChanged(GL10 gl, int width, int height)

    {

        if (height == 0)

        {

            height = 1; // 0으로 나누는 것을 방지하기 위해서

        }

        gl.glViewport(0, 0, width, height); // ViewPort 리셋

        gl.glMatrixMode(GL10.GL_PROJECTION); // MatrixMode를 Project Mode로

        gl.glLoadIdentity(); // Matrix 리셋

        // 윈도우의 Aspect Ratio 설정

        gl.glOrthof(0, 480, 800, 0, 1, -1);

        gl.glMatrixMode(GL10.GL_MODELVIEW); // Matrix를 ModelView Mode로 변환

        gl.glLoadIdentity(); // Matrix 리셋

    }

    public void onSurfaceCreated(GL10 gl, EGLConfig config)

    {

        gl.glShadeModel(GL10.GL_SMOOTH); // Smooth Shading이 가능하도록 설정

        gl.glClearColor(0.0 f, 0.0 f, 0.0 f, 1.0 f); // 하얀 바탕 그리기

        gl.glClearDepthf(1.0 f); // Depth Buffer 세팅

        gl.glEnable(GL10.GL_DEPTH_TEST); // Depth Test 가능하도록 설정

        gl.glDepthFunc(GL10.GL_LEQUAL); // The Type Of Depth Testing

        // glHint 설정

        gl.glHint(GL10.GL_PERSPECTIVE_CORRECTION_HINT, GL10.GL_NICEST);

    }

}
SnowTriangle.java
package snowdeer.opengles.test;

import java.nio.ByteBuffer;

import java.nio.ByteOrder;

import java.nio.FloatBuffer;

import javax.microedition.khronos.opengles.GL10;

public class SnowTriangle

{

    private FloatBuffer m_vertexBuffer;

    // 삼각형 좌표 입력

    private float vertices[] = {
        0.0 f,
        0.0 f,
        0.0 f,

        240.0 f,
        800.0 f,
        0.0 f,

        480.0 f,
        0.0 f,
        0.0 f,
    };

    public SnowTriangle()

    {

        ByteBuffer byteBuf = ByteBuffer.allocateDirect(vertices.length * 4);

        byteBuf.order(ByteOrder.nativeOrder());

        m_vertexBuffer = byteBuf.asFloatBuffer();

        m_vertexBuffer.put(vertices);

        m_vertexBuffer.position(0);

    }

    public void draw(GL10 gl)

    {

        gl.glFrontFace(GL10.GL_CW); // 시계방향 그리기 설정

        // VertexPointer 설정

        gl.glVertexPointer(3, GL10.GL_FLOAT, 0, m_vertexBuffer);

        // Vertex Array 사용 가능하도록 설정

        gl.glEnableClientState(GL10.GL_VERTEX_ARRAY);

        // 삼각형 Strip 그리기

        gl.glDrawArrays(GL10.GL_TRIANGLE_STRIP, 0, vertices.length / 3);

        // Vertex Array 사용 상태를 다시 불가능하도록 설정

        gl.glDisableClientState(GL10.GL_VERTEX_ARRAY);

    }

}
=================================
=================================
=================================
출처: http://gogorchg.tistory.com/entry/Android-Opengl-es-20-LoadTexture
1.0에서는 Texture에 Bitmap 파일만 넣어주면, Android에서 알아서 바꿔주었었다.
아주 간편하게 Texture를 적용 시킬 수가 있었습니다.
(안에서 어떻게 돌아가든 관계 없어..)
하지만, 2.0에서는 모든 것을 개발자에게 맡기게 되어있죠.
구글링을 해본 결과 , 안드로이드의 Bitmap 값은 ARGB로 32bit 픽셀로 되어 있다고 합니다.
하지만, Opengl은 RGBA로 되어 있어서 컨버팅 할 필요가 생긴거죠.
그래서 2.0에서는 glTexture2D 의 매개변수가 Buffer로 되어 있는 겁니다.
결과적으로 Texture에 Bitmap을 로드 시킬 때 다음과 같은 코드 형식으로 하면 되겠네요.
 private static int loadTexture(InputStream is)
    {
        int[] textureId = new int[1];
        Bitmap bitmap;
        bitmap = BitmapFactory.decodeStream(is);

        ByteBuffer byteBuffer = ByteBuffer.allocateDirect(bitmap.getWidth() * bitmap.getHeight() * 4);
        byteBuffer.order(ByteOrder.BIG_ENDIAN);
        IntBuffer ib = byteBuffer.asIntBuffer();

        int[] pixels = new int[bitmap.getWidth() * bitmap.getHeight()];
        bitmap.getPixels(pixels, 0, bitmap.getWidth(), 0, 0, bitmap.getWidth(), bitmap.getHeight());
        for(int i=0; i<pixels.length; i++){
            ib.put(pixels[i] << 8 | pixels[i] >>> 24);
        }

        bitmap.recycle();

        byteBuffer.position(0);
        GLES20.glGenTextures ( 1, textureId, 0 );
        GLES20.glBindTexture ( GLES20.GL_TEXTURE_2D, textureId[0] );

        GLES20.glTexImage2D ( GLES20.GL_TEXTURE_2D, 0, GLES20.GL_RGBA, bitmap.getWidth(), bitmap.getHeight(), 0,
                              GLES20.GL_RGBA, GLES20.GL_UNSIGNED_BYTE, byteBuffer );

        GLES20.glTexParameteri ( GLES20.GL_TEXTURE_2D, GLES20.GL_TEXTURE_MIN_FILTER, GLES20.GL_LINEAR );
        GLES20.glTexParameteri ( GLES20.GL_TEXTURE_2D, GLES20.GL_TEXTURE_MAG_FILTER, GLES20.GL_LINEAR );
        GLES20.glTexParameteri ( GLES20.GL_TEXTURE_2D, GLES20.GL_TEXTURE_WRAP_S, GLES20.GL_CLAMP_TO_EDGE );
        GLES20.glTexParameteri ( GLES20.GL_TEXTURE_2D, GLES20.GL_TEXTURE_WRAP_T, GLES20.GL_CLAMP_TO_EDGE );

        return textureId[0];
    }

출처 : http://andytsui.wordpress.com/2011/04/19/texture-loading-on-android-open-gl-es-2-0/
=================================
=================================
=================================
출처: http://gogorchg.tistory.com/entry/Android-Opengl-es-20-Texture-Setting
[Android Opengl es 2.0 ] Texture Setting.
///
//  Load texture from resource
//
private int loadTexture(InputStream is, int texId)
{

    /*

         * Create our texture. This has to be done each time the

         * surface is created.

         */

    int[] textures = new int[1];

    if (texId == 0)

        GLES20.glGenTextures(1, textures, 0);

    else

        textures[0] = texId;

    int mTextureID = textures[0];

    GLES20.glBindTexture(GLES20.GL_TEXTURE_2D, mTextureID);

    GLES20.glTexParameterf(GLES20.GL_TEXTURE_2D, GLES20.GL_TEXTURE_MIN_FILTER,

        GLES20.GL_NEAREST);

    GLES20.glTexParameterf(GLES20.GL_TEXTURE_2D,

        GLES20.GL_TEXTURE_MAG_FILTER,

        GLES20.GL_LINEAR);

    GLES20.glTexParameteri(GLES20.GL_TEXTURE_2D, GLES20.GL_TEXTURE_WRAP_S,

        GLES20.GL_REPEAT);

    GLES20.glTexParameteri(GLES20.GL_TEXTURE_2D, GLES20.GL_TEXTURE_WRAP_T,

        GLES20.GL_REPEAT);

    Bitmap bitmap;

    try {

        bitmap = BitmapFactory.decodeStream(is);

        bitmap = Bitmap.createScaledBitmap(bitmap, getMinPowerByTwo(bitmap.getWidth()), getMinPowerByTwo(bitmap.getHeight()), false);

    } finally {

        try {

            is.close();

        } catch (IOException e) {

            // Ignore.

        }

    }

    GLUtils.texImage2D(GLES20.GL_TEXTURE_2D, 0, bitmap, 0);

    bitmap.recycle();

    return mTextureID;

}
전,, Buffer로 꼭 넣어야만 Opengl es 2.0 에서 Bitmap을 Texture에 넣을 수 있는줄 알았습니다.
http://gogorchg.tistory.com/entry/Android-Opengl-es-20-LiveWallpaper-%EC%97%90%EC%84%9C-%EC%82%AC%EC%9A%A9-%EC%8B%9C-onSurfaceCreated-%EB%AC%B8%EC%A0%9C
하지만, 위 소스 같이 예전 opengl es 1.1에서 했던 형태로 해도 문제가 없습니다.
잘못된 정보를 알려드려 죄송합니다. ;;;;
=================================
=================================
=================================
[Android Opengl es 2.0 ] 여러 Object를 한 번에 그리기.
| 나의 플랫폼/안드로이드 2011/11/07 16:58
Posted by GsBOB
코딩을 하는 도중... 만약에 1000개 이상의 Object들을 한꺼번에 그릴 려고 할 때,
For문으로 1000개를 돌려야 할까요???? 개발 요구사항에 따라 다르겠지만,
만약 전체적인 회전이나 컬러 알파 정도는 수정할 수 있는 방법이 있었습니다.
바로!!! 1000개의 Object의 Vertex를 지정하고,
한번에 그리는 것입니다.!!! ( 제가 초보라서.. 이제 알게됨..^^;)
Vertex와 Index 배열을 잘 이용하면 쉽게 그릴 수 있습니다.
먼저 테스트 해본 배열은
 private final float[] mVerticesData = {

            // X, Y, Z, U, V,alpha,colorR,colorG,colorB,colorA

    		 0.0f, 0.5f, 0, 1.0f, 0.0f,1.0f,0.0f,0.0f,1.0f,1.0f,    // 0
    		-0.5f, 0.5f, 0, 0.0f, 0.0f,1.0f,0.0f,0.0f,1.0f,1.0f,    // 1
    		-0.0f, 1.0f, 0, 1.0f, 1.0f,1.0f,0.0f,0.0f,1.0f,1.0f,    // 2
    		-0.5f, 1.0f, 0, 0.0f, 1.0f,1.0f,0.0f,0.0f,1.0f,1.0f,    // 3

    		 0.0f, 0.0f, 0, 1.0f, 0.0f,0.0f,1.0f,1.0f,1.0f,1.0f,    // 4
    		-0.5f, 0.0f, 0, 0.0f, 0.0f,0.0f,1.0f,1.0f,1.0f,1.0f,    // 5
    		-0.0f, 0.5f, 0, 1.0f, 1.0f,0.0f,1.0f,1.0f,1.0f,1.0f,    // 6
    		-0.5f, 0.5f, 0, 0.0f, 1.0f,0.0f,1.0f,1.0f,1.0f,1.0f,    // 7

    		 0.0f,-0.5f, 0, 1.0f, 0.0f,1.0f,1.0f,1.0f,1.0f,1.0f,    // 8
    		-0.5f,-0.5f, 0, 0.0f, 0.0f,1.0f,1.0f,1.0f,1.0f,1.0f,    // 9
    		-0.0f, 0.0f, 0, 1.0f, 1.0f,1.0f,1.0f,1.0f,1.0f,1.0f,    // 10
    		-0.5f, 0.0f, 0, 0.0f, 1.0f,1.0f,1.0f,1.0f,1.0f,1.0f,    // 11
     };


    private short[] indices = {

    		0, 1, 2, 2, 1, 3,                  // 첫번째 4각형
    		4, 5, 6, 6, 5, 7,                  // 두번째 4각형
    		8, 9, 10, 10, 9, 11,               //  세번째 4각형

    		};
주석에 적어 놓은 것과 같이, vertex 포인터 위치, 알파값 , 색깔 값으로 지정이 되어 있습니다.
[Shader 코드] : VertexShader에는 위치 값을 FrameShader에는 알파와 색깔 값을 설정
private final String mVertexShader =
        "uniform mat4 uMVPMatrix;\n" +
        "attribute vec4 aPosition;\n" +
        "attribute vec2 aTextureCoord;\n" +
        "varying vec2 vTextureCoord;\n" +
        "attribute float aAlpha;\n" +
        "varying float vAlpha; \n" +
        "attribute vec4 aColor;\n" +
        "varying vec4 vColor; \n" +


        "void main() {\n" +
        "  gl_Position = uMVPMatrix * aPosition;\n" +
        "  vTextureCoord = aTextureCoord;\n" +
        "  vAlpha = aAlpha;\n" +
        "  vColor = aColor;\n" +
        "}\n";


    private final String mFragmentShader =
        "precision mediump float;\n" +
        "varying vec2 vTextureCoord;\n" +
        "varying float vAlpha; \n" +
        "varying vec4 vColor; \n" +
        "uniform sampler2D sTexture;\n" +
        "void main() {\n" +
        "  gl_FragColor = texture2D(sTexture, vTextureCoord)*vColor*vAlpha;\n" +
        "}\n";
[ Attribute 적용 코드 ] : 버퍼로 초기화를 해준 후, 각각 Attribute에 할당
mTriangleVertices = ByteBuffer.allocateDirect(mTriangleVerticesData.length
                * FLOAT_SIZE_BYTES).order(ByteOrder.nativeOrder()).asFloatBuffer();
        mTriangleVertices.put(mTriangleVerticesData).position(0);


        mTriangleIndics = ByteBuffer.allocateDirect(indices.length
                * FLOAT_SIZE_BYTES).order(ByteOrder.nativeOrder()).asShortBuffer();
        mTriangleIndics.put(indices).position(0);


        mTriangleVertices.position(TRIANGLE_VERTICES_DATA_POS_OFFSET);
        GLES20.glVertexAttribPointer(maPositionHandle, 3, GLES20.GL_FLOAT, false,
                TRIANGLE_VERTICES_DATA_STRIDE_BYTES, mTriangleVertices);

        checkGlError("glVertexAttribPointer maPosition");
        GLES20.glEnableVertexAttribArray(maPositionHandle);
        checkGlError("glEnableVertexAttribArray maPositionHandle");


        mTriangleVertices.position(TRIANGLE_VERTICES_DATA_UV_OFFSET);
        GLES20.glVertexAttribPointer(maTextureHandle, 2, GLES20.GL_FLOAT, false,
                TRIANGLE_VERTICES_DATA_STRIDE_BYTES, mTriangleVertices);

        checkGlError("glVertexAttribPointer maTextureHandle");
        GLES20.glEnableVertexAttribArray(maTextureHandle);
        checkGlError("glEnableVertexAttribArray maTextureHandle");

        mTriangleVertices.position(TRIANGLE_VERTICES_DATA_COLOR_OFFSET);
        GLES20.glVertexAttribPointer(maColorHandle, 4, GLES20.GL_FLOAT, false,
                TRIANGLE_VERTICES_DATA_STRIDE_BYTES, mTriangleVertices);

        checkGlError("glVertexAttribPointer maColorHandle");
        GLES20.glEnableVertexAttribArray(maColorHandle);
        checkGlError("glEnableVertexAttribArray maColorHandle");


        mTriangleVertices.position(TRIANGLE_VERTICES_DATA_ALPHA_OFFSET);
        GLES20.glVertexAttribPointer(maAlphaHandle, 1, GLES20.GL_FLOAT, false,
                TRIANGLE_VERTICES_DATA_STRIDE_BYTES, mTriangleVertices);

        checkGlError("glVertexAttribPointer maAlphaHandle");
        GLES20.glEnableVertexAttribArray(maAlphaHandle);
        checkGlError("glEnableVertexAttribArray maAlphaHandle");
[ Draw 부분] : 3개의 Object에 한 개당 6개의 index 포인트가 있으므로 18을 설정
GLES20.glDrawElements ( GLES20.GL_TRIANGLES, 18, GLES20.GL_UNSIGNED_SHORT, mTriangleIndics );
결과 화면
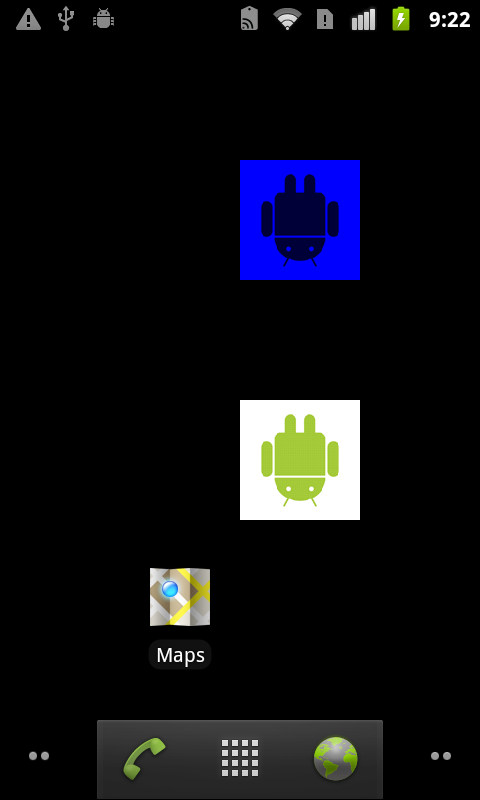
이 소스는 Apidemo에 있는 opengl2.0 샘플을 변경 한 것입니다
render 소스만 첨부 할터이니~ 참고하세요^^
=================================
=================================
=================================
[ Android Opengl es 2.0 ] 여러 Texture를 사용할 때
| 나의 플랫폼/안드로이드 2011/12/13 11:14
Posted by GsBOB
GLES20을 보면 Texture의 갯수를 30개 까지 설정을 할 수 있는 것 같이..(?) ㅋ 위치 변수가 있다.
하지만, 제가 경험해 본 일 중에.... 8개 이상의 Texture를 할당할 경우...
// Texture 위치
mObjTexLoc = GLES20.glGetUniformLocation ( mProgramObject, "s_texture" );
// Object Texture 설정
GLES20.glActiveTexture ( GLES20.GL_TEXTURE0 );
GLES20.glBindTexture ( GLES20.GL_TEXTURE_2D, mObjTexId0 );


GLES20.glActiveTexture ( GLES20.GL_TEXTURE1 );
GLES20.glBindTexture ( GLES20.GL_TEXTURE_2D, mObjTexId1 );


GLES20.glActiveTexture ( GLES20.GL_TEXTURE2 );
GLES20.glBindTexture ( GLES20.GL_TEXTURE_2D, mObjTexId2 );


GLES20.glActiveTexture ( GLES20.GL_TEXTURE3 );
GLES20.glBindTexture ( GLES20.GL_TEXTURE_2D, mObjTexId3 );


GLES20.glActiveTexture ( GLES20.GL_TEXTURE4 );
GLES20.glBindTexture ( GLES20.GL_TEXTURE_2D, mObjTexId4 );

....


GLES20.glActiveTexture ( GLES20.GL_TEXTURE8 );
GLES20.glBindTexture ( GLES20.GL_TEXTURE_2D, mObjTexId8 );

// Texture 이미지 셋팅
GLES20.glUniform1i ( mObjTexLoc, 0~8 );
다음과 같이 설정 할 수가 있다.
0번 부터 6번 까지는 아주 ~~ 잘되었다.
하지만.. 7번부터... 인덱스가 엉키는지.. 올바른 Texture 이미지가 나오지 않앗다.
그래서 생각해 본 것이!
6번까지는 무리없이 돌아가니~~~ 반복적으로 이용하자 이다.
Texture를 사용하는 자리에서 Texture를 액티브 시키고 바인딩 시키는 것이다.
Texture의 ID는 가지고 있으니깐.. ㅎㅎ
// Object Texture 설정
GLES20.glActiveTexture ( GLES20.GL_TEXTURE0 );
GLES20.glBindTexture ( GLES20.GL_TEXTURE_2D, mObjTexId0 );


GLES20.glActiveTexture ( GLES20.GL_TEXTURE1 );
GLES20.glBindTexture ( GLES20.GL_TEXTURE_2D, mObjTexId1 );

 ....


// Object Texture 설정
GLES20.glActiveTexture ( GLES20.GL_TEXTURE0 );
GLES20.glBindTexture ( GLES20.GL_TEXTURE_2D, mObjTexId7 );


GLES20.glActiveTexture ( GLES20.GL_TEXTURE1 );
GLES20.glBindTexture ( GLES20.GL_TEXTURE_2D, mObjTexId8 );
이렇게 하니 꼬이는 버그가 생긱지 않더군요. ㅎㅎ
이건 어디까지는 저의 경험~ ㅎㅎ
참고하세요~` ㅎ
=================================
=================================
=================================
Nexus S 이상 때부터 Opengl을 사용할 때,
본래 Bitmap 이미지의 크기를 2의 배수로 지정해주지 않으면,
그 Object를 하얗게 뿌려버리더군요.
그래서 다음과 같은 함수를 만들어서 사용을 합니다.
private int getMinPowerByTwo(int value) {

    int result = 2;

    do {

        result *= 2;

    } while (result < value);

    return result;

}
위 함수는 계속 2씩 곱해 나가다가 value 값 보다 커졌을 경우,
그 값을 리턴 시켜주는 거지요.
즉, 500x168 이라는 이미지가 있을 경우에는
위 함수를 통하여 우선 512 x256의 크기로 Bitmap을 리사이징 하고
Texture에 저장을 시킨 후,
Texture 크기를 500x168로 맞추면 되는 거죠^^
width = getMinPowerByTwo(bmp.getWidth());
height = getMinPowerByTwo(bmp.getHeight());


Bitmap tmpBmp = Bitmap.createScaledBitmap(bmp, width, height, true);
먼가 부분적으로 설명을 하여 이해하기가 힘들실지도 모르지만,
분명 어느정도 기초가 쌓여가면서 예제 소스들 보시고
이걸 보시면 아하 ~ 하면서 이해를 금방 하실 수 있을겁니다.^^
그럼 오늘도 즐코딩요~ㅋ
=================================
=================================
=================================
[ Android : AndEngine ] 텍스쳐 깨짐 현상.
| 나의 플랫폼/안드로이드 2011/07/05 13:39
Posted by GsBOB
Texture windBright_Tx = new Texture(256,256,TextureOptions.BILINEAR_PREMULTIPLYALPHA);확대 하거나 회전을 할 때, 이미지가 깨지는 것을 종종 볼 수 있다.
텍스쳐에 위와 같은 옵션을 줄 경우, 어느정도 무마되어진다.
참고하세요^^
=================================
=================================
=================================
출처: http://gogorchg.tistory.com/entry/Android-Color-%EA%B0%92%EC%9D%84-RGB%EB%A1%9C
[ Android ] Color 값을 RGB로
| 나의 플랫폼/안드로이드 2011/11/10 18:24
Posted by GsBOB
public void toRGB(int color) {

     float red = color >>  16 & 0xff;

     float green = color >> 8 & 0xff;

     float blue = color  & 0xff;

     Log.d("DEBUG1",red+" / "+green+ " / " +blue);

}
간단한 함수이다..
그래도 색깔 값을 이용할려면 자주 쓰일 듯하다. ㅎㅎ
=================================
=================================
=================================
이 문제는 제가 코딩을 잘못 하거나, 샘플 소스를 잘못 이용한 걸 수도 있지만,
경험의 유추했을 때 결론이 나와. 이렇게 글을 남깁니다.
혹시 잘못된 부분이 있으면 주저 말고 댓글을 달아주시면 감사하겠습니다.^^
Opengl es 2.0을 사용하여 개발하는 중.. 화면을 껏다가 다시 켜면..
뭔가 속도가 느려지다가 결국 Out of memory 오류와 함께 팅겨져 버립니다.
역시나 Out of memory 부분은 Texture 부분이 문제 이죠.
전 onSurfaceCreated 함수 내에 Texture를 셋팅 하는 소스를 코딩하였습니다.
loadTexture ( mContext.getResources().openRawResource( R.raw.background) ,"mBgTexId" );
디버깅을 해본 결과... 예전 Opengl es 1.1에서는 화면을 갱신 해도, onSurfaceCreated 함수가 불러지지 않았었습니다.
하지만, Opengl es 2.0으로 바뀌면서 static 메모리 함수로 바뀌고 나서
GLES20와 관련된 메모리 장치들이 초기화가 되는 것 같습니다.
더 웃긴 건... 초기화가 되면서, 메모리 Texture 버퍼들이 삭제가 되지 않는 점입니다.
결국.. 프로그램 실행 시 , 한번만 실행이 되었던 onSurfaceCreated 함수내에 예외 처리가 필요했습니다.
deleteTexture(texId);
texId = loadTexture ( mContext.getResources().openRawResource( R.raw.background) ,"mBgTexId" );
private void deleteTexture(int texId){
    // 전에 저장되어 있는 texture 가 있는지 확인
    if(texId == 0)

     return;


    int idArr[];


    IntBuffer intbuf;

    idArr = new int[]{texId};

    intbuf = getIntBufferFromIntArray(idArr);

    GLES20.glDeleteTextures(1, intbuf);

 }
이렇게 계속 갱신 할때마다 Texture를 불러 올 경우, 매번 이미지를 불러와야 하므로 속도가 느려집니다.
결국, TextureBuffer를 저장 시켜놓고, 갱신 할때마다 TextureBuffer를 이용하는 쪽으로 수정하였습니다.
이럴 경우, Texture 설정 시간이 조금 걸리지만 그리 느려지는 현상이 줄어듭니다.
private int loadTexture(InputStream is, String strKey)

{

    int[] textureId = new int[1];
    // 기존의 존재하는지 확인

    if (texBuffer.get(strKey) == null) {

        TexValue value = new TexValue();

        Bitmap bitmap;

        bitmap = BitmapFactory.decodeStream(is);

        bitmap = Bitmap.createScaledBitmap(bitmap, getMinPowerByTwo(bitmap.getWidth()), getMinPowerByTwo(bitmap.getHeight()), false);

        ByteBuffer byteBuffer = ByteBuffer.allocateDirect(bitmap.getWidth() * bitmap.getHeight() * 4);

        byteBuffer.order(ByteOrder.BIG_ENDIAN);

        IntBuffer ib = byteBuffer.asIntBuffer();

        int bitmapWidth = bitmap.getWidth();

        int bitmapHeight = bitmap.getHeight();

        int[] pixels = new int[bitmapWidth * bitmapHeight];

        bitmap.getPixels(pixels, 0, bitmap.getWidth(), 0, 0, bitmap.getWidth(), bitmap.getHeight());

        bitmap.recycle();

        bitmap = null;

        for (int i = 0; i < pixels.length; i++) {

            ib.put(pixels[i] << 8 | pixels[i] >>> 24);

        }

        value.bmpWidth = bitmapWidth;

        value.bmpHeight = bitmapHeight;

        value.texBuffer = byteBuffer;
        // Buffer를 저장 시켜 놓는다.

        texBuffer.put(strKey, value);

    }

    texBuffer.get(strKey).texBuffer.position(0);

    GLES20.glGenTextures(1, textureId, 0);

    GLES20.glBindTexture(GLES20.GL_TEXTURE_2D, textureId[0]);

    GLES20.glTexParameteri(GLES20.GL_TEXTURE_2D, GLES20.GL_TEXTURE_MIN_FILTER, GLES20.GL_LINEAR);

    GLES20.glTexParameteri(GLES20.GL_TEXTURE_2D, GLES20.GL_TEXTURE_MAG_FILTER, GLES20.GL_LINEAR);

    GLES20.glTexParameteri(GLES20.GL_TEXTURE_2D, GLES20.GL_TEXTURE_WRAP_S, GLES20.GL_CLAMP_TO_EDGE);

    GLES20.glTexParameteri(GLES20.GL_TEXTURE_2D, GLES20.GL_TEXTURE_WRAP_T, GLES20.GL_CLAMP_TO_EDGE);

    GLES20.glTexImage2D(GLES20.GL_TEXTURE_2D, 0, GLES20.GL_RGBA, texBuffer.get(strKey).bmpWidth, texBuffer.get(strKey).bmpHeight, 0, GLES20.GL_RGBA, GLES20.GL_UNSIGNED_BYTE, texBuffer.get(strKey).texBuffer);

    return textureId[0];

}
지금 이건 저의 경험을 토대로 나온 것들입니다.
뭔가 문제가 있다고 생각되시면 언제든지! 꼭! 댓글 부탁드립니다.
감사합니다.
=================================
=================================
=================================
이미지가 보이지 않을 시에는 무엇보다!
벡터와 버퍼의 사이즈를 확실히 확인 한 후,
gl.glEnable(GL10.GL_TEXTURE_2D); //Enable Texture Mapping
는 설정 되어 있는지!
loadGLTexture(gl, this.context);
함수를 불러 들이셨는지!
이래도 보이지 않으시는 분들은,
혹시 BMP를 제외한 JPG나 PNG이미지 파일을 출력할려고 하신다면
bitmap을 리사이징 해줘야합니다.
정사각형 형태로.
64x64 , 128,128, 256x256,512x512 등..
Bitmap bitmap256 = Bitmap.createScaledBitmap(bitmap, 512, 512, true);
혹시 저같이 헤매시는 분을 위해 적어놓습니다.
죄송합니다. 꼭 저 위 형태가 아니라 가로 세로 길이를 일치 시키기만 하면 됩니다.
80x80,90x90 모두 표현 되요^^
-- 다시 죄송...
핸드폰 기기에 따라 다른 것 같습니다.
HTC 디자이어 HD 같은 경우는 꼭 64x64형태로 맞춰야 하지만,
Sky Vega X 같은 경우는 좌우만 일치하면 보이더라구요.
참조하세요^^
=================================
=================================
=================================
[Android] Opengl 텍스쳐 변경 시!!!
| 나의 플랫폼/안드로이드 2011/04/06 11:21
Posted by GsBOB
제가 하루 동안 갑자기 발생한 Memory over flow 때문에...
원래 제출 해야하는 날보다 하루 미루게 되었던 대 사건의 원인을 적어볼까 합니다.
- 테스트 폰 : HTC 디자이어 HD, Sky Vega X
- 문제:
LiveWallpaper의 설정을 여러 번 바꾼 후에, 갑자기 핸드폰이 멈춰버리는 대 사건이!-0-
- 원인:
거의 5시간을 걸쳐 디버깅 하고, 구글리을 해서 알아낸 결과!
heap memory가 사라지지 않고, 계속 쌓이는 것이었습니다.
처음 Bitmap의 초기화를 잘 못했나 해서 받아들인 Bitmap에 전부 초기화를 했습니다.
[Bitmap 초기화 방법]
gl.glGenTextures(textures.length , textures, 0);
gl.glBindTexture(GL10.GL_TEXTURE_2D, textures[i]);
gl.glTexParameterf(GL10.GL_TEXTURE_2D, GL10.GL_TEXTURE_MAG_FILTER, GL10.GL_NEAREST);
gl.glTexParameterf(GL10.GL_TEXTURE_2D, GL10.GL_TEXTURE_MIN_FILTER, GL10.GL_NEAREST);

GLUtils.texImage2D(GL10.GL_TEXTURE_2D, 0, bitmap, 0);


bitmap.recycle();
bitmap = null;
=> 위와 같이 텍스처에 설정을 해 놓으면 다시 Bitmap을 쓸 일이 없기 때문에 초기화를 꼭! 해주세요.
하지만!!
heap momory는 줄어들지 않고 계속 차지 하고 있는 것입니다.(참고로, 전 이미 모든 Bitmap에 recycle를 해준 상태였음)
그래서 Texture에 문제다! 라고 생각한 저는 바로 구글링을 다시 시작했습니다.
찾아보면.. 거의 Bitmap에 대한 이야기가 대부분 이더군요.
근데!! 문제가 된 것은 단순합니다.
텍스쳐를 처음 설정할 때(추가할 때)는 gl.glGenTextures 로써 포인터를 지정하지만,
텍스쳐를 다른 Bitmap으로 수정할 때는 gl.glGenTextures를 사용하면 안됩니다.!!!!
정말 중요한 부분 입니다. 저 함수를 지정하면 별도의 텍스쳐 주소를 지정해주므로,
다시 프로그램이 종료가 되지 않은 상태에서는 계속 쌓이게 되어 버립니다.
꼭 텍스쳐를 변경할 부분이 있으시면
load함수와 set함수 2개를 만들어 두세요.
public void loadGLTexture(GL10 gl, Bitmap bitmap) {

    if (bitmap == null) {

        Log.e("DEBUG", "loadGLTexture : Bitmap is null!!!!!!!!!!");

        return;

    }

    //텍스처 포인터 설정

    gl.glGenTextures(textures.length, textures, 0);

    gl.glBindTexture(GL10.GL_TEXTURE_2D, textures[index]);

    gl.glTexParameterf(GL10.GL_TEXTURE_2D, GL10.GL_TEXTURE_MAG_FILTER, GL10.GL_NEAREST);

    gl.glTexParameterf(GL10.GL_TEXTURE_2D, GL10.GL_TEXTURE_MIN_FILTER, GL10.GL_NEAREST);

    GLUtils.texImage2D(GL10.GL_TEXTURE_2D, 0, bitmap, 0);

    bitmap.recycle();
    bitmap[i] = null;

}

public void setGLTexture(GL10 gl, Bitmap bitmap) {

    if (bitmap == null) {

        Log.e("DEBUG", "setGLTexture : Bitmap is null!!!!!!!!!!");

        return;

    }

    gl.glBindTexture(GL10.GL_TEXTURE_2D, textures[index]);
    gl.glTexParameterf(GL10.GL_TEXTURE_2D, GL10.GL_TEXTURE_MAG_FILTER, GL10.GL_NEAREST);

    gl.glTexParameterf(GL10.GL_TEXTURE_2D, GL10.GL_TEXTURE_MIN_FILTER, GL10.GL_NEAREST);

    GLUtils.texImage2D(GL10.GL_TEXTURE_2D, 0, bitmap[i], 0);

    bitmap.recycle();

    bitmap[i] = null;

}
위 두 함수를 참고하세요^^
=================================
=================================
=================================
java.lang.IllegalStateException: Immutable bitmap passed to Canvas constructor
Bitmap bitmap = BitmapFactory.decodeFile(..);
Canvas canvas = new Canvas(bitmap);
canvas.save();
canvas.drawbitmap(...);
...
canvas.restore();
위 와 같은 형식에 소스에서 디버깅을 하면 회색 네모상자의 에러가 나옵니다.
BitmapFactory에서 불러온 이미지는 수정이 불가능 하다고 하네요.
크기나 뭐 옵션 같은 것은 줄 수 있겠지만요^^
그래서 똑같은 비트맵을 복사함으로써 해결이 됩니다.
Bitmap bitmap = BitmapFactory.decodeFile(..);
Bitmap copyBitmap = bitmap.copy(Bitmap.Config.ARGB_8888,true);
아니면 새로운 비트맵을 생성 해서 그 속에 이미지랑 다른 것들도 함께 넣어버리는 것이지요.
Bitmap paletBmp = Bitmap.createBitmap(imgWidth, imgHeight, Bitmap.Config.ARGB_8888);
Canvas canvas = new Canvas(paletBmp);
....
간단하죠??^^
=================================
=================================
=================================
배경화면에 이미지를 출력할 때,
offset까지 생각을 해서 화면보다 좌우를 더 크게할 경우가 많으시죠.
그럴 경우, 이미지가 커지고 출력할 때
과부하가 생기기도 합니다.
즉, 큰 이미지의 딱 화면 크기 정도만 가져와서
표현을 하게 되면, 과부하가 생길 이유가 없겠죠.

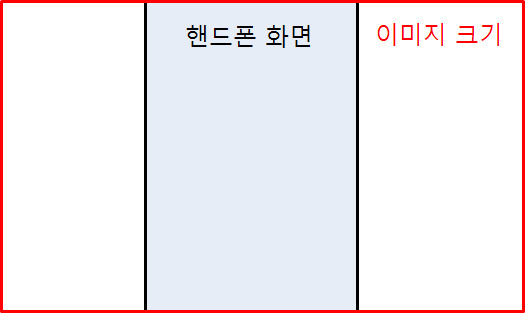
하늘색 부분만 보이도록 하는 것이지요!
소스는 다음과 같습니다.
RectF rect = new RectF(0, 0, screenSizeWidth, screenSizeHeight); // 네모 상자 크기 지정
Matrix matrix = new Matrix();
matrix.mapRect(rect);
matrix.setTranslate(mOffsetX, 0); // offset설정
mainCanvas.drawBitmap(mainBmp,matrix,mainPaint); // 이미지에 적용해서 출력
=================================
=================================
=================================
'스마트기기개발관련 > OpenGL (그래픽, 게임)' 카테고리의 다른 글
| 안드로이드 android NDK jni 폴더안에 폴더를 만들어 빌드해보기 관련 (0) | 2020.09.18 |
|---|---|
| android 안드로이드 오픈지엘 OpenGL ES 2.0 효과, api 등등 (1) | 2020.09.18 |
| 안드로이드 android ndk 디버그 하는법 관련 (0) | 2020.09.18 |
| 안드로이드 오픈지엘 OpenGL ES 2.0 매핑 투영 카메라 관련 (0) | 2014.06.11 |
| 안드로이드 Android 오픈지엘 OpenGL 사용 시 Antialiasing 작용 관련 (0) | 2012.11.13 |


댓글 영역