=================================
=================================
=================================
ECMAScript 6 기능구현 확인을 위한 파이어폭스 39 이상 테스트 버전 받기
Related Posts:
- Mozilla Firefox 41 Alpha 1
- Mozilla Firefox 40.0 Alpha 2 “Aurora”
- Mozilla Firefox 35.0.1
- Mozilla Firefox 37.0.2
- Mozilla Firefox 36.0.4
- Mozilla Firefox 38.0.6
- Mozilla Firefox 29.0.1
- Mozilla Firefox 28.0
- Mozilla Firefox 34.0.5
- Mozilla Firefox 27.0.1
=================================
=================================
=================================
크롬 높은 버전(42이상 예상) 에서 자바스크립트 Class를 사용 하고 싶으시면 현재는 "use strict"; 일 사용해야 합니다. (다른 상위버전 브라우져도 써야 할 때도 있습니다)
여기 링크 구문 인용: http://blog.chromium.org/2015/03/chrome-42-beta-push-notifications_12.html
<script>


'use strict';


class Polygon {
    constructor(height, width) {
        this.name = 'Polygon';
        this.height = height;
        this.width = width;
    }


    sayName() {
        log('Hi, I am a ', this.name + '.');
    }
}


let p = new Polygon(300, 400);


</script>
=================================
=================================
=================================
지원되는 IDE 와 설정
출처: https://github.com/angelozerr/tern.java/wiki/Tern-&-ECMAScript-support
Tern - Eclipse IDE
Installation
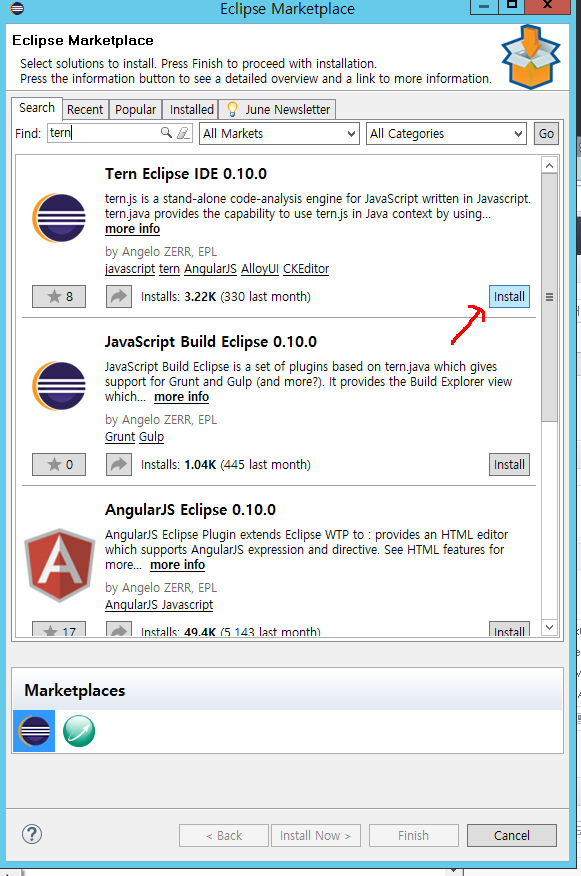
위 이클립스 마켓 플레이스에서 찾아서 인스톨 해도된다.
It is recommanded to use Eclipse JEE distribution because Tern Eclipse IDE works with WebTools and JSDT (extends completion of JSDT), see Technical-information and #29.
- Install Tern Eclipse IDE with update site.
- Configure Nodejs.
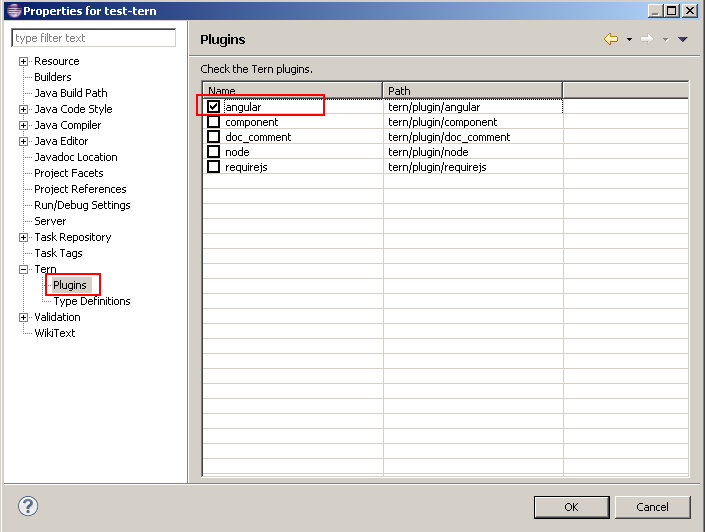
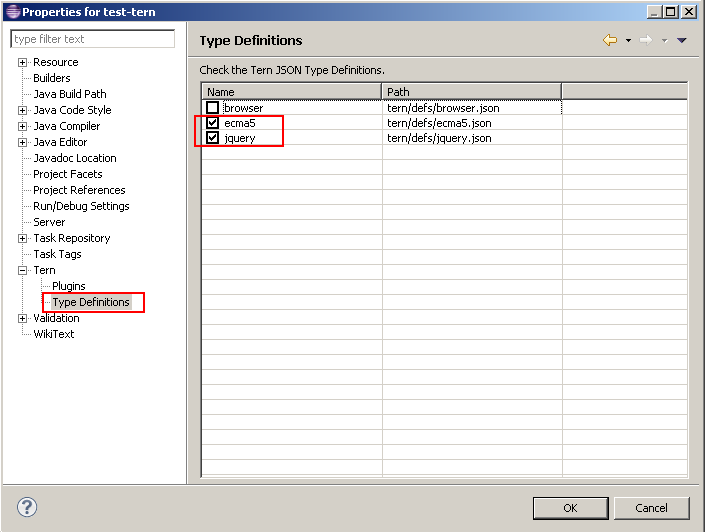
Tern IDE - Configuration
Convert To Tern Project

Configure Tern Plugin
Configure Tern JSON Type Definitions
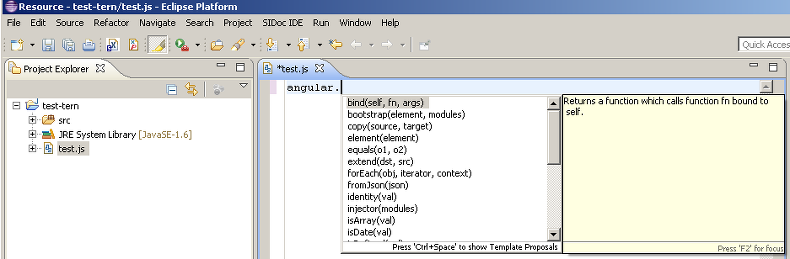
Completion with JSDT
If you open a JavaScript file with the JSDT Editor, you can benefit with Tern completion :
---------------------------------------------------------------------------
---------------------------------------------------------------------------------------------------
tern supports :
- ECMAScript 5 with ecma5.json.
- ECMAScript 6 with ecma6.json.
After installing and converting your project as Tern Project (see Tern-Eclipse-IDE), open Project Properties, click on Tern / Modules item and select the ECMAScript tern module and the version :
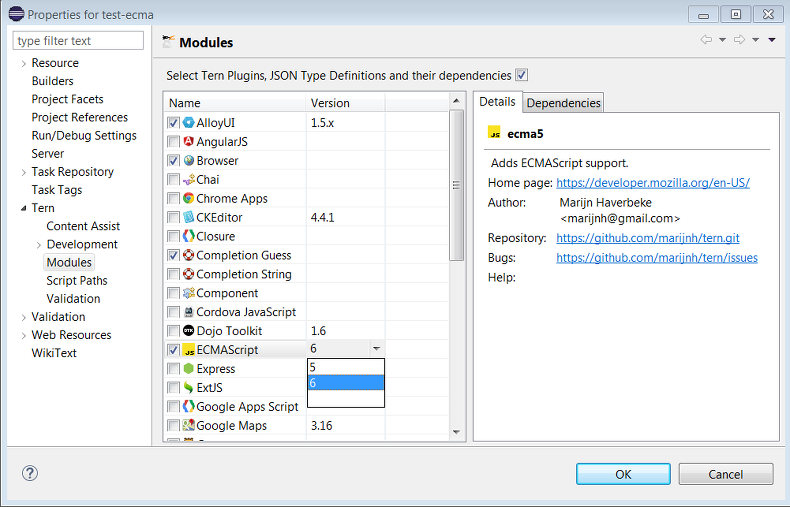
ECMAScript 5
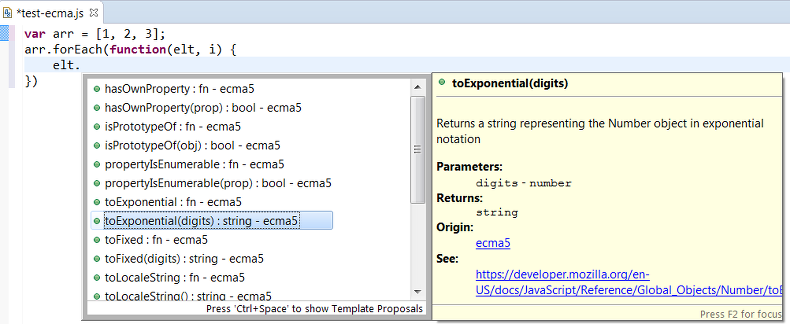
ECMAScript 5 gives the capability to provide completion for Array :
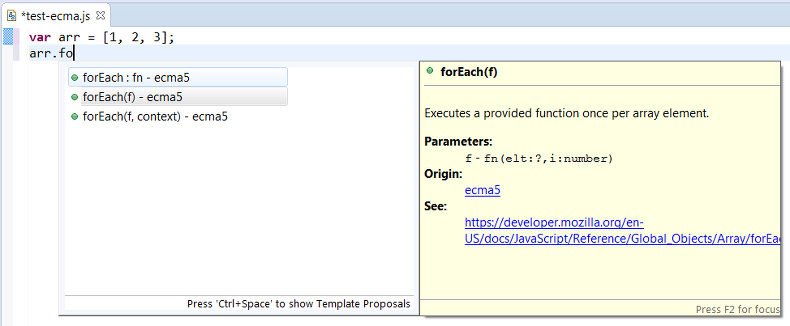
In this sample, arr is an Array of number, the completion for elt item provides Number methods :
ECMAScript 6
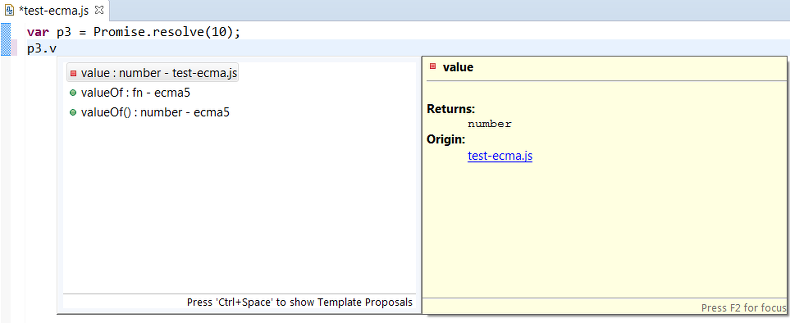
ECMAScript 6 provides Promise object. If you select ECMAScript 6 module, Tern provides completion for this object :
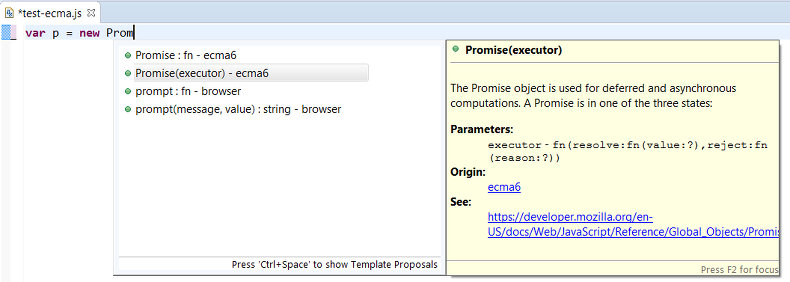
Tern is able to discover the type of the Promise value :
------------------------------------------------------------------------------------------------------------
---------------------------------
출처: https://www.jetbrains.com/webstorm/whatsnew/
What’s new in WebStorm 10
WebStorm 10 strives to deliver everything you expect from the best web development IDE. The update brings improvements in language and technology support, fast performance, powerful new features and UI improvements.
Improved JavaScript support
WebStorm 10 works much more smoothly with large projects after we’ve reworked support for JavaScriptfrom the ground up. Enjoy faster code highlighting and code completion suggestions, as well as enhanced ECMAScript 6 support including module syntax.
=================================
=================================
=================================
출처 https://www.snip2code.com/Snippet/329780/ES6----JavaScript
# ES6시대의 JavaScript
- 원문 : http://techlife.cookpad.com/entry/2015/02/02/094607
안녕하세요. 사원사업부의 마루야마[@h13i32maru](https://twitter.com/h13i32maru)입니다.
최근의 Web 프론트엔드의 변화는 매우 격렬해서, 조금 눈을 땐 사이에 점점 새로운 것이 나오고 있더라구요. 그런 격렬한 변화중 하나가 ES6이라는 차세대 JavaScript의 사양입니다. 이 ES6는 현재 재정중으로 집필시점에서는 Draft Rev31이 공개되어있습니다.
> JavaScript는 ECMAScript(ECMA262)라는 사양을 기반으로 구현되어있습니다.
> 현재 모던한 Web 브라우저는 ECMAScript 5.1th Edition을 기반으로 한 JavaScript실행 엔진을 탑재하고 있습니다.
> 그리고 다음 버전인 ECMAScript 6th Edition이 현재 재정중으로, 약칭으로 ES6이라는 명칭이 사용되고 있습니다.
이 번엔, 다른 언어에 있고 JavaScript에도 있으면 하는 기능과, JavaScript에서 잘 나오는 패턴을 통합적으로 적을 수 있는 기능을 중심으로 소개하겠습니다.
## Class
JavaScript는 “프로토타입 기반의 OOP”라 불리고 있는 것 처럼, Java나 Ruby등의 “클래스 기반의 OOP”와는 조금 다릅니다. 하지만 프로토타입 베이스의 기능을 효과적으로 사용한다는 것은 여태까지 별로 없었다고 생각합니다. 오히려 가짜 클래스 기능을 구현하던가, 클래스를 실현하기 위해 라이브러리를 사용해 프로그래밍을 적는 것이 많을 것입니다. 이것은 npm에서 `class`로 검색하면 많은 패키지가 나오는 것만 생각해도 알수 있다고 생각합니다. 여기서 ES6에서는 클래스 기능을 도입해서, 클래스를 간단히 취급할 수 있게 되었습니다.
```javascript

// ES5

'use strict';


function User(name){

  this._name = name;

}


User.prototype = Object.create(null, {

  constructor: {

	value: User

  },


  say: {

	value: function() {

	  return 'My name is ' + this._name;

	}

  }

});


function Admin(name) {

  User.apply(this, arguments);

}


Admin.prototype = Object.create(User.prototype, {

  constructor: {

	value: Admin

  },


  say: {

	value: function() {

	  var superClassPrototype =  Object.getPrototypeOf(this.constructor.prototype);

	  return '[Administrator] ' + superClassPrototype.say.call(this);

	}

  }

});


var user = new User('Alice');

console.log(user.say()); // My name is Alice


var admin = new Admin('Bob');

console.log(admin.say()); // [Administrator] My name is Bob

```


```javascript

// ES6

'use strict';


class User {

  constructor(name) {

	this._name = name;

  }


  say() {

	return 'My name is ' + this._name;

  }

}


class Admin extends User {

  say() {

	return '[Administrator] ' + super.say();

  }

}


var user = new User('Alice');

console.log(user.say()); // My name is Alice


var admin = new Admin('Bob');

console.log(admin.say()); // [Administrator] My name is Bob
## Function Arguments
JavaScript에서 함수의 디폴트 인수나 가변길이 인수를 사용하고 싶다고 생각해도 언어에서 직접적인 방법이 없었기 때문에, `||`를 사용한 마법같은 방법이나 `arguments`을 사용한 메타프로그래밍같은 방법을 쓰고 있었습니다. 여기서 ES6는 함수의 가 인수의 선언 방법이 강화되어, 자연스럽게 적을 수 있게 되었습니다. 이것은 나중에 프로그램을 읽을 때에, 시그니쳐만으로 보면 그 함수가 기대하는 인수를 어느정도 알 수 있게 되었다는 효과가 있습니다.
```javascript

// ES5

'use strict';


function loop(func, count) {

  count = count || 3;

  for (var i = 0; i < count; i++) {

func();

  }

}


function sum() {

  var result = 0;

  for (var i = 0; i < arguments.length; i++) {

result += arguments[i];

  }

  return result;

}


loop(function(){ console.log('hello')}); // hello hello hello

console.log(sum(1, 2, 3, 4)); // 10

```


```javascript

// ES6

'use strict';


function loop(func, count = 3) {

  for (var i = 0; i < count; i++) {

func();

  }

}


function sum(...numbers) {

  return numbers.reduce(function(a, b) { return a + b; });

}


loop(function(){ console.log('hello')}); // hello hello hello

console.log(sum(1, 2, 3, 4)); // 10

```
실제로 이 디폴트 인수나 가변 길이 인수는 함수의 반인수부분만으로 사용하지는 않고, 변수의 대입처리전반이 강화된 것의 일부분이 됩니다. ES6에서 변수의 대입처리에 관해서는 [Destructuring and parameter handling in ECMAScript 6](http://www.2ality.com/2015/01/es6-destructuring.html)에서 샘플을 포함한 다양한 패턴이 소개되어 있습니다.
## Arrow Function
JavaScript에서는 이벤트 구동의 처리를 자주 적습니다. 예를들어 DOM이 클릭되면 뭔가 처리하거나, XHR 리퀘스트가 완료되면 뭔가 처리하는 경우입니다. 이런 처리를 JavaScript에서 구현하려면, 콜백 함수나 이벤트리스너라고 불리는 것을 대상 객체(DOM이나 XHR)에 설정합니다. 이 콜백함수를 등록하는 시점에서 `this`에 콜백 함수안의 억세스하고 싶은 경우도 자주 있습니다만, 여태까지는 클로져를 사용해 `this`를 보존하던가, `Function.prototype.bind`를 사용해 `this`를 속박하거나 했습니다. ES6에서는 Arrow Function라고 불리는 새로운 함수 정의 식이 도입되어, 이 `this`에 관한 번거로움을 해소하고 있습니다.
```javascript

// ES5

'use strict';


var ClickCounter = {

  _count: 0,


  start: function(selector) {

var node = document.querySelector(selector);

node.addEventListener('click', function(evt){

  this._count++;

}.bind(this));

  }

};


ClickCounter.start('body');

```


```javascript

// ES6

'use strict';


var ClickCounter = {

  _count: 0,


  start: function(selector) {

var node = document.querySelector(selector);

node.addEventListener('click', (evt)=>{

  this._count++;

});

  }

};


ClickCounter.start('body');

```
## Promise
여태까지 XHR등의 비동기처리는 시작전에 콜백함수를 정의해서, 비동기처리가 끝나면 그 콜백함수가 호출되는 것이 일반적이었지만, 여러 콜백함수의 설정방법이 있었습니다. 예를들어, 비동기처리의 함수에 콜백 함수를 인수로 넘기거나(`setTimeout`이나 `setInterval`), 비동기처리를 행하는 객체에 콜백 함수를 등록하거나(`XHR`나 `WebWorker`), 비동기처리의 반환값에 콜백 함수를 등록하거나(`IndexedDB`)등이 있습니다.
이런 여러 방법이 있기 때문에, 사용하는 측에서는 각각의 방법을 나눠서 사용할 필요가 있습니다. 여기서 ES6에서는 Promise라는 비동기처리를 종합적으로 처리하는 방법이 언어레벨에서 재공되게 되었습니다. 사용법은, 비동기처리를 행하는 함수는 Promise를 반환값으로 반환해, 부른 쪽에서는 Promise에 콜백 함수를 등록한다는 것입니다.
```javascript

// ES5

'use strict';


function sleep(callback, msec) {

  setTimeout(callback, msec);

}


sleep(function(){

  console.log('wake!')

}, 1000);

```


```javascript

// ES6

'use strict';


function sleep(msec) {

  return new Promise(function(resolve, reject){

setTimeout(resolve, msec);

  });

}


sleep(1000).then(function(){

  console.log('wake!');

});

```
또 비동기 처리에서는 예외처리가 문제가 됩니다. 단순히 `try-catch`로 감싸도 비동기에서 예외가 일어나면 보충할 수 없습니다. 여기서 Promise에서는 비동기 처리의 예외처리도 종합적으로 처리하는 방법이 제공되고 있습니다. 이 Promise에 관해서는 Web에서 무료로 읽을 수 있는 [JavaScript Promiseの本](http://azu.github.io/promises-book/)([번역](http://www.hanbit.co.kr/ebook/look.html?isbn=9788968487293))이 무척 참고가 됩니다.
## Generator
마지막으로 Generator에 관해 소개하겠습니다. 여기까지는 JavaScript에서 있지만 사용하기 힘들거나, 통일되지 않았던 것을 개선한 기능이지만, 이 Generator라는 것은 완전 새로운 개념으로 ES6에 도입되었습니다.<sup>1</sup>
Generator는 함수 처리안의 임의의 장소에서 처리를 중단/재개할 수 있는 구조를 제공하는 것입니다. 이 구조는 일반적으로 코루틴(co-rutine)이라 불립니다. 코루틴을 사용하면 무한 리스너나 이터레이터등의 구현을 할 수 있습니다.
이 Generator와 Promise를 조합해서 비동기 처리를 동기처리처럼 직렬로 적을 수 있게 되었습니다. 기본적인 생각 법은 "비동기 처리가 개시되면 처리를 중단해, 비동기처리가 완료되면 처리를 재개한 뒤 연결 처리를 싱행해 나감"입니다. 아까, Promise 절에서 소개한 샘플 코드를 Generator를 사용해 직렬로 적어 보겠습니다. 밑의 샘플코드에서는 Generator와 Promise를 사용해 비동기 처리를 직렬로 적을수 있게 되는 [co](https://github.com/tj/co)라는 라이브러리를 사용하고 있습니다.
```javascript

// ES6

'use strict';


co(function*(){

  console.log('sleep...');

  yield sleep(1000);

  console.log('wake!');

});

```
이번에는 co를 사용해 해설했지만, co를 사용하지 않고 비동기처리를 직렬로 적는 구조로 async/await라는것이 ES7에서는 제공되고 있습니다.<sup>2</sup>
Generator에 관해서는 저의 블로그에서 [ES6 Generatorを使ってasync/awaitを実装するメモ](http://blog.h13i32maru.jp/entry/2015/01/02/225457)로 해설 하고 있습니다. 흥미가 있으시면 봐주세요.
## 결론
이번에는 JavaScript에서 안타까웠던 곳이 ES6에서 어떻게 변하는가를 중심으로 설명했습니다. 여기서 소개하는 내용은 ES6의 일부로, 이외에도 Modules, Symbol, Data Structures, Proxy, Template String등 여러 기능이 추가되어 있습니다. 현시점에서는 ES6로 적은 코드를 그대로 브라우져나 node에서 실행하는 것은 어려운 상황입니다만, ES6를 ES5로 트랜스컴파일하는 툴로 [traceur-compiler](https://github.com/google/traceur-compiler)나 [6to5](https://6to5.org/)가 있으므로 가볍게 시험해 보실 수 있습니다. 또 각 브라우져나 툴이 ES6의 어느 기능에 대응하고 있는지는 [ECMAScript compatibility table](http://kangax.github.io/compat-table/es6/)이 참고가 됩니다.
ES6시대의 JavaScript를 준비해서 지금부터 조금씩 건드려 보시면 어떨까요?
1. Firefox에서는2006년 쯤에 이미 구현되어 있습니다.
2. C#의 async/await와 같은 것
=================================
=================================
=================================
ECMAScript 6은 차기 표준이고, 코드네임은 "ES.next"입니다. 명세 초안은 ECMA 위키에서 확인하실 수 있습니다. 첫 초안 작업은 2011년 7월 12일에 "ES.next"로 공개된 ECMAScript 5.1에 기반을 두고 작성되었습니다. 2014년 8월 시점에서 ECMAScript 6은 기능 추가가 동결되었으며, 2015년 내로 완료될 예정입니다. ECMAScript 6는 2015년 3월부터 공식 발표 과정으로 넘어갑니다(2015년 6월에 완료).
ECMAScript 표준에 대한 피드백 채널은 es-discuss을 이용하시면 됩니다.
이미 지원되는 기능
다음 기능들은 Firefox에서 이미 구현되어 있습니다:
표준 라이브러리
Array 객체 추가사항
- for...of에서의 Array 반복 (Firefox 13)
- Array.from() (Firefox 32)
- Array.of() (Firefox 25)
- Array.prototype.fill() (Firefox 31)
- Array.prototype.find(), Array.prototype.findIndex() (Firefox 25)
- Array.prototype.entries(),
Array.prototype.keys() (Firefox 28) - Array.prototype.copyWithin() (Firefox 32)
새로운 Map과 Set 객체 그리고 WeakMap과 WeakSet 객체
- Map (Firefox 13)
- for...of에서의 Map 반복 (Firefox 17)
- Map.prototype.forEach() (Firefox 25)
- Map.prototype.entries(),
Map.prototype.keys(),
Map.prototype.values() (Firefox 20) - 생성자 인수: new Map(null) (Firefox 37)
- 몽키 패치 된 생성자 내의 set() (Firefox 37)
- Set (Firefox 13)
- for...of에서의 Set 반복 (Firefox 17)
- Set.prototype.forEach() (Firefox 25)
- Set.prototype.entries(),
Set.prototype.keys(),
Set.prototype.values() (Firefox 24) - 생성자 인수: new Set(null) (Firefox 37)
- 몽키 패치 된 생성자 내의 add() (Firefox 37)
- WeakMap (Firefox 6)
- WeakMap.clear() (Firefox 20)
- 반복 가능한 WeakMap 생성자 내의 선택적 인수 (Firefox 36)
- 생성자 인수: new WeakMap(null) (Firefox 37)
- 몽키 패치 된 생성자 내의 set() (Firefox 37)
- WeakSet (Firefox 34)
- 생성자 인수: new WeakSet(null) (Firefox 37)
- 몽키 패치 된 생성자 내의 add() (Firefox 37)
새로운 Math 함수
- Math.imul() (Firefox 20)
- Math.clz32() (Firefox 31)
- Math.fround() (Firefox 26)
- Math.log10(), Math.log2(), Math.log1p(), Math.expm1(), Math.cosh(), Math.sinh(),Math.tanh(), Math.acosh(), Math.asinh(), Math.atanh(), Math.hypot(), Math.trunc(),Math.sign(), Math.cbrt() (Firefox 25)
Number 객체 추가사항
- Number.isNaN() (Firefox 16)
- Number.isFinite() (Firefox 16)
- Number.isInteger() (Firefox 16)
- Number.parseInt() (Firefox 25)
- Number.parseFloat() (Firefox 25)
- Number.EPSILON (Firefox 25)
- Number.MAX_SAFE_INTEGER, Number.MIN_SAFE_INTEGER (Firefox 31)
- Number.isSafeInteger() (Firefox 32)
Object 객체 추가사항
- Object.is() (Firefox 22)
- Object.setPrototypeOf() (Firefox 31)
- Object.assign() (Firefox 34)
- Object.getOwnPropertySymbols() (Firefox 33)
새로운 Promise 객체
- Promise (Firefox 24(Firefox 29에서 기본값으로 활성화 되어 있음))
RegExp 객체 추가사항
- RegExp 선택적인 (y) 플래그 (Firefox 3)
- 일반적 RegExp.prototype.toString (Firefox 39)
String 객체 추가사항
- String.fromCodePoint() (Firefox 29)
- String.prototype.codePointAt() (Firefox 29)
- String.prototype.startsWith(), String.prototype.endsWith() (Firefox 17)
- String.prototype.includes() (Firefox 17)
- String.prototype.repeat() (Firefox 24)
- String.prototype.normalize() (Firefox 31)
- String.raw() (Firefox 34)
- u{XXXXXX} 유니코드 코드 포인트 (Firefox 40)
새로운 Symbol 객체
- Symbol (Firefox 36)
- Symbol.iterator (Firefox 36)
- Symbol.for() - 전역 Symbol 레지스트리 (Firefox 36)
- Symbol.match (Firefox 40)
새로운 class 구문
- 기본 지원 (Firefox 39)
- extends 지원 (Firefox 39)
- static 메소드 정의 (Firefox 39)
형식화된 배열
형식화된 배열은 ECMAScript 6의 일부로 지정되었고, 더 이상 자신의 기존 명세서를 따르지 않습니다.
- ArrayBuffer
- DataView
- Int8Array
- Uint8Array
- Uint8ClampedArray
- Int16Array
- Uint16Array
- Int32Array
- Uint32Array
- Float32Array
- Float64Array
표현식과 연산자
- 배열을 위한 Spread 연산자 (Firefox 16)
- Symbol.iterator 속성 사용 (Firefox 36)
- 함수 호출을 위한 Spread 연산자 (Firefox 27)
- Symbol.iterator 속성 사용 (Firefox 36)
문(문장)
- for...of (Firefox 13)
- .iterator()와 .next()에 관한 동작 (Firefox 17)
- "@@iterator" 속성 사용 (Firefox 27)
- Symbol.iterator 속성 사용 (Firefox 36)
함수
그 밖의 기능
- 2진과 8진 숫자 리터럴 (Firefox 25)
- 템플릿 문자열 (Firefox 34)
- 객체 이니셜라이져: 줄임 속성 이름 (Firefox 33)
- 객체 이니셜라이저: 계산된 속성 이름 (Firefox 34)
- 객체 이니셜라이저: 줄임 메소드 이름 (Firefox 34)
지속적인 호환성 및 안정화 기능 변경
다음 기능들은 Firefox에서 부분적으로 구현되어 있지만, ES6보다 오래 전에 도입되어 ECMA TC39 표준화 단체에서 계속 논의되고 있습니다.
- 레거시 반복자와 생성자 (JS 1.7, Firefox 2)
- ES6 반복자와 생성자는 Firefox 26+에서 구현되어 있음
- 분할 할당 (JS 1.7, Firefox 2) (ES6 호환 bug 950547)
- const (JS 1.5, Firefox 1.0) (ES6 호환 bug 950547)
- let (JS 1.7, Firefox 2) (ES6 호환 bug 950547)
- Proxy (Firefox 18) (ES6 호환 bug 978228)
아직 지원되지 않는 기능
다음 기능들은 ECMAScript 6 초안 명세서에 존재하지만, 아직 Firefox에서는 구현되지 않았습니다:
- 모듈 (bug 568953)
- import 구문
- export 구문
- Array.prototype.values() (bug 875433)
- Reflect (bug 987514)
- \u{nnnnnn} 유니코드 코드 포인트 이스케이프 (bug 952985)
- 잘 알려진 Symbol 기호
- RegExp "u" 플래그
같이 보기
=================================
=================================
=================================
출처: http://www.sitepoint.com/understanding-ecmascript-6-class-inheritance/
This article is part of a web dev tech series from Microsoft. Thank you for supporting the partners who make SitePoint possible.
I’d like to share with you a series of articles about ECMAScript 6 , sharing my passion for it and explaining how it can work for you. I hope you enjoy reading them as much as I did writing them.
First, I work in Microsoft on the browser rendering engine for Project Spartan, which is a vast improvement over the Internet Explorer engine we got to know (and love?) over the years. My personal favorite feature of it is that it supports a lot of ECMAScript 6. To me, this is a massive benefit to writing large applications for the web.
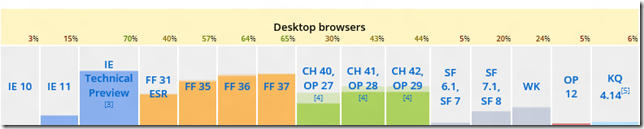
We now have almost 70% of ECMAScript 6 features in Project Spartan so far according to this compatibility table and ES6 on status.modern.IE.
I love JavaScript, but when it comes to working on large projects like Babylon.js, I prefer TypeScript which is now powering Angular 2 btw. The reason is that JavaScript (or otherwise known as ECMAScript 5) doesn’t have all the syntax features I am used to from other languages I write large projects in. I miss classes and inheritance, for instance.
So without further ado, let’s get into just that:
Creating a class
JavaScript is a prototype oriented language and it is possible to simulate classes and inheritance with ECMAScript 5.
The flexibility of functions in JavaScript allows us to simulate encapsulation we are used to when dealing with classes. The trick we can use for that is to extend the prototype of an object:
var Animal = (function () { function Animal(name) { this.name = name; } // Methods Animal.prototype.doSomething = function () { console.log("I'm a " + this.name); }; return Animal; })(); var lion = new Animal("Lion"); lion.doSomething(); |
We can see here that we defined a class with properties and methods.
The constructor is defined by the function itself (function Animal) where we can instantiate properties. By using the prototype we can define functions that will be considered like instance methods.
This works, but it assumes you know about prototypical inheritance and for someone coming from a class-based language it looks very confusing. Weirdly enough, JavaScript has a class keyword, but it doesn’t do anything. ECMAScript 6 now makes this work and allows for shorter code:
class AnimalES6 { constructor(name) { this.name = name; } doSomething() { console.log("I'm a " + this.name); } } var lionES6 = new AnimalES6("Lion"); lionES6.doSomething(); |
The result is the same, but this is easier to write and read for developers who are used to writing classes. There is no need for the prototype and you can use the constructor keyword to define the constructor.
Furthermore, classes introduce a number of new semantics that aren’t present in the ECMAScript 5 equivalent. For example, you cannot call a constructor without new or you cannot attempt to construct methods with new. Another change is that methods are non-enumerable.
Interesting point here: Both versions can live side by side.
At the end of the day, even with the new keywords you end up with a function with a prototype where a function was added. A method here is simply a function property on your object.
One other core feature of class-based development, getters and setters, are also supported in ES6. This makes it much more obvious what a method is supposed to do:
class AnimalES6 { constructor(name) { this.name = name; this._age = 0; } get age() { return this._age; } set age(value) { if (value < 0) { console.log("We do not support undead animals"); } this._age = value; } doSomething() { console.log("I'm a " + this.name); } } var lionES6 = new AnimalES6("Lion"); lionES6.doSomething(); lionES6.age = 5; |
Pretty handy, right?
But we can see here a common caveat of JavaScript: the “not really private” private member (_age). I wrote an article some time ago on this topic.
Thankfully, we now have a better way to do this with a new feature of ECMAScript 6 : symbols:
var ageSymbol = Symbol(); class AnimalES6 { constructor(name) { this.name = name; this[ageSymbol] = 0; } get age() { return this[ageSymbol]; } set age(value) { if (value < 0) { console.log("We do not support undead animals"); } this[ageSymbol] = value; } doSomething() { console.log("I'm a " + this.name); } } var lionES6 = new AnimalES6("Lion"); lionES6.doSomething(); lionES6.age = 5; |
So what’s a symbol? This is a unique and immutable data type that could be used as an identifier for object properties. If you don’t have the symbol, you cannot access the property.
This leads to a more “private” member access.
Or, at least, less easily accessible. Symbols are useful for the uniqueness of the name, but uniqueness doesn’t imply privacy. Uniqueness just means that if you need a key that must not conflict with any other key, create a new symbol.
But this is not really private yet because thanks to Object.getOwnPropertySymbols, downstream consumers can access your symbol properties.
Handling inheritance
Once we have classes, we also want to have inheritance. It is – once again – possible to simulate inheritance in ES5, but it was pretty complex to do.
For instance, here what is produced by TypeScript to simulate inheritance:
var __extends = this.__extends || function (d, b) { for (var p in b) if (b.hasOwnProperty(p)) d[p] = b[p]; function __() { this.constructor = d; } __.prototype = b.prototype; d.prototype = new __(); }; var SwitchBooleanAction = (function (_super) { __extends(SwitchBooleanAction, _super); function SwitchBooleanAction(triggerOptions, target, propertyPath, condition) { _super.call(this, triggerOptions, condition); this.propertyPath = propertyPath; this._target = target; } SwitchBooleanAction.prototype.execute = function () { this._target[this._property] = !this._target[this._property]; }; return SwitchBooleanAction; })(BABYLON.Action); |
Not really easy to read.
But the ECMAScript 6 alternative is better:
var legsCountSymbol = Symbol(); class InsectES6 extends AnimalES6 { constructor(name) { super(name); this[legsCountSymbol] = 0; } get legsCount() { return this[legsCountSymbol]; } set legsCount(value) { if (value < 0) { console.log("We do not support nether or interstellar insects"); } this[legsCountSymbol] = value; } doSomething() { super.doSomething(); console.log("And I have " + this[legsCountSymbol] + " legs!"); } } var spiderES6 = new InsectES6("Spider"); spiderES6.legsCount = 8; spiderES6.doSomething(); |
Thanks to the extends keyword you can specialize a class into a child class while keeping reference to the root class with the super keyword.
With all these great additions, it is now possible to create classes and work with inheritance without dealing with prototype voodoo magic.
Why using TypeScript is even more relevant than before…
With all these new features being available on our browsers, I think it’s even more important to use TypeScript to generate JavaScript code.
First off, all the latest versions of TypeScript (1.4) started adding support for ECMAScript 6 code (with letand const keywords) so you just have to keep your existing TypeScript code and enable this new option to start generating ECMAScript 6 code.
But if you look closely at some TypeScript code you will find that it looks like ECMAScript 6 without the types. So learning TypeScript today is a great way to understand ECMAScript 6 tomorrow!
Conclusion
Using TypeScript, you can have all this now, across browsers, as your code gets converted into ECMASCript 5. If you want to use ECMAScript 6 directly in the browser, you can upgrade to Windows 10 and test with Project Spartan’s rendering engine there. If you don’t want to do that just to try some new browser features, you can also access a Windows 10 computer with Project Spartan here. This also works on your MacOS or Linux box.
Of course Project Spartan is not the only browser that supports the open standard ES6. Other browsers are also on board and you can track the level of support here.
The future of JavaScript with ECMAScript 6 is bright and honestly I can’t wait to see it widely supported on all modern browsers!
This article is part of a web dev tech series from Microsoft. We’re excited to share Project Spartan and its new rendering engine with you. Get free virtual machines or test remotely on your Mac, iOS, Android, or Windows device at modern.IE.
=================================
=================================
=================================
출처: http://seokjun.kr/ecmascript-6-features/
ECMAScript 6
git.io/es6features 을 기본으로 한글로 설명하였습니다. (기능들의 명칭은 별도로 번역하지 않았습니다.)
Introduction
새로운 Javascript 표준으로 알려져있는 ECMAScript 6 는 2015년 6월 개정을 목표로 하고 있다. Javascript 로 만들어진 여러 엔진들에 적용되고 있는데 링크 를 참조하도록 하자.
ECMAScript 6 의 전체적인 사양은 ES6 표준 초안 을 확인하도록 하자.
ES6에 도입된 달라진 점들:
- arrows
- classes
- enhanced object literals
- template strings
- destructuring
- default + rest + spread
- let + const
- iterators + for..of
- generators
- unicode
- modules
- module loaders
- map + set + weakmap + weakset
- proxies
- symbols
- subclassable built-ins
- promises
- math + number + string + array + object APIs
- binary and octal literals
- reflect api
- tail calls
ECMAScript 6 달라진 점들
Arrows
Arrows 는 => 함수를 짧게 표현하는 방식을 말한다. 이는 C#, Java 8 이나 CoffeeScript 과 문법적으로 유사하다고 한다. 일반적인 함수와는 다르게 this 를 호출해도 함수 자신을 뜻하는 것이 아니라 선언된 윗단계 스코프의 this 를 공유한다.
// Expression bodies
var odds = evens.map(v => v + 1);
var nums = evens.map((v, i) => v + i);
var pairs = evens.map(v => ({even: v, odd: v + 1}));

// Statement bodies
nums.forEach(v => {
  if (v % 5 === 0)
    fives.push(v);
});

// Lexical this
var bob = {
  _name: "Bob",
  _friends: [],
  printFriends() {
    this._friends.forEach(f =>
      console.log(this._name + " knows " + f));
  }
}
이해를 돕기 위해 위 예제를 기존 ECMAScript 5 의 구문으로 번역하여 보면 다음과 같이 표현할 수 있다.
// Expression bodies
var odds = evens.map(function (v) {
  return v + 1;
});
var nums = evens.map(function (v, i) {
  return v + i;
});
var pairs = evens.map(function (v) {
  return { even: v, odd: v + 1 };
});

// Statement bodies
nums.forEach(function (v) {
  if (v % 5 === 0) fives.push(v);
});

// Lexical this
var bob = {
  _name: "Bob",
  _friends: [],
  printFriends: function printFriends() {
    var _this = this;

    this._friends.forEach(function (f) {
      return console.log(_this._name + " knows " + f);
    });
  }
};
Classes
ECMAScript 6 에서 가장 기대되고 있는 부분이 역시 Class 가 아닐까 한다. 포로토타입 기반 객체 지향 패턴의 설탕(Simple Sugar)과 같은 존재라고 표현했다. 어디다든 그냥 넣어서 먹을 수 있는게 설탕이듯 쉽고 편리하게 사용할 수 있어서 그렇게 표현한 것 같다. 생성자를 지원하고, 상속받은 객체의 메소드를 super 를 통해 부를수도 있고, 인스턴스, 정적 메소드 등등 을 지원한다고 한다.
class SkinnedMesh extends THREE.Mesh {
  constructor(geometry, materials) {
    super(geometry, materials);

    this.idMatrix = SkinnedMesh.defaultMatrix();
    this.bones = [];
    this.boneMatrices = [];
    //...
  }
  update(camera) {
    //...
    super.update();
  }
  get boneCount() {
    return this.bones.length;
  }
  set matrixType(matrixType) {
    this.idMatrix = SkinnedMesh[matrixType]();
  }
  static defaultMatrix() {
    return new THREE.Matrix4();
  }
}
Enhanced Object Literals
Object 구문이 향상되었다고 한다. 프로토타입도 생성시에 설정할 수 있고, foo: foo 와 같은 형태는 그냥 foo 라고 만 적어도 된다. 역시 클래스 처럼 상위 객체를 호출할 수 있고, 메소드 선언도 편리해졌거 하는 등등 의 장점이 있다. 결국 클래스가 도입되면서 그와 유사한 형태로 Object 를 변경한 것으로 보인다.
var obj = {
    // __proto__
    __proto__: theProtoObj,
    // Shorthand for ‘handler: handler’
    handler,
    // Methods
    toString() {
     // Super calls
     return "d " + super.toString();
    },
    // Computed (dynamic) property names
    [ 'prop_' + (() => 42)() ]: 42
};
Template Strings
String 문법이 많이 좋아졌다. 특히 \n 을 사용해야 한줄을 띄워쓸 수 있었는데, 다른 언어들과 유사한 형태로 바뀐 것으로 보인다. 그리고 Interpolation 이 가능해진 것도 아주 다행스럽다. 변수 + ' 어쩌구 ' + 변수 이짓거리를 해본 사람은 알겠지... 태그를 넣어서 String 에 어떤 속성을 넣어줄 수 있는 것 같은데, 이건 해보기전에는 잘 모르겠다.
// Basic literal string creation
`In JavaScript '\n' is a line-feed.`

// Multiline strings
`In JavaScript this is
 not legal.`

// String interpolation
var name = "Bob", time = "today";
`Hello ${name}, how are you ${time}?`

// Construct an HTTP request prefix is used to interpret the replacements and construction
GET`http://foo.org/bar?a=${a}&b=${b}
    Content-Type: application/json
    X-Credentials: ${credentials}
    { "foo": ${foo},
      "bar": ${bar}}`(myOnReadyStateChangeHandler);
Destructuring
Destructuring 부분이 가장 확연하게 차이나는 부분이라고 생각한다. 이것때문에 이 글을 쓰고 있다능... 변수 바인딩에서 패턴을 응용할 수 있다는 이야기인 것 같다.
그냥 보기는 어려워서 역시 ECMAScript 5 형태로 바꾸어 비교해보았다.
list matching
// ECMA Script 6
var [a, , b] = [1,2,3];

// ECMA Script 5
var _ref = [1, 2, 3];
var a = _ref[0];
var b = _ref[2];
object matching
// object matching

// ECMA Script 6
var { op: a, lhs: { op: b }, rhs: c }
       = getASTNode()

// ECMA Script 5
var _getASTNode = getASTNode();
var a = _getASTNode.op;
var b = _getASTNode.lhs.op;
var c = _getASTNode.rhs;
object matching shorthand
// binds `op`, `lhs` and `rhs` in scope

// ECMAScript 6
var {op, lhs, rhs} = getASTNode()

// ECMAScript 5
var _getASTNode2 = getASTNode();
var op = _getASTNode2.op;
var lhs = _getASTNode2.lhs;
var rhs = _getASTNode2.rhs;
in parameter position
// ECMA Script 6
function g({name: x}) {
  console.log(x);
}
g({name: 5})

// ECMA Script 5
function g(arg) {
  var x = arg.name;
  console.log(x);
}
g({ name: 5 });
Fail-soft destructuring
Destructuring 으로 변수를 선언할때 값이 없으면 undefined 가 입력되고 default 값을 넣어줄 수도 있다. Object 에서 foo["bar"] 에 아무런 값이 없으면 undefined 를 보여주는 것과 유사하다고 생각하면 된다.
// Fail-soft destructuring
var [a] = [];
a === undefined;

// Fail-soft destructuring with defaults
var [a = 1] = [];
a === 1;
Default + Rest + Spread
함수의 선언시에 다양한 방법으로 Argument 를 입력할 수 있게 되었다. 디폴트 값을 입력해줄 수 있다. 특히 독특한 점은 Rest 와 Spread 라는 개념인데, Rest 는 Arguments 의 수를 예상할 수 없을때 사용할 수 있고, Spread 하여 값을 사용할 수 있다. 말로 설명하려니 좀 난해한데, 아래 예제를 참고하자.
default parameter values
function f(x, y=12) {
  // y is 12 if not passed (or passed as undefined)
  return x + y;
}
f(3) == 15
rest & spreadfunction
function f(x, ...y) {
  // y is an Array
  return x * y.length;
}
f(3, "hello", true) == 6
function f(x, y, z) {
return x + y + z;
}
// Pass each elem of array as argument
f(...[1,2,3]) == 6 Let + Const
블록 스코프 안에서 var 를 대체할 수 있는 let 과 const 가 도입되었다. let 으로 선언한 함수는 현재 block scope 안에서만 작동하고, const 는 상수처럼 값을 변경할 수 없다.
function f() {
  {
    let x;
    {
      // okay, block scoped name
      const x = "sneaky";
      // error, const
      x = "foo";
    }
    // error, already declared in block
    let x = "inner";
  }
}
Iterators + For..Of
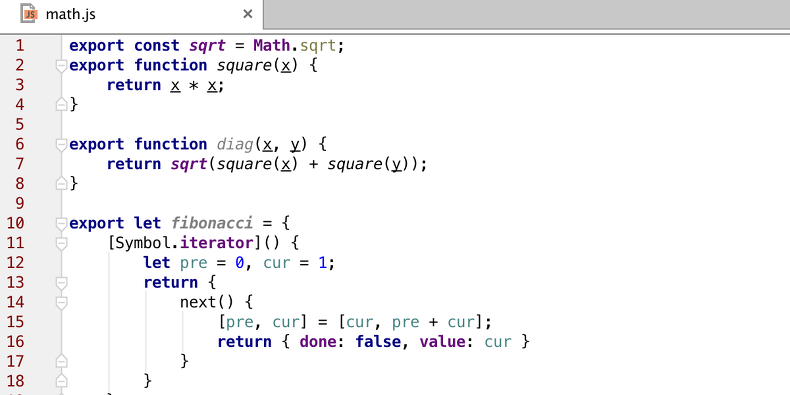
CLR IEnumerable 이나 Java Iterable 과 같은 특수한 반복문을 사용할 수 있게 되었다. for..of 구문이 새로 생기면서 가능해졌는데, 이 역시 뭐라 설명하기 난해하다. 예제를 참조...
let fibonacci = {
  [Symbol.iterator]() {
    let pre = 0, cur = 1;
    return {
      next() {
        [pre, cur] = [cur, pre + cur];
        return { done: false, value: cur }
      }
    }
  }
}

for (var n of fibonacci) {
  // truncate the sequence at 1000
  if (n > 1000)
    break;
  console.log(n);
}
반복문은 아래의 덕타입 인터페이스로 만들어졌다고 한다. 일종의 약속된 행위를 정의해둔 것? 여기를 참조하자. 모질라 짱짱맨!!
interface IteratorResult {
  done: boolean;
  value: any;
}
interface Iterator {
  next(): IteratorResult;
}
interface Iterable {
  [Symbol.iterator](): Iterator
}
Generators
Geneartors 는 iterator-authoring을 function* 와 yield 를 통해서 단순화 시킨다고 하는데, 이부분은 아직 모르겠어서 패스한다.
Generators simplify iterator-authoring using function* and yield. A function declared as function* returns a Generator instance. Generators are subtypes of iterators which include additional next and throw. These enable values to flow back into the generator, so yield is an expression form which returns a value (or throws).
Note: Can also be used to enable ‘await’-like async programming, see also ES7 await proposal.
var fibonacci = {
  [Symbol.iterator]: function*() {
    var pre = 0, cur = 1;
    for (;;) {
      var temp = pre;
      pre = cur;
      cur += temp;
      yield cur;
    }
  }
}

for (var n of fibonacci) {
  // truncate the sequence at 1000
  if (n > 1000)
    break;
  console.log(n);
}
The generator interface is (using TypeScript type syntax for exposition only):
interface Generator extends Iterator {
    next(value?: any): IteratorResult;
    throw(exception: any);
}
Unicode
고정 공백 유니코드를 지원한다. 기타 등등.
Non-breaking additions to support full Unicode, including new Unicode literal form in strings and new RegExp u mode to handle code points, as well as new APIs to process strings at the 21bit code points level. These additions support building global apps in JavaScript.
// same as ES5.1
"𠮷".length == 2

// new RegExp behaviour, opt-in ‘u’
"𠮷".match(/./u)[0].length == 2

// new form
"\u{20BB7}"=="𠮷"=="\uD842\uDFB7"

// new String ops
"𠮷".codePointAt(0) == 0x20BB7

// for-of iterates code points
for(var c of "𠮷") {
  console.log(c);
}
Modules
주로 CommonJS 등에서 사용하는 모듈 패턴을 언어 차원에서 지원하게 되었다. 이부분은 아무래도 node.js 의 영향이 있었던 듯 싶다.
// lib/math.js
export function sum(x, y) {
  return x + y;
}
export var pi = 3.141593;
// app.js
import * as math from "lib/math";
alert("2π = " + math.sum(math.pi, math.pi));
// otherApp.js
import {sum, pi} from "lib/math";
alert("2π = " + sum(pi, pi));
export default 나 export * 도 사용할 수 있다. 아래 참조:
// lib/mathplusplus.js
export * from "lib/math";
export var e = 2.71828182846;
export default function(x) {
    return Math.log(x);
}
// app.js
import ln, {pi, e} from "lib/mathplusplus";
alert("2π = " + ln(e)*pi*2);
Module Loaders
Module loaders 이 지원하는 개념:
- Dynamic loading
- State isolation
- Global namespace isolation
- Compilation hooks
- Nested virtualization
모듈을 불러올때 다양한 설정을 추가할 수 있게 되었다. 뭐라 설명하긴 어렵지만, 여튼 module 패턴을 적용하면서 만들어진 내용으로 보인다.
// Dynamic loading – ‘System’ is default loader
System.import('lib/math').then(function(m) {
  alert("2π = " + m.sum(m.pi, m.pi));
});

// Create execution sandboxes – new Loaders
var loader = new Loader({
  global: fixup(window) // replace ‘console.log’
});
loader.eval("console.log('hello world!');");

// Directly manipulate module cache
System.get('jquery');
System.set('jquery', Module({$: $})); // WARNING: not yet finalized
Map + Set + WeakMap + WeakSet
데이터 스트럭쳐를 효율적으로 만들기 위해서 일반적으로 많이 쓰이는 알고리즘을 적용했다.
// Sets
var s = new Set();
s.add("hello").add("goodbye").add("hello");
s.size === 2;
s.has("hello") === true;
array 와 유사하지만 중복 방지
// Maps
var m = new Map();
m.set("hello", 42);
m.set(s, 34);
m.get(s) == 34;
일반적인 map 사용 방식과 같음. 다양한 key 를 설정할 수 있다.
// Weak Maps
var wm = new WeakMap();
wm.set(s, { extra: 42 });
wm.size === undefined

// Weak Sets
var ws = new WeakSet();
ws.add({ data: 42 });
// Because the added object has no other references, it will not be held in the set
WeakMap 과 WeakSet 은 좀 다른 방식을 사용하는 것 같은데, leak-free 라고 한다. 뭔지 잘 모르겠음.
Proxies
Proxies enable creation of objects with the full range of behaviors available to host objects. Can be used for interception, object virtualization, logging/profiling, etc.
// Proxying a normal object
var target = {};
var handler = {
  get: function (receiver, name) {
    return `Hello, ${name}!`;
  }
};

var p = new Proxy(target, handler);
p.world === 'Hello, world!';
// Proxying a function object
var target = function () { return 'I am the target'; };
var handler = {
apply: function (receiver, ...args) {
return 'I am the proxy';
}
};
var p = new Proxy(target, handler);
p() === 'I am the proxy'; There are traps available for all of the runtime-level meta-operations:
var handler =
{
  get:...,
  set:...,
  has:...,
  deleteProperty:...,
  apply:...,
  construct:...,
  getOwnPropertyDescriptor:...,
  defineProperty:...,
  getPrototypeOf:...,
  setPrototypeOf:...,
  enumerate:...,
  ownKeys:...,
  preventExtensions:...,
  isExtensible:...
}
Symbols
Symbols enable access control for object state. Symbols allow properties to be keyed by either string (as in ES5) or symbol. Symbols are a new primitive type. Optional name parameter used in debugging - but is not part of identity. Symbols are unique (like gensym), but not private since they are exposed via reflection features like Object.getOwnPropertySymbols.
var MyClass = (function() {

  // module scoped symbol
  var key = Symbol("key");

  function MyClass(privateData) {
    this[key] = privateData;
  }

  MyClass.prototype = {
    doStuff: function() {
      ... this[key] ...
    }
  };

  return MyClass;
})();

var c = new MyClass("hello")
c["key"] === undefined
Subclassable Built-ins
In ES6, built-ins like Array, Date and DOM Elements can be subclassed.
Object construction for a function named Ctor now uses two-phases (both virtually dispatched):
- Call Ctor[@@create] to allocate the object, installing any special behavior - Invoke constructor on new instance to initialize
The known @@create symbol is available via Symbol.create. Built-ins now expose their @@create explicitly.
// Pseudo-code of Array
class Array {
    constructor(...args) { /* ... */ }
    static [Symbol.create]() {
        // Install special [[DefineOwnProperty]]
        // to magically update 'length'
    }
}

// User code of Array subclass
class MyArray extends Array {
    constructor(...args) { super(...args); }
}

// Two-phase 'new':
// 1) Call @@create to allocate object
// 2) Invoke constructor on new instance
var arr = new MyArray();
arr[1] = 12;
arr.length == 2
Math + Number + String + Array + Object APIs
Many new library additions, including core Math libraries, Array conversion helpers, String helpers, and Object.assign for copying.
Number.EPSILON
Number.isInteger(Infinity) // false
Number.isNaN("NaN") // false

Math.acosh(3) // 1.762747174039086
Math.hypot(3, 4) // 5
Math.imul(Math.pow(2, 32) - 1, Math.pow(2, 32) - 2) // 2

"abcde".includes("cd") // true
"abc".repeat(3) // "abcabcabc"

Array.from(document.querySelectorAll('*')) // Returns a real Array
Array.of(1, 2, 3) // Similar to new Array(...), but without special one-arg behavior
[0, 0, 0].fill(7, 1) // [0,7,7]
[1, 2, 3].find(x => x == 3) // 3
[1, 2, 3].findIndex(x => x == 2) // 1
[1, 2, 3, 4, 5].copyWithin(3, 0) // [1, 2, 3, 1, 2]
["a", "b", "c"].entries() // iterator [0, "a"], [1,"b"], [2,"c"]
["a", "b", "c"].keys() // iterator 0, 1, 2
["a", "b", "c"].values() // iterator "a", "b", "c"

Object.assign(Point, { origin: new Point(0,0) })
Binary and Octal Literals
2진 b, 8진 o 구분자가 추가되었다.
0b111110111 === 503 // true
0o767 === 503 // true
Promises
Promises 가 적용되었다. 만세!
function timeout(duration = 0) {
    return new Promise((resolve, reject) => {
        setTimeout(resolve, duration);
    })
}

var p = timeout(1000).then(() => {
    return timeout(2000);
}).then(() => {
    throw new Error("hmm");
}).catch(err => {
    return Promise.all([timeout(100), timeout(200)]);
})
Reflect API
Full reflection API exposing the runtime-level meta-operations on objects. This is effectively the inverse of the Proxy API, and allows making calls corresponding to the same meta-operations as the proxy traps. Especially useful for implementing proxies.
// No sample yet
Tail Calls
Calls in tail-position are guaranteed to not grow the stack unboundedly. Makes recursive algorithms safe in the face of unbounded inputs.
function factorial(n, acc = 1) {
    'use strict';
    if (n <= 1) return acc;
    return factorial(n - 1, n * acc);
}

// Stack overflow in most implementations today,
// but safe on arbitrary inputs in ES6
factorial(100000)
=================================
=================================
=================================
출처: http://horajjan.blog.me/220296296132
ECMAScript 6 !!!
아직 차세대 자바스크립트 스펙인만큼 시중의 국내 서적 중에 설명된 게 거의 없습니다
그나마 두꺼운 책, '프론트엔드 개발자를 위한 자바스크립트 프로그래밍, 부록A' 에 설명이 잘 된거 같아 이를 인용하겠습니다
먼저, 가볍게 아래 링크의 글을 읽어 보는 것도 좋을 것 같습니다
Nonblock: EcmaScript 6 new Features
blog.javarouka.me

A.1.1 상수
기존 자바스크립트에는 공식적으로 지정된 상수가 없었습니다. ES6에서는 const 키워드로 상수를 추가하였습니다. var와 비슷한 방식으로 const를 써서 선언한 변수는 일단 초기화한 다음에는 값을 바꿀 수 없습니다
| const MAX_SIZE = 25; |
A.1.2 블록 레벨과 기타 스코프
ES6에서는 let 키워드를 통해 블록 레벨 스코프 개념을 도입했습니다
| for (var i=0; i<10; i++) { // 코드 } alert(i); // 10 ... for (let i=0; i<10; i++) { // 코드 } alert(i); // 에러(i가 정의되지 않았습니다) |
A.2.1 나머지 매개변수와 확산 변수
ES6에서는 arguments 객체가 더 이상 존재하지 않습니다. 하지만 매개변수의 숫자가 변할 수 있다고 생각한다면 '나머지(rest) 매개변수'를 써서 미리 선언할 수 있습니다
| function sum(num1, num2, ... nums) { var result = num1 + num2; for (let i=0, len=nums.length; i<len; i++) { result += nums[i]; } return result; } var result = sum(1, 2, 3, 4, 5, 6); |
A.2.2 매개변수의 기본 값
| funtion sum(num1, num2=0) { return num1 + num2; } var result1 = sum(5); // 5 var result2 = sum(5, 5); // 10 |
A.2.3 Generator
Generator란 한 번에 한 가지 값을 만들어내는 객체입니다. ES6에서는 yield 연산자를 써서 특정한 값을 반환하는 함수를 생성하는 방식으로 발생기를 만들어 사용합니다. yield를 사용하는 함수를 호출하면 새 Generator 인스턴스를 생성하여 반환합니다. 반환받은 발생기에서 next() 메서드를 호출하면 첫 번째 값을 가져옵니다. next() 메서드를 호출할 때마다 해당 발생기를 생성했던 원래 함수를 실행하며 yield가 특정 값을 반환하게 되면 실행을 멈춥니다. 이런 면에서 yield는 return과 비슷하게 동작한다고 할 수 있습니다. next()를 다시 호출하면 yield 다음 문장부터 코드 실행을 계속하여 다음 yield를 만날 때까지 진행하며 이 지점에서 다시 새 값을 반환합니다
| funtion myNumbers() { for (var i=0; i<10; i++) { yield i * 2; } } var generator = myNumbers(); try { while(true) { document.write(generator.next() + "<br/>"); } } catch(e) { // 의도적으로 비워 둠 } finally { generator.close(); } |
myNumbers()를 호출하면 Generator가 반환됩니다. myNumbers() 함수 자체는 매우 단순하여 값을 하나 반환(yield)하는 for 루프 하나만 들어있습니다. next()를 호출할 때마다 for 루프를 진행하며 다음 값을 반환합니다.
마지막 루프 다음에 yield를 호출하지 않고 myNumbers()가 끝나면 next()를 호출할 때StopIteration 에러가 일어납니다. 따라서 Generator에 있는 숫자를 모두 사용하기 위해 while 루프를 try-catch 문으로 감싸서 에러 때문에 코드 실행이 멈추지 않게 했습니다
Generator 사용을 끝냈으면 close() 메서드를 호출해야 합니다. close() 메서드를 호출해야 원래 함수에서 남아 있는 부분이 확실히 실행됩니다. Generator는 연속된 값이 필요하며 각 값이 이전 값과 관련된 상황에서 유용합니다
A.3.1 Iterator
Iterator란 연속된 값을 한 번에 하나씩 반환하는 객체입니다. Iterator를 사용하면 루프를 쓰지 않고도 같은 일을 할 수 있습니다. 객체에서 Iterator를 생성할 때는 생성자에 원하는 객체를 넘기면 됩니다. next() 메서드는 연속된 값에서 다음 값을 가져옵니다. next() 메서드는 배열을 반환합니다. 배열의 첫 번째 값은 생성자에 넘겼던 것이 배열이면 인덱스, 객체였다면 프로퍼티 이름입니다. 두 번째는 그 인덱스나 프로퍼티에 해당하는 값입니다. 값이 더 이상 없을 때 next()를 호출하면 StopIteration 에러가 발생합니다
| // 객체인 경우 var person = { name : "Nicholas", age : 29 }; var iterator = new Iterator(person); try { while(true) { let value = iterator.next(); // name:Nicholas // age:29 document.write(value.join(":") + "<br>"); } } catch(ex) { // 의도적으로 비워둠 } // 배열인 경우 var colors = ["red", "green", "blue"]; var iterator = new Iterator(colors); try { while(true) { let value = iterator.next(); // 0:red // 1:green // 2:blue document.write(value.join(":") + "<br>"); } } catch(ex) { // 의도적으로 비워둠 } |
다음과 같이 Iterator 생성자에 두 번째 매개변수로 true를 넘기면 next()에서 프로퍼티 이름이나 인덱스만 반환합니다
| var iterator = new Iterator(colors, true); |
배열 통합(array comprehension)과 할당에 대한 내용은 책을 보자
A.4.1 Proxy 객체
ES6에서는 자바스크립트에 프록시 개념을 도입했습니다. '프록시'는 프록시 객체 자체에서 동작하지는 않는 인터페이스를 제공하는 객체입니다. 프록시 객체를 생성하려면 Proxy.create() 메서드에 handler 객체를 넘겨서 호출하며 옵션으로 prototype 객체를 넘길 수 있습니다
| var proxy = Proxy.create(handler); // myObject가 프로토타입인 프록시 생성 var proxy = Proxy.create(handler, myObject); |
handler 객체는 '트랩(trap)'을 정의하는 프로퍼티를 구성합니다. 트랩에는 7가지 '기본 트랩'과 '파생 트랩'이 있는데 내용이 너무 많으니 자세한 내용은 책을 봅시다
프록시는 데이터 일부를 직접적으로 조작할 수 없도록 숨기면서도 인터페이스 구실을 할 API를 제공해야 할 때 주로 사용합니다
A.4.3 Map과 Set
이제 자바스크립트에도 ES6부터 Map과 Set이 지원됩니다
| var map = new Map(); map.set("name", "Nicholas"); map.set("book", "Professional JS"); console.log(map.has("name")); // true console.log(map.get("name")); // "Nicholas" map.delete("name"); ... var set = new Set(); set.add("name"); console.log(set.has("name")); // true set.delete("name"); console.log(set.has("name")); // false |
WeakMap, 구조체 타입(StructType), 배열 타입(ArrayType)은 책을 봅시다
A.5.1 클래스와 멤버
이제 자바스크립트에도 클래스(class)가 지원됩니다!
| class Person { constructor(name, age) { public name = name; private age = age; } sayName() { alert(this.name); } getOlder(years) { private(this).age += years; // 불확실한 문법 } } |
A.5.2 getter / setter
새로운 클래스 문법에서는 프로퍼티 getter와 setter를 직접적으로 정의할 수 있습니다. 문법은 메서드와 같지만 get이나 set 키워드를 앞에 씁니다
| class Person { constructor(name, age) { public name = name; public age = age; private innerTitle = ""; } get title() { return innerTitle; } set title(value) { innerTitle = value; } sayName() { alert(this.name); } getOlder(years) { this.age += years; } } |
A.5.3 상속
extends 키워드를 씁니다. 부모 클래스의 생성자는 super() 메서드를 사용하여 호출합니다
| class Employee extends Person { constructor(name, age) { super(name, age); } } |
A.6 모듈 (module)
'모듈'은 자신만의 최상위 실행 컨텍스트를 가지므로 자신이 실행하는 전역 실행 컨텍스트를 어지럽히지 않습니다. 외부로 노출해야 할 멤버가 있다면 export 키워드를 앞에 써서 표시합니다
| module MyModule { // 노출할 멤버 export let myobject = {}; export function hello() { alert("hello"); } // 이 함수는 노출하지 않습니다 function goodbye() { // ... } } |
이 모듈은 myobject 객체와 hello() 함수를 외부에 노출합니다. 멤버를 가져올 때는 import 명령어를 사용합니다
| // myobject만 가져옵니다 import myobject from MyModule; console.log(myobject); // 노출된 멤버는 모두 가져옵니다 import * from MyModule; console.log(myobject); console.log(hello); // 명시적으로 이름 선언하여 가져오기 import {myobject, hello} from MyModule; console.log(myobject); console.log(hello); // 가져오기 없이 모듈 직접 사용 console.log(MyModule.Obmyobject); console.log(MyModule.hello); |
외부 모듈은 모듈을 포함하는 URL을 제공하여 동적으로 모듈을 불러올 수 있습니다
| import * from "mymodule.js"; |
모듈 전체를 가져오지 않고 모듈에서 노출하는 멤버 일부만 가져오려면 다음과 같이 import를 사용합니다
| import myobject from "mymodule.js"; |
모듈은 기본적으로 서로 연관된 기능을 하나로 모으고 전역 스코프를 깔끔하게 유지하는 역할을 합니다
[출처] [자바스크립트] ECMAScript 6 둘러보기|작성자 쪼쪼
=================================
=================================
=================================
Class 변수 Private 관련
So I have been trying to wrap my head around all the new options in ECMAscript 6 and to do this I tried to develop a simple setup which would allow me to place absolutely positioned <div>'s on the page. Well, let's just jump right into the code:
main.js:
import {Screen} from './objects/screen';
import {Position} from './objects/position';

var welcomeScreen = new Screen("Hello World");
welcomeScreen.title = "Hello World2";
welcomeScreen.position = new Position(100,100);
//Make sure the following does work if you have any advices, because there is a simple mistake which breaks this:
console.log(welcomeScreen.position.x);

var secondScreen = new Screen("Second screen", new Position(200,200));
objects/baseobject.js:
export class BaseObject{
    on(eventname,func){
        if(typeof this.listeners == "undefined"){
            this.listeners = {};
        }
        if(typeof this.listeners[eventname] == "undefined"){
            this.listeners[eventname] = [];
        }
        this.listeners[eventname].push(func);
        return this;
    }
    trigger(eventname){
        if(this.listeners && this.listeners[eventname]){
            for(let func of this.listeners[eventname]){
                func.call(this);
            }
        }
    }
}
objects/screen.js:
import {BaseObject} from './baseobject';
// private properties:
var pp = {
    position: Symbol(),
    title: Symbol()
};
export class Screen extends BaseObject{
    constructor(title,position = new Position(0,0)){
        this.element = document.createElement("div");
        this.element.classList.add("screen");
        this.title = title;
        this.position = position;
        document.body.appendChild(this.element);
    }
    reposition(){
        this.element.style.left = this.position.x + "px";
        this.element.style.top = this.position.y + "px";
    }
    set position(position){
        var that = this;
        this[pp.position] = position;
        this[pp.position].on("positionchange",function(){
            that.reposition();
        }).trigger("positionchange");
    }
    get position(){
        return this[pp.position];
    }
    set title(value){
        this[pp.title] = value;
        this.element.textContent = value;
    }
    get title(){
        return this[pp.title];
    }
}
objects/position.js
import {BaseObject} from './baseobject';
// private properties:
var pp = {
    x: Symbol(),
    y: Symbol()
};
export class Position extends BaseObject{
    constructor(x,y){
        this[pp.x]=x;
        this[pp.y]=y;
    }
    set x(value){
        this[pp.x]=x;
        super.trigger("positionchange");
    }
    get x(){
        return this[pp.x];
    }
    set y(value){
        this[pp.y]=y;
        super.trigger("positionchange");
    }
    get y(){
        return this[pp.y];
    }
}
Points of interest:
- Are there nice EC6 language features I am forgetting?
- Is there a nicer way to handle the 'set triggers' (-> private property construction)
- Should I be using modules? Combine classes into the same files? etc.
- And in good codereview fashion, I am looking forward to all possible criticisms :D :D
add a comment |
Most interesting,
- In BaseObject, you should really have a constructor that builds this.listeners, it would make your code much cleaner afterwards
- I am not sure why your listeners are not private in BaseObject ?
- I am not sure what is more important to you, learn EC6 or position divs efficiently, if the latter is more important, than this code is massive overkill ;)
If you want to avoid having a constructor for BaseObject, then I would re-write on like this:
on(eventname,func){ this.listeners = this.listeners || []; this.listeners[eventname] = this.listeners[eventname] || []; this.listeners[eventname].push(func); return this; }
| shareimprove this answer |
| To point 1 I did this because this way a user doesn't need to call the super constructor on each and every object he constructs. To point 2, you are absolutely right, I forgot entirely. And lastly to point 3: It is to learn EC6 whilst making a mobile app framework slowly (this was just me trying to figure out the setup). – |
o, going to 'answer' my own question here with a nice thing I discovered since then. Might expand my answer if I discover more stuff.
In ECMAscript 6 rather than
var that = this; something.on("positionchange",function(){ that.reposition(); });
You can do
something.on("positionchange",() => { this.reposition(); });
As the this scope doesn't change.
=================================
=================================
=================================
출처: http://wiki.codekin.com/index.php/ECMAScript_%ED%95%98%EB%AA%A8%EB%8B%88
ECMAScript 하모니
ECMAScript3.1이 자바스크립트의 다음 세대로 인정받은 후 ECMAScript4의 기능을 3.1에 일부 도입하는 프로젝트가 진행됨. (하모니 프로젝트) 결국 ECMAScript 5판이라는 이름으로 빠르게 표준화, 명세가 완결되자마자 하모니 프로젝트가 즉시 시행됨. 3.1을 받아들이고 언어를 완전히 바꾸기 보다는 점진적 발전시키는 방향을 택하였음. 하모니는 ECMAScript 6이라고도 불린다.
부가설명 자료 : JavaScript Web Programming ECMASCRIPT / STRICT MODE
변경점
상수
const 키워드를 통해 상수를 지정할 수 있다.
const myPI = 3.14;const 키워드를 통해 지정된 상수는 다음과 같은 특징을 가진다.
//1. 재할당 될 수 없다.
const myPI = 3.14;
myPI = 3.15;
console.log(myPI); // 3.14
//2. 동일한 명의 변수를 선언하면 에러가 발생한다.
const myPI = 3.14;
var myPI = 3.15; // error
console.log(myPI);블록 레벨과 스코프
let 키워드를 이용하여 블록 레벨의 변수를 사용할 수 있다. let 키워드를 통해 생성된 변수는 해당 블록이 끝나는 순간 바로 파괴된다. 다음 코드로 var로 생성된 변수와 let으로 생성된 변수의 블록레벨이 어떻게 다른지 확인할 수 있다.
for(var j = 0; j <= 20; j++){
    // some codes...
}
console.log(j); // 20

for(let i = 0; i <= 10; i++){
    // some codes...
}
console.log(i); //error : i is not defined
let은 하나의 값의 영역을 나타냄으로 다음과 같이 사용하면 원하는 블록에서만 유효한 값으로 사용할 수 있다.
var vnNum = 10;
let(vnNum = 5, vnPowNum = 2){
  console.log(Math.pow(vnNum, vnPowNum); // 25
}
console.log(Math.pow(vnNum, vnPowNum); // 100

//표현식 내에서만 작동하게 만들 수도 있다.
var res = let(vnNum = 5, vnPowNum = 2) Math.pow(vnNum, vnPowNum);
console.log(res); //25
함수
동적 파라미터
하모니에서는 더 이상 arguments 객체가 존재하지 않는다. 선언하지 않은 파라미터에 접근할 수 없다. 하지만 파라미터의 숫자가 동적으로 변할 수 있는 경우 프로그래머는 명시적으로 ... 키워드를 사용할 수 있다.
function someFunction(pnNum, psStr, ...poObjects){
    for(let i = 0, len = poObjects.length; i < len; i++){
        console.log(poObjects[i].toString());
    }
}
확산 파라미터
위 처럼 동적 파라미터는 함수의 작성레벨에서 진행된다면 확산 파라미터는 함수의 호출레벨에서 정의될 수 있다. 동적 파라미터가 함수 작성 레벨에서 파라미터가 더 들어올 수 있다고 가정하여 선언하는 것이라면 확산 파라미터는 이미 준비된 변수를 편하게 사용하자는 뜻에서 사용한다고 생각하면 된다.
function mainFunc(){
    someFunction(...[5, 1, 2, 3, 5, 1]);
}
확산 파라미터로 보낸 someFunction(...[5, 1, 2, 3, 5, 1]);부분은 someFunction.apply(this, [5, 1, 2, 3, 5, 1]);와도 같은 의미를 갖는다. 한마디로 배열내의 각 요소가 호출하려는 함수의 각 파라미터에 확산되어 할당되고 실행된다.
파라미터 기본값
다음은 파라미터가 전달되지 않았다면 기본값을 갖게 하는 코드이다. 이 같은 방법을 이용하면 모든 파라미터가 들어왔는지 확인할 필요가 없어져 편리해진다.
function someFunction(poObj1, poObj2="null"){
    return poObj1.toString() + "/" | poObj2.toString();
}
제너레이터
Generator는 한 시점에 한 가지 값을 만들어내는 객체이다. 다음은 yield 키워드를 써서 함수의 특정시점에 값을 반환하도록 만드는 기법이다.
function someFunction(){
    for(let i = 0, len = 10; i < len; i++){
        yield i * len;
    }
}

function mainFunction(){
    var generator = someFunction(); //someFunction()에 대한 generator를 생성

    while(true){
        try{
            console.log(generator.next()); //generator.next()를 이용하여 다음 yield 구간까지 진행하고 값을 반환한다.
        }catch (error){
            //catch부는 선언하지 않는다.
        }finally{
            generator.close(); //제너레이터 종료
        }
    }
}
generator는 더 이상 yield를 실행할 구간이 없다면 StopIteration 에러를 발생시킨다. 이때 프로그램이 종료되지 않도록 try-catch를 이용하여 의도적으로 catch문 작성을 진행하지 않고, finally문에서 제너레이터를 close() 시켜준다. close()를 실행하는 이유는 함수에서 나머지 문장을 완벽히 실행시키기 위해서 이며 finally구문 실행시키기 위해서이다. 따라서 제너레이터는 반드시 close()하도록 한다.
이터레이터
연속된 값을 한 번에 하나씩 반환해주는 자료구조객체이다. 하모니에서는 모든 타입에 대한 이터레이터를 지원한다. 객체에대한 이터레이터를 획득하고 싶다면 Iterator의 매개변수로 해당 객체를 넘겨주면된다. 다음은 이터레이터를 이용하여 객체를 순회하는 코드이다.
var myObject = {
                   name : "korea"
                 , location : "asia"
                 , language : "kr"
               };

var iterator = new Iterator(myObject);

try{
    while(true){
        let val = iterator.next();
        console.log(val.join(" : "));
    }
}catch(ex){

}
이터레이터 또한 더 이상 반환할 값이 없을때 StopIteration 에러가 발생한다. try-catch를 통해 의도적으로 catch문을 비워두고 코드가 실행될 수 있도록 한다.
배열과 기타 구조
배열통합
배열 통합이란 특정 조건에 맞는 값으로 배열을 초기화하는 방법을 말한다. 이 기법은 파이썬에서 쓰이는 구조를 도입한 것으로 다음 코드는 표현식에 맞는 값들로 배열에 초기화한다.
var vaValues = [1, 2, 3, 4, 5, 6, 7, 8, 9, 10];
var vaArray1  = [prop for each (prop in vaValues) if(prop % 2 === 0)]; //vaArray1에 짝수만 할당한다.
var vaArray2  = [prop for each (prop in vaValues) if(prop % 2 !== 0)]; //vaArray2에 홀수만 할당한다.
할당
다음은 값의 묶음에서 일부만 추출하여 변수에 따로 저장하는 방법이다. 다음은 분할을 이용하여 값들을 할당하는 방법이다.
var [name, location] = ["korea", "asia"];
console.log(name); //korea
console.log(location); //asia

//다음과 같이 일부만 분할할 수 도 있다.
var [, food] = ["kr", "kimchi"];

console.log(food); //kimchi

//객체 또한 분할이 가능하다.
var obj = {
              name     : "korea"
            , food     : "kimchi"
            , language : "kr"
          };

var {name : objName, food : objFood, language : objLanguage} = obj;
console.log(objName); //korea
console.log(objFood); //kimchi
console.log(objLanguage); //kr

//분할을 이용하면 다음과 같이 temp변수 없이 스왑이 가능하다.
var a = 10;
var b = 20;

[a, b] = [b, a];

console.log(a); //20
console.log(b); //10
새로운 객체 타입
Proxy 객체
Proxy 함수
Map과 Set
Map과 Set은 자료구조의 한 종류로 값들의 묶음이라고 생각하면된다. 다른 프로그래밍 언어에서 사용되는 개념과 동일하다.
var map = new Map();
map.set("name", "korea");
map.set("location", "asia");
map.set("etc", "etc");
map.delete("etc");

console.log(map.get("name")); //korea
console.log(map.has("location")); //true
console.log(map.get("location")); //asia
console.log(map.get("etc")); //undefined

var set = new Set();

set.add("kimchi");
set.add("dokdo");
set.add("etc");
set.delete("etc");

console.log(set.has("kimchi")); //true
console.log(set.has("dokdo")); //true
console.log(set.has("etc")); //false
WeakMap
객체를 key로 가지게 할 수 있는 WeakMap을 지원한다. key객체가 삭제되면 WeakMap 객체내부의 값도 삭제된다.
var key = {};
weakMap = new WeakMap();
weakMap.set(key, "HelloWorld!");

console.log(weakMap.get(key)); //HelloWorld!

key = null; //key객체를 삭제하면 weakMap 내부의 값도 사라진다.

weakMap.get(key);

console.log(weakMap.get(key)); //undefined
구조체 타입
자바스크립트의 단점 중 하나의 데이터형으로 모든 숫자를 표현한다는 것이 있다. WebGL에서는 정형 배열을 도입하여 이 문제를 완화하였고 ECMAScript6판에서는 정형 구조(typed structrue)를 도입하여 자바스크립트의 숫자형 데이터 타입을 확장하였다. '구조체 타입'은 레코드 하나에 여러 프로퍼티를 조합하는 C언어의 구조체를 차용한 것이며, 자바스크립트의 구조체 타입은 프로퍼티와 그에 담길 데이터 타입을 명시하여 비슷한 데이터 구조를 생성한다. 초기 구현에는 여러 가지 블록 타입이 정의 되어있다.
- uint8 : 부호 없는 8비트 정수
- int8 : 부호 붙은 8비트 정수
- uint16 : 부호 없는 16비트 정수
- int16 : 부호 붙은 16비트 정수
- uint32 : 부호 없는 32비트 정수
- int32 : 부호 붙은 32비트 정수
- float32 : 32비트 부동소수점 숫자
- float64 : 64비트 부동소수점 숫자
블록 타입은 단 한 가지 값만 저장하며 나중에는 위 여덟 가지 외에도 더 추가될 것으로 보고 있다. 구조체 타입을 생성할 때는 StructType의 인스턴스에 객체 리터럴 형식의 프로퍼티 정의를 넘긴다.
var Volume = new StructType({width : uint32, height : uint32});위 코드는 width와 height 두 프로퍼티를 가지는 타입 Volume을 생성한다. 각 프로퍼티는 부호 없는 32비트 정수만을 저장한다. 변수 Volume은 사실 생성자이며 객체 생성자와 동일하게 사용할 수 있다. 구조체 타입의 인스턴스를 초기화할 때는 객체 리터럴에 프로퍼티 값을 담아 생성자로 넘겨주어야한다.
var boxBolume = new Volume({width : 110, height : 120});
console.log(boxBolume.width);
console.log(boxBolume.height);
위 코드는 width는 110이고 height는 120인 boxBolume의 새 인스턴스를 생성한다. 이들 프로퍼티를 읽고 쓸 때는 반드시 32비트 부호 없는 정수를 써야한다. 각 프로퍼티를 서로 다른 타입으로 정의하여 더 복잡한 타입을 생성할 수도 있다.
var BoxWeight = new StructType({ kg : int32, g : int32 });
var BoxBolume = new StructType({ width : int32, height : int32 });
var Box       = new StructType({ size : BoxBolume, weight : BoxWeight });
var BoxSpec   = new Box({
						  size   : { width : 110,  height :  120 }
						, weight : {    kg : 1  ,       g : 1000 }
					}
);

console.log(BoxSpec.size.width) //110
위 코드는 단순한 구조체 타입 BoxBolume과 BoxWeight를 생성하고 두 구조체 타입을 엮어 복잡한 구조체 타입 Box를 생성한다. 이렇게 생성된 구조체 타입도 입력되는 값들의 데이터 형이 정확하게 할당되는지 확인한다.
배열 타입
배열 타입은 구조체 타입과 연관이 있다. 배열 타입은 값이 특정 타입으로 제한된, WebGL의 정형 배열과 매우 비슷한 배열을 생성한다. 새 배열 타입을 생성하려면 ArrayType 생성자를 호출하면서 어떤 데이터 타입을 얼마나 수용할지 지정한다.
var Size = new StructType({ width : int32, height : int32 });
var SizeArray = new ArrayType(Size, 2);

var boxes = new BoxArray(
							[
								  { width : 110, height : 120 }
								, { width : 120, height : 130 }
							]
						);
위 코드는 Size의 인스턴스 두 개를 저장할 SizeArray라는 새 배열 타입을 생성한다. 배열 타입을 초기화할 때는 데이터가 담긴 배열을 넘긴다. 구조체 타입과 마찬가지로 리터럴을 넘겨도 정확한 데이터 타입으로 강제 변환된다.
클래스
멤버
클래스 초안에서는 인스턴스와 프로토타입 모두 기본적으로 내부(private) 멤버를 지원한다. private 예약어는 해당 멤버가 내부적이며 클래스의 메서드를 통해서만 접근할 수 있음을 나타낸다. 내부 멤버에 접근하려면 private() 함수에 this를 넘겨 접근하는 방식을 이용하여야한다. 다음 코드는 Box클래스의 내부 프로퍼티 height를 증가시키는 메서드를 작성한 코드이다.
class Box {
	constructor(width, height){
		public width = width;
		private height = height;
	}

	printWidth(){
		console.log(this.width);
	}

	sizeupHeight(addSize){
		private(this).height += addSize;
	}
}
내부 프로퍼티에 접근하는 문법은 아직 정해진 것은 아니며, 추후에 변경될 가능성이 높다.
getter / setter
getter와 setter를 정의하여 Object.defineProperty()를 호출하는 과정이 없어지게되었다. 문법은 동일하나 앞에 get과 set 예약어를 사용함으로써 선언할 수 있다.
class Person {
    constructor(width, height){
      public width  = width;
      public height = height;
      private boxName = "";

      get boxName(){
        return boxName;
      }

      set boxName(value){
        boxName = value;
      }
    }

    printWidth(){
      alert(this.width);
    }

    heightUp(addSize){
      this.height += addSize;
    }
}
상속
상속과 관련하여 기존 문법보다 좋아진 점은 쉬워졌다는 것이다. 상속을 위하여 생성자를 복사하거나 프로토타입체인에 대하여 고려해야되었던 부분들이 없어지고 다른 프로그래미언어에서 널리 사용되고있는 extends 예약어를 통하여 상속할 수 있게 되었다.
class childBox extends Box{
	constrctor(width, height){
		super(width, height);
	}
}
위 코드는 Box의 자식에 해당하는 childBox를 생성한다. 프로토타입 체인은 내부적으로 일어나고, 생성자를 복사하는 과정은 super()함수를 통하여 자바스크립트가 지원하게되었다. super()는 다음 코드와 논리적으로 동일하다.
function childBox(width, height){
	Box.call(this, width, height);
}

childBox.prototype = new Box();
위 방식 외에도 extends 예약어대신 prototype 예약어를 사용하여 클래스의 프로토타입객체를 직접 지정할 수 도 있다.
var baseBox = {
	printWidth : function(){
		alert(this.width);
	},

	printHeight : function(){
		alert(this.height);
	}
};


class childBox prototype baseBox {
	constructor(width, height){
		public width = width;
		public height = height;
	}
}
위 코드는 baseBox객체에 childBox.prototype을 직접적으로 할당하며, Object.create문법과 같은 타입으로 상속하게 된다.
모듈
모듈이라함은 네임스페이스와 패키지를 뜻한다. 자바스크트에서 반드시 알고 가야할 개념이며 가장 주목받기도 한다. 각 모듈은 고유한 기능을 갖추고 다른 모듈과 구분된다. 자바스크립트에서는 여러가지 형태로 난존하여왔는데 ECMAScript 6판에서 모듈을 생성하고 관리하는 공식적인 방법을 모색하고 있다.
모듈
모듈은 자신만의 최상위 실행 컨텍스트를 가지고, 자신이 존재하는 전역 실행컨텍스트를 어지럽히지 않는다. 기본적으로 변수, 함수, 클래스 등 모듈에서 선언한 것은 모두 해당 모듈 내부에만 존재한다. 외부로 노출해야 할 멤버가 있다면 export예약어를 통하여 표시할 수 있다.
module HelloModule {
	export let obj = {

	};

	export function hello() {
		alert("HelloWorld!");
	}

	function somethingFunction(){
		//some codes...
	}
}
위 모듈 HelloModule은 obj객체와 helloWorld() 함수를 외부에 노출시킨다. 위 모듈은 페이지 어디에서든지 다른 모듈 안에서라도 사용할 수 있게된다. 하지만 그렇게 하기 위해서는 먼저 외부에서 사용 가능한 멤버를 가져와야 한다. 이것은 import 예약어를 통하여 취할 수 있다.
//HelloModule의 공개된 obj만 추출한다.
import obj from HelloModule;
console.log(obj);

//HelloModule의 모든 공개 멤버를 추출한다.
import * from HelloModule;
console.log(obj);

//HelloModule의 공개된 obj, HelloWorld 멤버를 추출한다.
import {obj, HelloWorld} from HelloModule;
console.log(obj);

//가져오기 없이 직접 사용
console.log(HelloModule.obj);
실행 컨텍스트에서 모듈에 접근할 수 있으면 모듈에서 공개한 멤버에 직접 접근할 수 있게 된다. import 작업은 단순히 모듈에서 공개된 멤버를 현재 실행 컨텍스트로 불러와 모듈을 참조할 필요 없이 직접 접근을 가능하게 하는 작업이다.
외부 모듈
모듈을 포함하는 URL을 제공하여 동적으로 모듈을 불러올 수 있다. 모듈 선언 다음에 URL을 추가하여 사용한다.
module helloModule from "HelloModule.js"
import helloObject from helloModule;
위 코드는 자바스크립트 엔진에서 HelloModule.js를 내려받고 helloModule이란 모듈을 불러온다. 이 호출은 다른 프로세스를 차단하므로 자바스크립트 엔진에서 URL을 내려받아 평가할 때까지 코드 실행이 중단된다. 모듈 전체를 가져오지 않고 모듈에서 공개한 멤버 일부만 가져오려면 다음과 같이 import를 사용하면된다.
import helloObject from "HelloModule.js"모듈은 기본적으로 서로 연관된 기능을 하나로 모으고 전역 스코프를 깨끗하게 유지하는 역할만을 한다.
=================================
=================================
=================================
출처: http://blog.hazard.kr/archives/tag/%EC%9E%90%EB%B0%94%EC%8A%A4%ED%81%AC%EB%A6%BD%ED%8A%B8
ECMAScript 6 Harmony 를 네 브라우저에 돌려봐라!
나 참.. 기분 존나 나쁘네.
뭐? CoffeeScript? TypeScript? 어쩌고 저째? 자바스크립트가 죽을 거라고?
난 동의 안한다. 제아무리 자바스크립트를 편하게 만들어도 오리지날이다. 결국 그들도 자스로 움직인다. 제아무리 편해도.
스칼라가 결국 자바에서 돌아가기 위해 자바 코드로 생성해서 컴파일 하는 것처럼 말이다.
튜닝의 끝은 순정이란 말이 괜히 나오는게 아니지.
그래서 소개한다. 니 브라우저에 직접 ECMA 6 을 적용할 기회를 내가 선사해 주겠다. 2가지 프로젝트가 있다.
1. Traceur
구글신은 미쳤다. 이번에 소개할 피로젝트는 자바 2명 타요가 아닌 외계인 2명 타요 해서 ECMA 6을 몸소 체험할 수 있는
Traceur 를 소개한다.
프로젝트 페이지는 https://github.com/google/traceur-compiler
이 스크립트 컴파일러는 ES6 을 당신 브라우저에 돌릴 수 있게 한다.
일단 IE 8은 안된다. 쳇. 최소한 8이라도 지원해주지.
크롬과 불여우는 일단 된다. 올ㅋ
Traceur 가 지원하는 ECMA 6 기능이다.
일단 여태 나오고 알려진 것들을 지원한다.
하지만 이 ES6 하모니를 쓸 때 몇가지 주의할 점이 있다.
알다시피 ES6은 확정된 표준이 아니다. 특히 클래스와 모듈이 그 대표적인데, 이들이 어떻게 바뀔지는 장담을 못하겠다.
제발 안바뀌길 바래라.
뭐.. 그래봐야 기반 스크립트 (타입스크립트 등) 또한 아직까지 안정화된 버전을 내놓지 못하고 있기 때문에
물론 커피스크립트는 상당히 안정화 되고 쓰는 사람 많은거 안다.
근데 뭐가 좋다 말을 못하겠지만, 그래도 그런 스크립트는 표준에 넣지 못할 것이다.
난 커피스크립트가 자바의 스칼라처럼 생각하지만, 그래도 스칼라도 많이 쓰지 않는가? 물론 갈라파고스 한국은 빼고.
난 표준을 만들고 따르는 주의자긴 하지. 자바스크립트는 아직까지는 강력하기 때문에. 단지 좀 귀찮고 짱나서 그렇지.
어쨌든, ES6 을 직접 체험해보고자 한다면, 이 컴파일러를 이용해 제작된 ES6Fiddle 을 사용하라.
ECMAScript 6 이 어떻게 돌아가는지 알 수 있을 것이다.
2. continuum
그에 비해 이 ES6 컴파일러는 커뮤니티의 참여로 만들어졌다. 그다음 낫고, IE 8부터 지원해주기 때문에 우왕굳.
프로젝트 사이트는 https://github.com/Benvie/continuum
체험 사이트는 http://benvie.github.io/continuum/
현재 구현된 기능들이다.
- 통합 할당 및 인자
- 가변 처리자 및 배열 초기자
- 가변 인자
- 클래스와 상속
- 화살표식 함수(람다식) (.NET 의 람다식과 동일한 형식)
- 블록 단위 변수
- 새로운 Math 함수
- 새로운 Object 함수
- 새로운 String 함수
- concise methods in object literals
- 열거 및 삭제 가능한 프로토타입
- Map, Set, 그리고 WeakMap (가비지 컬렉션이 현실화되지는 않았음)
- 열거자와 for…of 반복문
- 템플릿
- 모듈과 imports, exports
- 내장 ‘@std’ 모듈 module std = '@std' 또는 import call from '@function'
- 생성기
- 프록시와 리플렉션
- Symbols with syntactic @name support
- 형식화된 배열Typed Arrays
- Object.observe (es-next/es7)
- 인자 기본값
- 꼬리물기 호출 최적화
- 배열 초기화 식 (부분 지원)
아래 기능은 아직 구현이 안되어 있으며 추후 지원될 예정이라 한다.
- 생성기 식
- 이진 데이터 api (structs, etc.)
- 프로미즈 (내가 Feature request 했음.)
물론 프로미즈같은 경우 promisejs 또는 q 로 해결은 가능하기 때문에 커버는 해줄만 하다.
ECMA 6 기능에 목이 말랐다면 지금 바로 체험하라.
아참, 마지막으로 ES6의 새로운 기능을 한글로 잘 정리한 위키 페이지가 있어 이걸 소개하고 쿨하게 끝내겠다.
http://wiki.codekin.com/index.php/ECMAScript_%ED%95%98%EB%AA%A8%EB%8B%88
끝이다.
추신 업데이트 사항 : Traceur 외에 나머지 ES6 컴파일러는 몇달동안 활동이 없다. 그냥 Traceur 써라. 진자끝.
=================================
=================================
=================================
기타 관련 링크 모음
http://code.tutsplus.com/articles/use-ecmascript-6-today--net-31582
현재 ECMAScript 6 진행 정도
https://kangax.github.io/compat-table/es6/
JavaScript의 표준인 ECMAScript 2015 (6th Edition)이 표준으로 제정
1. 자바스크립트의 역사 – 과거
http://wit.nts-corp.com/2014/08/13/1925
2. 현재 자바스크립트와 ECMAScript 6 차이
https://gist.github.com/marocchino/841e2ff62f59f420f9d9
3. ECMAScript 5 표준문서
http://www.ecma-international.org/ecma-262/5.1/
4. ECMAScript 6 표준문서
http://www.ecma-international.org/ecma-262/6.0/index.html
[출처] JavaScript의 표준인 ECMAScript 2015 (6th Edition)이 표준으로 제정|작성자 nonoll
=================================
=================================
=================================
'WEB > JavaScript' 카테고리의 다른 글
| 자바 플러그인 (JRE) 설치 여부 체크하는 코드 (0) | 2020.09.22 |
|---|---|
| html 스크립트 자바 스크립트 파일 이벤트, onchange 이벤트 관련 (0) | 2020.09.21 |
| html5, javascript ... 웹 파일 읽기/쓰기 업로드 가능 관련 (2) | 2020.09.20 |
| [JavaScript] 스크립트 기반 애니메이션용 타이밍 컨트롤 관련 (0) | 2020.09.20 |
| [JavaScript] 자바스크립트 코드, 코드압축, 코드숨기기 코드암호화 보안 관련 (0) | 2020.09.20 |


댓글 영역